Quick Start Guide: Prime Color Camera Setup
Optimize a Prime Color Camera system with recommended settings for best performance.
This quick start guide applies to Prime Color and Prime Color FS setups.
Please see our full Prime Color Camera chapter for more in-depth information on each topic.
If you experience latency or camera drops, you may need to increase the specifications on certain components, especially if your system includes a large number of Prime Color cameras. Please reach out to our Support team, if you continue experiencing these issues after upgrading to the hardware specifications and setup recommendations below.
1-2 Color Camera Setup Hardware Requirements
Windows 10 or 11 Professional (64 Bit)
Designated 1Gbps NIC w/drivers
CPU: Intel i9 or better 3.5GHz+
Network switch with 1Gbps uplink port
RAM: 16GB+ of memory
GPU: GTX 1050 or better with latest drivers and supports OpenGL version 4.0 or higher.
M.2 SSD
3+ Color Camera Setup Hardware Requirements
Windows 10 or 11 Professional (64 Bit)
Designated 10Gbps+ NIC w/drivers
CPU: Intel i9 or better 3.5GHz+
Network switch with 10Gbps+ uplink port
RAM: 32GB+ of memory
GPU: RTX 2070 or better with latest drivers and supports OpenGL version 4.0 or higher.
M.2 SSD
Quick Start Hardware Setup
Cabling
Power
Each Prime Color camera must be uplinked and powered through a standard PoE connection that can provide at least 15.4 watts to each port simultaneously.
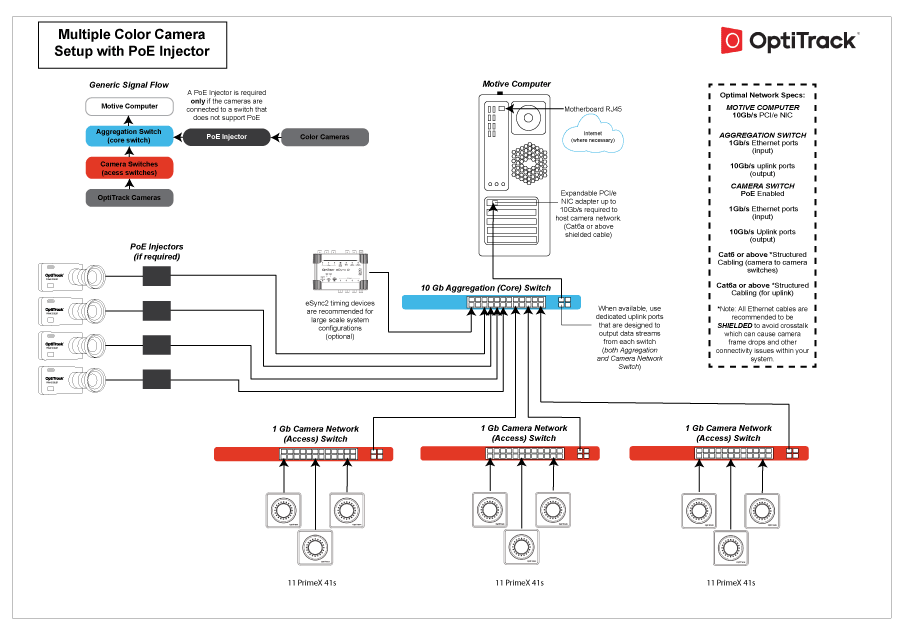
Please note that if your aggregation switch is PoE, you can plug your Prime Color Cameras directly into the aggregation switch. PoE injectors are optional and are only required if your aggregation switch is not PoE.
Prime Color cameras connect to the camera system just like other Prime series camera models. Simply plug the camera onto a PoE switch that has enough available bandwidth and it will be powered and synchronized along with other tracking cameras. When you have two color cameras, they will need to be distributed evenly onto different PoE switches so that the data load is balanced.
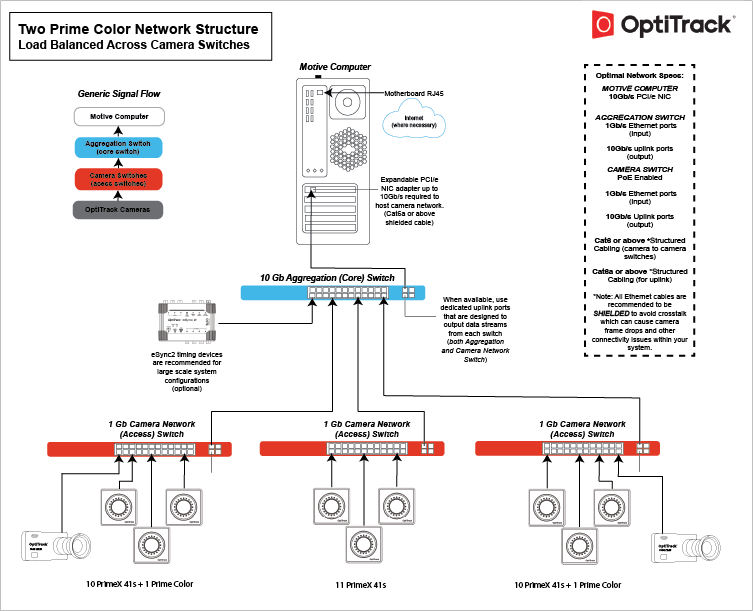
For 1-2 Prime Color Cameras we recommend using a 1Gbps network switch with 1Gbps uplink port and a 1Gpbs NIC or higher. For 3+ Prime Color Cameras it is required to use network switches with a 10Gbps uplink port in conjunction with a 10Gbps designated NIC and their appropriate drivers.
NIC drivers may need to be installed via disc or downloaded from the manufacture's support website. If you're unsure of where to find these drivers or how to install them, please reach out to our Support team.
Load Balancing and Bit Rate
Higher bit rates send more data across the network, which needs to be accounted for in load balancing the network. For example, 3 PrimeX Color cameras running at 100MB/s can easily surpass 1 Gb of data throughput, potentially resulting in dropped frames if all are connected to the same switch.
When connecting PrimeX Color cameras to a camera network switch rather than directly to the aggregate (core) switch, we recommend connecting no more than 1 camera per switch, at a maximum bit rate of 30-50 Mb/s, for optimal quality.
SFP Uplink ports
The uplink ports on the camera network switches must be able to connect to the aggregate or core switch at 10 Gb when a PrimeX Color camera is connected. This may require an SFP Injector in an SFP uplink port to allow the port to transmit data at 10 Gb.
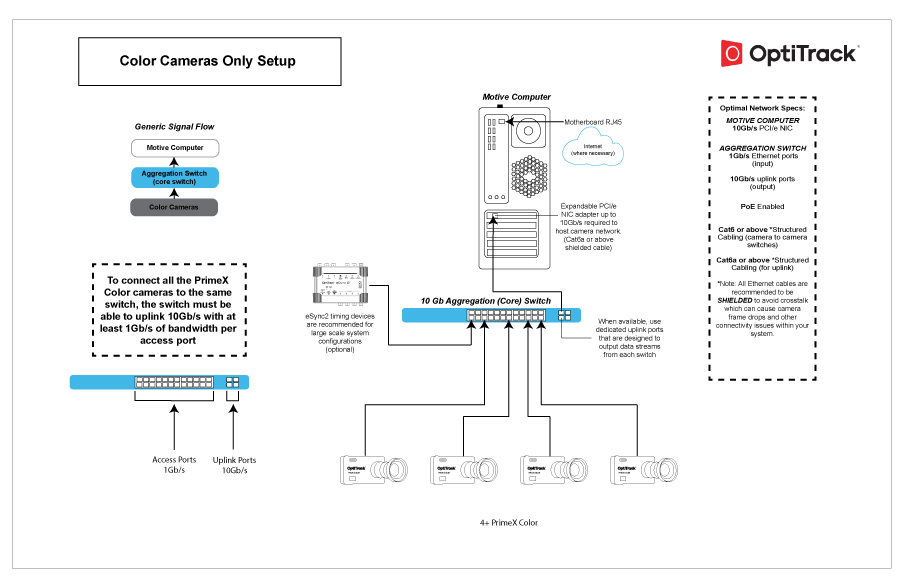
When using multiple Prime Color cameras, we recommend connecting the color cameras directly into the 10-gigabit aggregation (uplink) switch. This configuration allows the data to travel directly through the uplink switch to the host computer through the 10-gigabit network interface. This also separates the color cameras from the tracking cameras.
To connect all the PrimeX Color cameras to the same switch, the switch must be able to uplink 10Gb/s with at least 1Gb/s of bandwidth per access port.
A PoE injector is required if the uplink switch does not provide PoE.
To connect all the PrimeX Color cameras to the same switch, the switch must be able to uplink 10Gb/s with at least 1Gb/s of bandwidth per access port.
Ethernet Cable Requirements
Cable Type
There are multiple categories for Ethernet cables, and each has different specifications for maximum data transmission rate and cable length. For an Ethernet based system, Cat6 or above Gigabit Ethernet cables should be used. 10 Gigabit Ethernet cables – Cat6a or above — are recommended in conjunction with a 10 Gigabit uplink switch for the connection between the uplink switch and the host PC in order to accommodate for high data traffic.
Note
10Gb uplink switches, NICs, and cables are recommended for large camera counts or high data cameras like the Prime Color cameras. Typically 1Gb switches, NICs, and cables should be enough to accommodate smaller and moderately sized systems. If you're unsure of whether or not you need more than 1Gb, please contact one of our Sales Engineers here or see our Cabling and Load Balancing page for more information.
Electromagnetic Shielding
We recommend using only cables that have electromagnetic interference shielding. If unshielded cables are used, cables in close proximity to each other have the potential to create data transfer interference and cause cameras to stall in Motive.
Unshielded cables do not protect the cameras from Electrostatic Discharge (ESD), which can damage the camera. Do not use unshielded cables in environments where ESD exposure is a risk.
Windows Setup
Debloat Windows
Remove all "bloatware" from the Motive PC to optimize the system and to ensure unnecessary background processes are not running. Background processes take valuable CPU resources from Motive and can cause frame drops while the camera system is running.
There are many external resources to guide you in removing unused apps and halting unnecessary background processes. Those steps will not be covered within the scope of this page.
Firewall and Antivirus Settings
As a general rule for all OptiTrack camera systems, best practice is to disable Windows firewalls and disable or remove any Antivirus software. Both can cause frame drops while running your camera system.
These optimizations involve disabling various Windows security features. It is crucial that the PC is isolated from the internet or other potential sources of malware.
Windows 11 Local Group Policy Editor
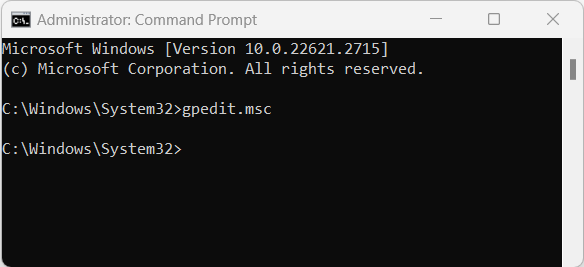
Many of the recommended optimizations are completed using Window’s Local Group Policy Editor. To open this program:
From the Windows search bar, type CMD.
Run Command Prompt as administrator.
At the command line, type gpedit.msc and press enter.
This will open the Local Group Policy Editor window.
Disable Firewall
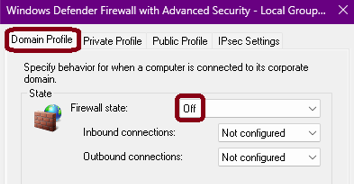
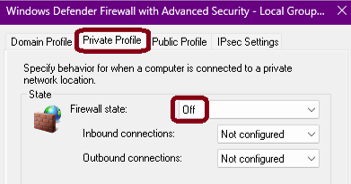
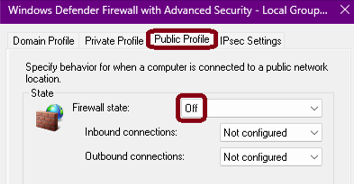
Set a Local Group Policy to disable Private, Public, and Domain firewalls.
Once these policies are implemented, the firewall cannot be re-enabled by any other means.
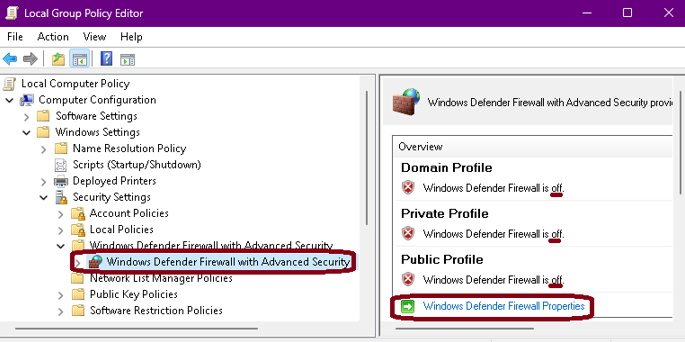
Open Window’s Local Group Policy Editor.
Navigate to Computer Configuration -> Windows Settings -> Security Settings -> Windows Defender Firewall with Advanced Security.
The Overview panel shows the current status of the firewall. Click Windows Defender Firewall Properties to change the state of the Domain, Private, and Public profiles to Off then click OK.
Disable Antivirus
Set a Local Group Policy to disable Microsoft Defender Antivirus.
Once this policy is implemented, the Windows Defender Antivirus cannot be re-enabled in Virus & Threat Protection.
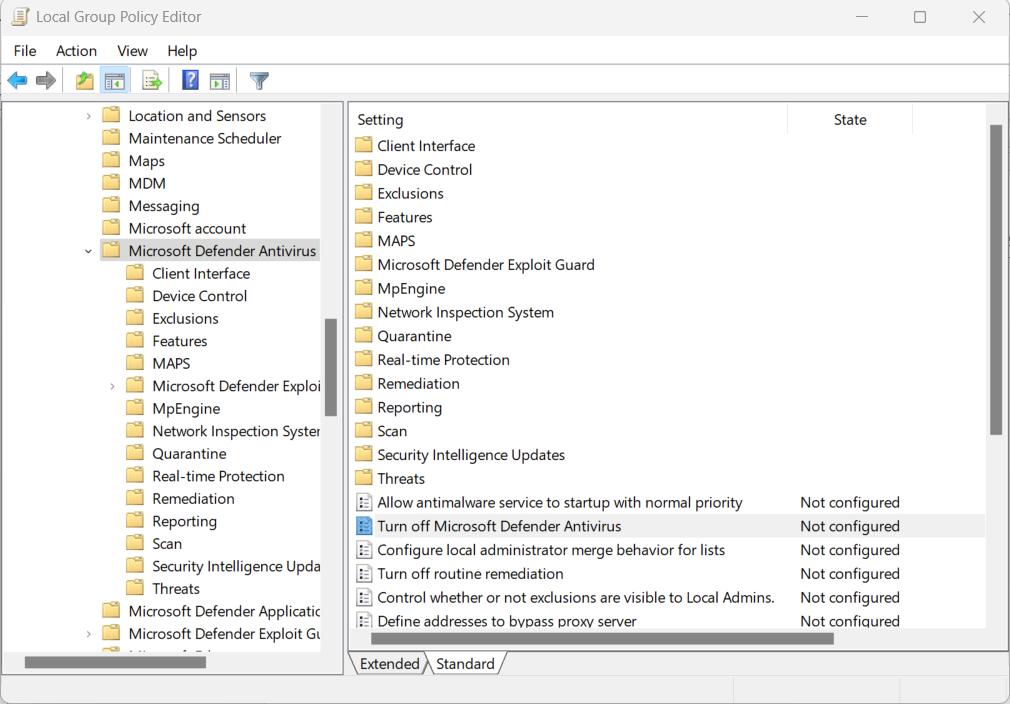
Open Window’s Local Group Policy Editor.
Navigate to Computer Configuration -> Administrative Templates -> Windows Components -> Microsoft Defender Antivirus.
Double-click Turn Off Microsoft Defender Antivirus.
Select Enabled and click OK.
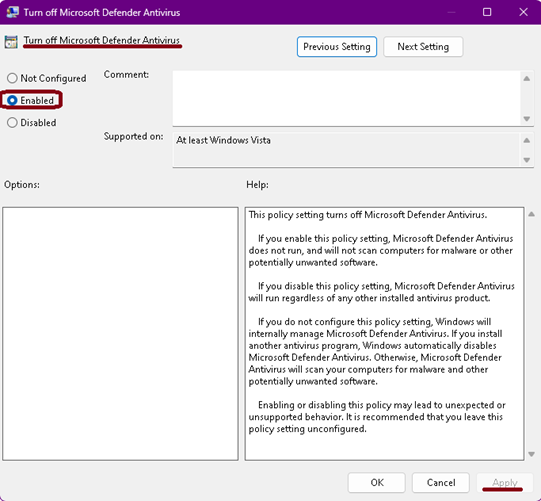
Disable Anti-malware Real-time Protection
Open Window’s Local Group Policy Editor.
Navigate to: Computer Configuration -> Administrative Templates -> Windows Components -> Microsoft Defender Antivirus -> Real-time Protection.
Double-click Turn off real-time Protection.
Set the policy to Enabled and click OK.
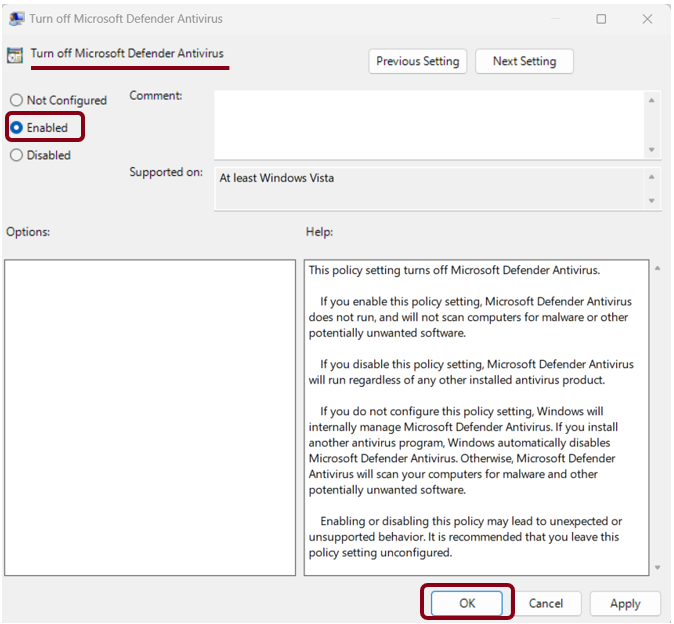
Priority
Customize the Motive desktop shortcut to launch the program with high priority.
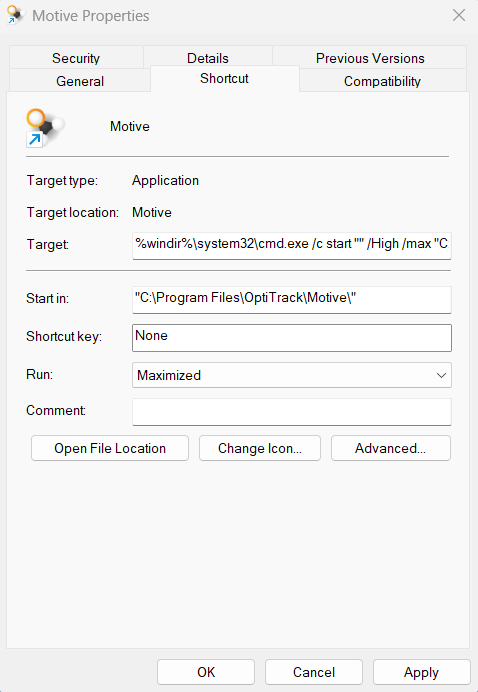
On the desktop, right-click the Motive shortcut and select Properties.
Select the Shortcut tab.
Copy and paste the text below into the Target field:
C:\Windows\System32\cmd.exe /C start "" /high "C:\Program Files\OptiTrack\Motive\Motive.exe"
Set the Run property to Maximized.
Click OK to save your changes and close the window.
Do not set the priority to Realtime. This can cause Windows to prioritize Motive above input processes such as mouse and keyboard, resulting in a loss of input control.
Processor Affinity (Optional)
If the system has a CPU with a lower core count, you may need to disable Motive from running on one or two cores. This will help stabilize the overall system and free those cores for other Windows-required processes.
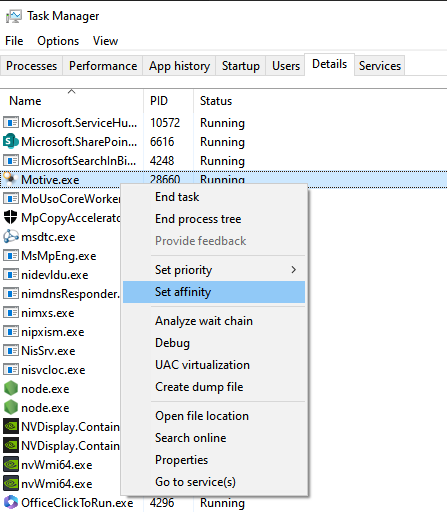
From the Task Manager, navigate to the Details tab and right click on Motive.exe.
Select Set Affinity.
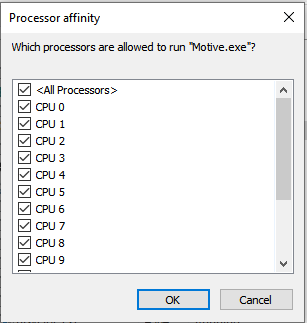
From this window, uncheck the cores you wish to disable for Motive.exe to run on.
Click OK.
Do not disable more than 2 cores to insure Motive still runs smoothly. We recommend starting with one core and disabling a second only if frame drop issues continue.
Do not disable more cores than cameras. Motive requires at least one core for each PrimeX Color Camera on the system.
Network Setup
Switch Settings
Switches purchased as a component of the OptiTrack system will ship with the proper configuration. If using a switch purchased elsewhere, ensure that any built-in Storm Control features are disabled.
NIC Settings
The Network Interface Card (NIC) has two settings to optimize your system and reduce issues when capturing Prime Color Camera video.
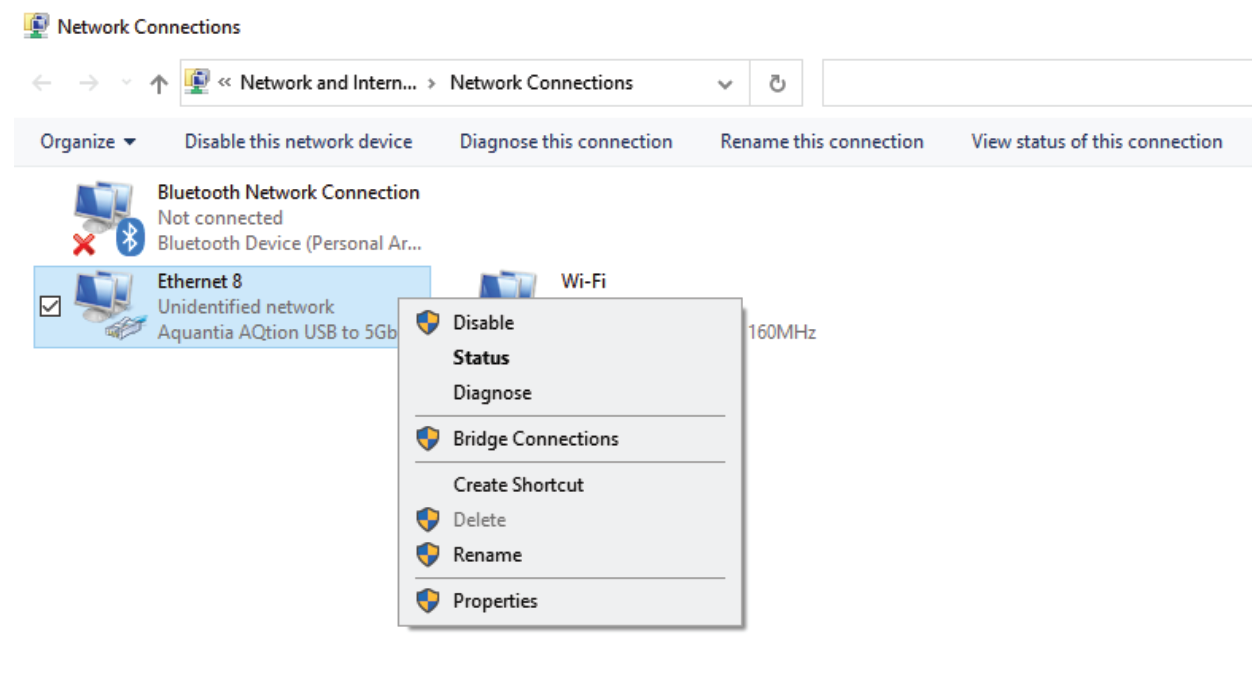
To configure the NIC, type Network in the Windows search bar to find and open the Control Panel to View Network Connections.
Double-click or right-click the NIC for the camera system and select Properties.
On the Properties window, click the Configure... button.
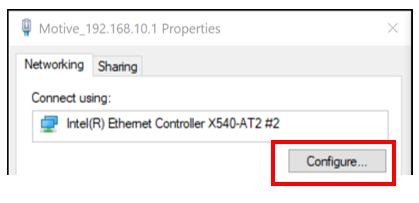
Click the Advanced tab to access the NIC Properties.
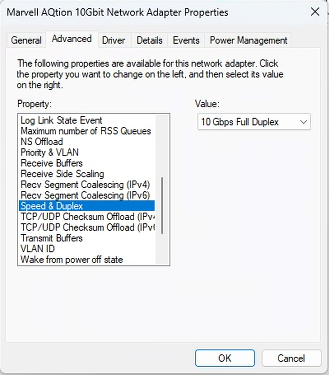
Speed & Duplex
This setting determines the rate of data transmission (speed) and whether the NIC can operate at its full range (full duplex) or if throttling will occur (half duplex).
The property should be set to the highest throughput of the NIC. For example, if you have a 10Gbps NIC, select 10Gbps Full Duplex.
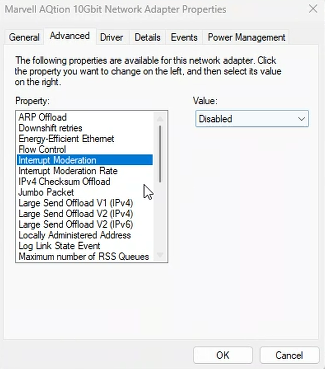
Interrupt Moderation
This setting allows the NIC to moderate interrupts. When there is a significant amount of data being transmitted to Motive, Interrupt Moderation can increase the number of interrupts, impacting system performance.
This property should be disabled.
Restart NIC
To apply changes made to the NIC properties, the NIC must be restarted.
Click the Driver tab.
Click Disable, then Enable to restart the NIC with the new settings.
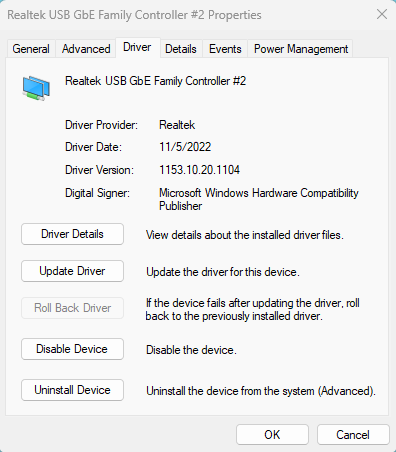
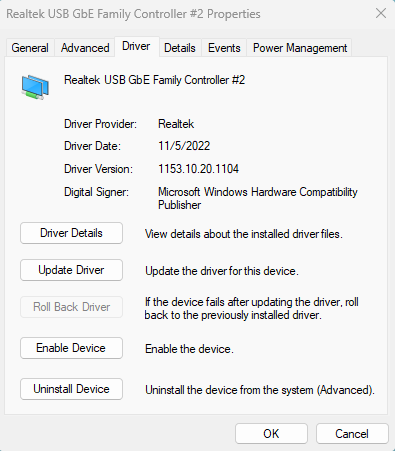
Rebooting the NIC will take the camera system down for a few minutes. This is normal and once the NIC is rebooted the system should work as expected.
NIC Adapters (Laptop)
Although not recommended, you can use a laptop PC to run a Prime Color Camera system. The laptop will require an external network adapter to connect to the camera network. The settings noted above typically do not apply to these types of adapters.
Use a Thunderbolt port adapter with a corresponding Thunderbolt port on your laptop rather than standard USB-C adapters/ports.
Motive Setup
Prime color cameras are displayed as a separate category under the Devices pane. You can customize the column view and configure select camera settings directly from this pane. Please see the Devices Pane page for more information.
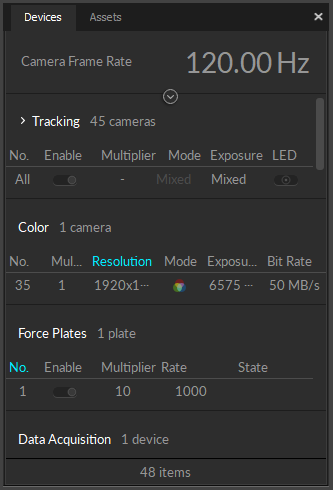
Prime Color Settings
Select the camera to display its properties in the Properties pane. The following settings are unique to Color Cameras.
We recommend closing the Cameras View during recording to further stabilize Motive, minimizing lag and reducing frame drops.
Resolution
This property sets the resolution of the images captured by the selected camera.
You may need to reduce the maximum frame rate to accommodate the additional data produced by recording at higher resolutions. The table below shows the maximum allowed frame rates for each respective resolution setting.
960 x 540 (540p)
500 FPS
1280 x 720 (720p)
360 FPS
1920 x 1080 (1080p) Default
250 FPS
Bit Rate
This setting determines the selected color camera's output transmission rate, and is only applicable when the Compression mode for the camera is set to Constant Bit Rate (the default value) in the Camera properties.
The maximum data transmission speed that a Prime color camera can output is 100 megabytes per second (MB/s). At this setting, the camera will capture the best quality image, however, it could overload the network if there isn't enough bandwidth to handle the transmitted data. We recommend setting the bit rate in the 30-50 Mb/s range for optimal quality.
Load Balancing and Bit Rate: Higher bit rates send more data across the network, which needs to be accounted for in load balancing the network. For example, 3 PrimeX Color cameras running at 100MB/s can easily surpass 1 Gb of data throughput, potentially resulting in dropped frames if all are connected to the same switch.
Since the bit-rate controls the rate of data each color camera outputs, this is one of the most important settings to adjust when configuring the system.
When a system is experiencing 2D frame drops, one of the following system requirements is not being met:
Network bandwidth
CPU processing speed
Insufficient number of available or utilized CPU cores
RAM/disk memory
Decreasing the bit-rate in such cases may slow the data transmission speed of the color camera enough to resolve the problem.
Read more about compression mode and bit rate settings on the page Properties Pane: Camera.
Gamma
Gamma correction is a non-linear amplification of the output image. The gamma setting adjusts the brightness of dark pixels, mid-tone pixels, and bright pixels differently, affecting both brightness and contrast of the image. Depending on the capture environment, especially with a dark background, you may need to adjust the gamma setting to get best quality images.
Color Camera Presets
Presets for Color Cameras use standard settings to optimize for different outcomes based on file size and image quality. Calibration mode sets the appropriate video mode for the camera type in addition to other setting changes.
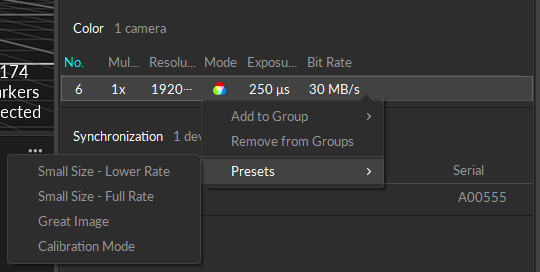
The optimal Bit Rate for each preset is calculated based on the master camera frame rate when the preset is selected. Lower bit rates result in smaller file sizes. Higher bit rates produce higher quality captures and result in larger file sizes.
Small Size - Lower Rate
Video Mode: Color Video
Rate Multiplier: 1/4 (or closest possible)
Exposure: 20000 (or max)
Bit Rate: [calculated]
Small Size - Full Rate
Video Mode: Color Video
Rate Multiplier: x1
Exposure: 20000 (or max)
Bit Rate: [calculated]
Great Image
Video Mode: Color Video
Rate Multiplier: x1
Exposure: 20000 (or max)
Bit Rate: [calculated]
Calibration Mode
Video Mode:
FS Series: Object Mode
Non-FS Series: Color Object Mode
Rate Multiplier: x1
Exposure: 250
Bit Rate: N/A
Was this helpful?

