NI-DAQ Setup
Overview
OptiTrack motion capture systems support the integration of National Instruments data acquisition (NI-DAQ) devices. Through NI-DAQ devices, signals from various analog devices (e.g. transducers or EMG sensors) can be converted into digital signals at a user-defined sampling frequency, and they can be precisely synchronized with the motion tracking data. This page provides instructions on connecting NI-DAQ devices and acquiring analog signals within Motive.
For a list of supported models, please refer to the Supported NI-DAQ Models section of this page.
For instructions specific to the NI-DAQ devices, please refer to the respective product User Guide or the NI's getting started guide.
Required Components
OptiTrack motion capture system
The eSync 2 synchronization hub
Motive version 1.10 and above with a valid software license.
OptiTrack Peripheral Device module
NI-DAQ device(s): PCI or USB. See more at Supported Devices
Third party analog devices
Additional Notes
The NI-DAQ functionalities are not supported with the use of the Motive API.
For integration of digital force plates, follow the Force Plate Setup guide. Analog platforms can be integrated through a NI-DAQ, but only raw voltage signals can be detected and the force plate features within Motive will not be supported.
Up to 32 analog channels are supported for each NI-DAQ device. If you wish to use higher channel counts, please contact us for more details.
OptiHub 2: Precise synchronization with a USB camera system is NOT supported. An Ethernet camera system with the eSync 2 synchronization hub should be used for NI-DAQ integrations. It is possible for the USB camera system to roughly synchronize to a NI-DAQ device via triggered sync, however, there will always be a variable time delay between the trigger and when the cameras start exposing. Due to this variable offset, the two of the recorded datasets cannot be perfectly aligned at the start of recording.
Hardware Setup
Motive supports PCI and USB data acquisition devices from National Instruments, and the NI-DAQmx driver must be installed on the computer in order to use the devices. The driver setup instructions will be covered in the software setup section of this page. A list of supported models can be found in the section below.
For general instructions on setting up the mocap system, refer to the Hardware Setup pages.
Hot plugging is not supported with the integration. When a new device is connected to the system, you must re-start Motive to instantiate it.
Supported National Instruments Devices
Below is the list of NI-DAQ device models that are supported with Motive. For best compatibility, use the recommended models or verified models since they are most tested to work with Motive. Unverified models are expected to work as well, but their integration has not been tested yet.
NaturalPoint Recommended Devices
USB-63XX X-Series
Verified Devices
USB-6341, USB-6351, USB-6361
USB-6002
USB 6281 (M Series)
Unverified Devices
(Low Cost) USB Basic Series
NI 6000, NI 6001, NI 6002, NI 6003, NI 6008, NI 6009
E Series
NI 6023E, NI 6024E*, NI 6025E, NI 6030E, NI 6031E, NI 6032E/33E/34E/35E, NI 6036E*, NI 6040E, NI 6052E, NI 6062E*, NI 6070E, NI 6071E, NI PCI-MIO-16E-1, NI PCI-MIO-16E-4, NI PCI-MIO-16XE-10, NI PCI-MIO-16XE-50
M Series
NI 6210/11/12/15/16/18, NI 6220, NI 6221, NI 6224, NI 6225, NI 6229, NI 6230/32/33/36/38/39, NI 6250, NI 6251, NI 6254, NI 6255, NI 6259, NI 6280, NI 6281, NI 6284, NI 6289
X Series
NI 6320, NI 6321, NI 6323, NI 6341, NI 6343, NI 6345, NI 6351, NI 6353, NI 6355, NI 6356, NI 6358, NI 6361, NI 6363, NI 6365NI 6366, NI 6368, NI 6375
S Series
Simultaneous Sampling: NI 6110, NI 6111, NI 6115, NI 6120, NI 6122, NI 6123, NI 6124, NI 6132, NI 6133, NI 6143, NI 6154
SC Express
Signal Conditioning: NI 4300, NI 4302, NI 4303, NI 4304, NI 4305, NI 4322, NI 4330, NI 4331, NI 4339, NI 4353, NI 4357
DSA Series
Sound and Vibration: NI 4431, NI 4432, NI 4461, NI 4462, NI 4463, NI 4464, NI 4472/B, NI 4474, NI 4492, NI 4495, NI 4496, NI 4497, NI 4498, NI 4499, NI 4610
CompactDAQ
Platform to be used with I/O Modules:
Not Supported
C Series
Network DAQ
USB DAQ
I/O Modules to be paired with Chassis: NI 92xx, NI 94xx
NI MyDAQ
Educational: NI MyDAQ
Unsupported Devices
Compact DAQ systems are not supported.
Questions?
If you have any questions regarding supported devices or if you are unsure of which NI-DAQ component to use, please contact us to discuss.
USB NI-DAQ Device Wiring Setup
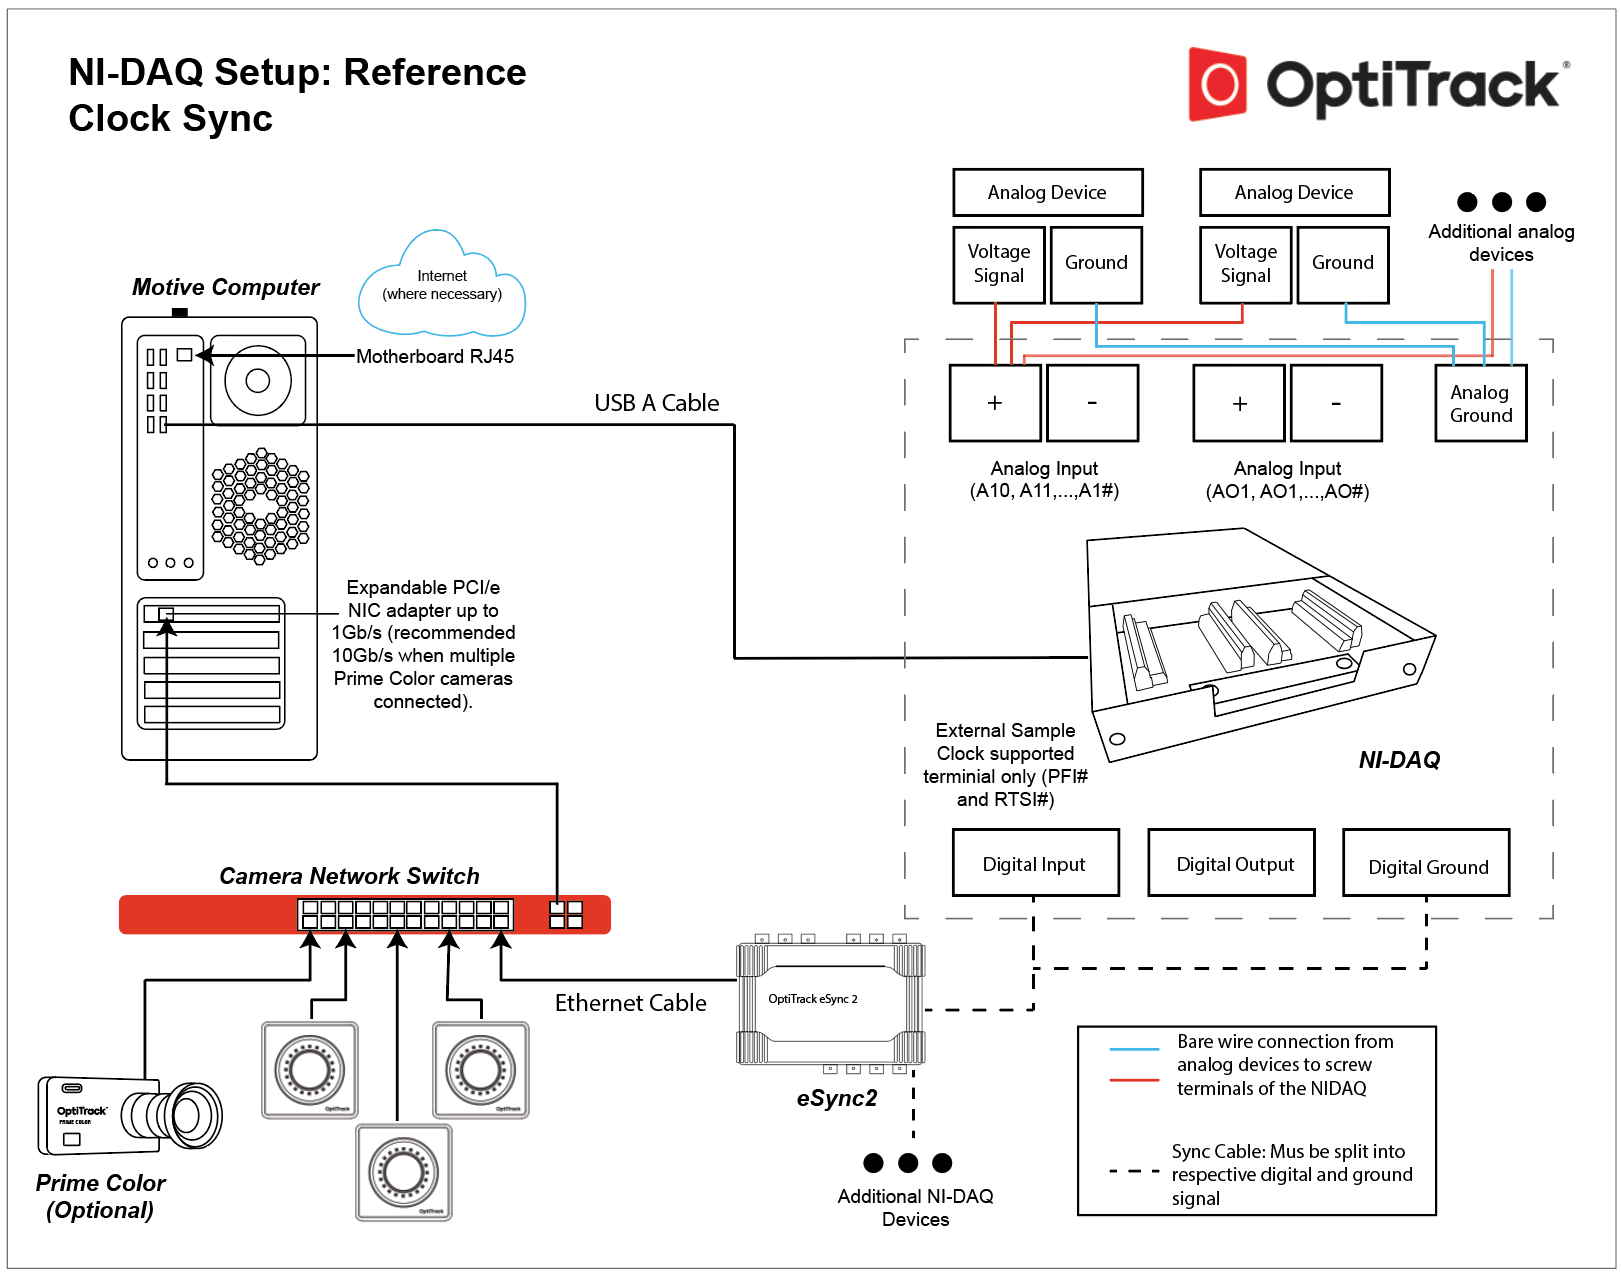
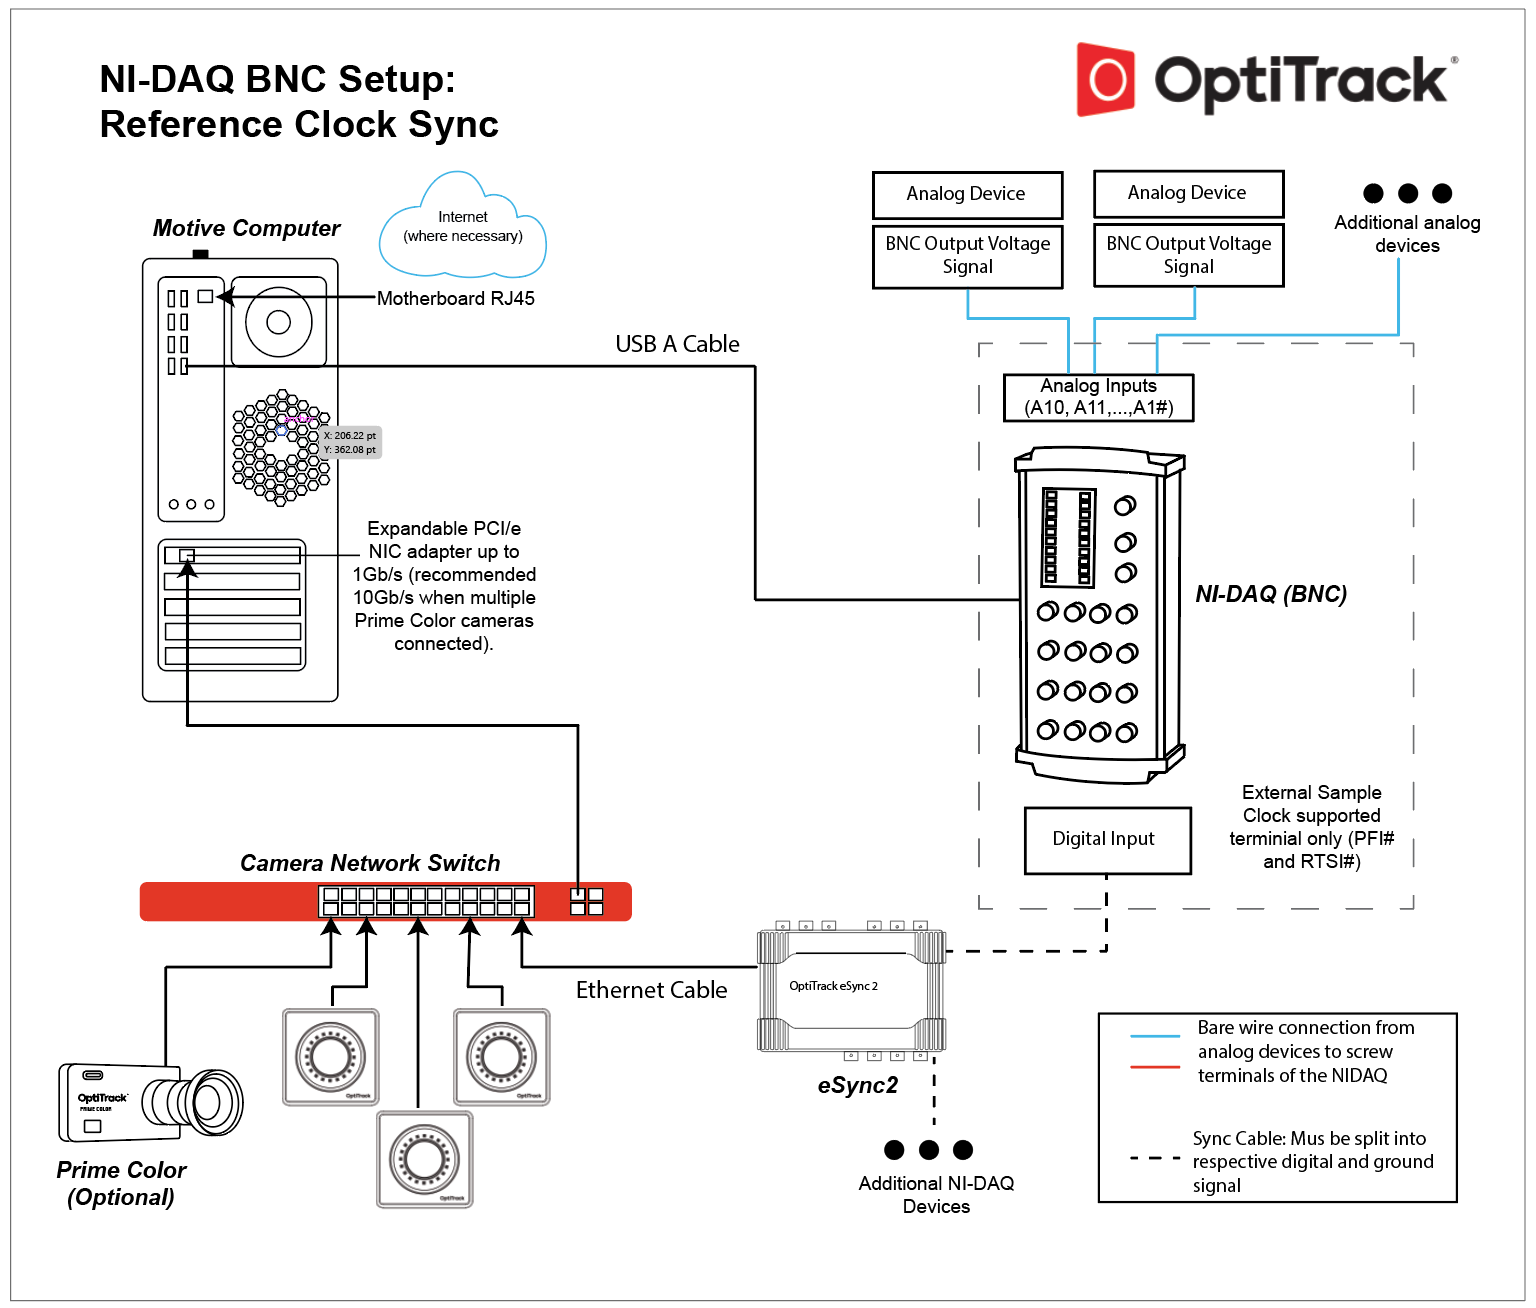
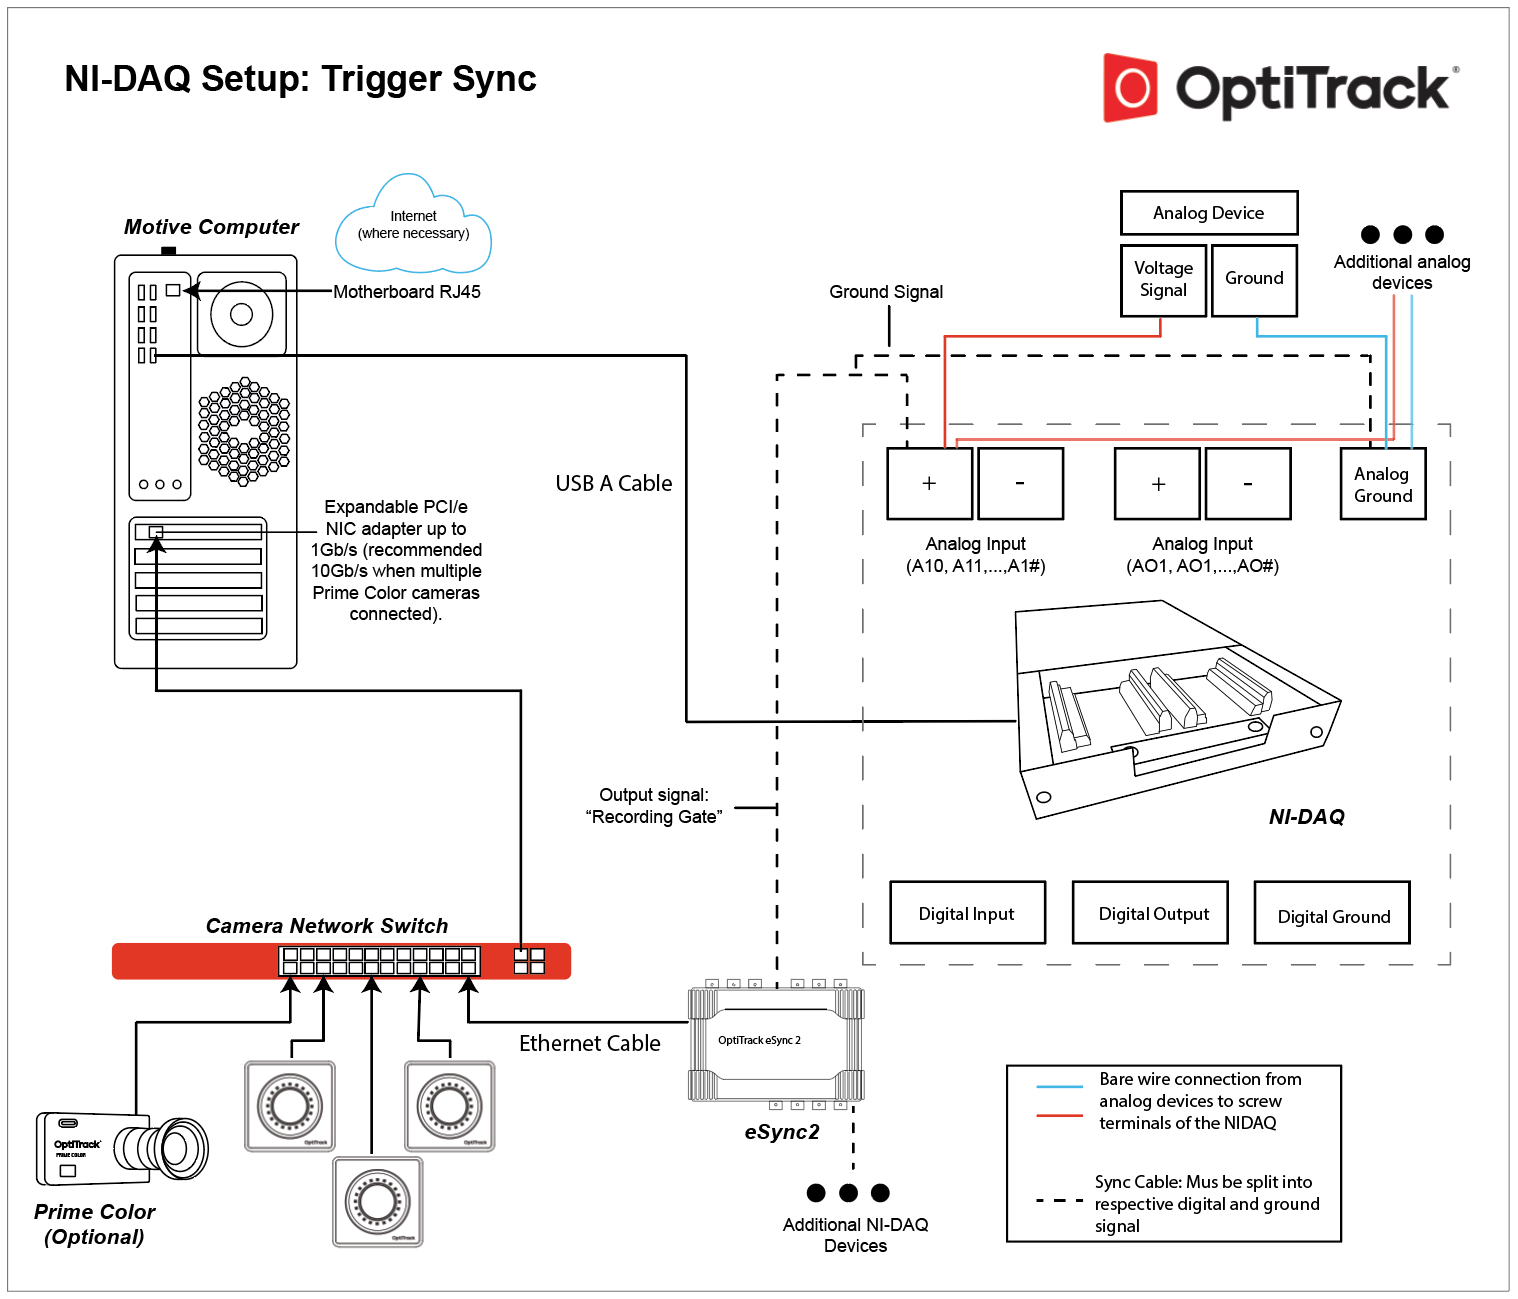
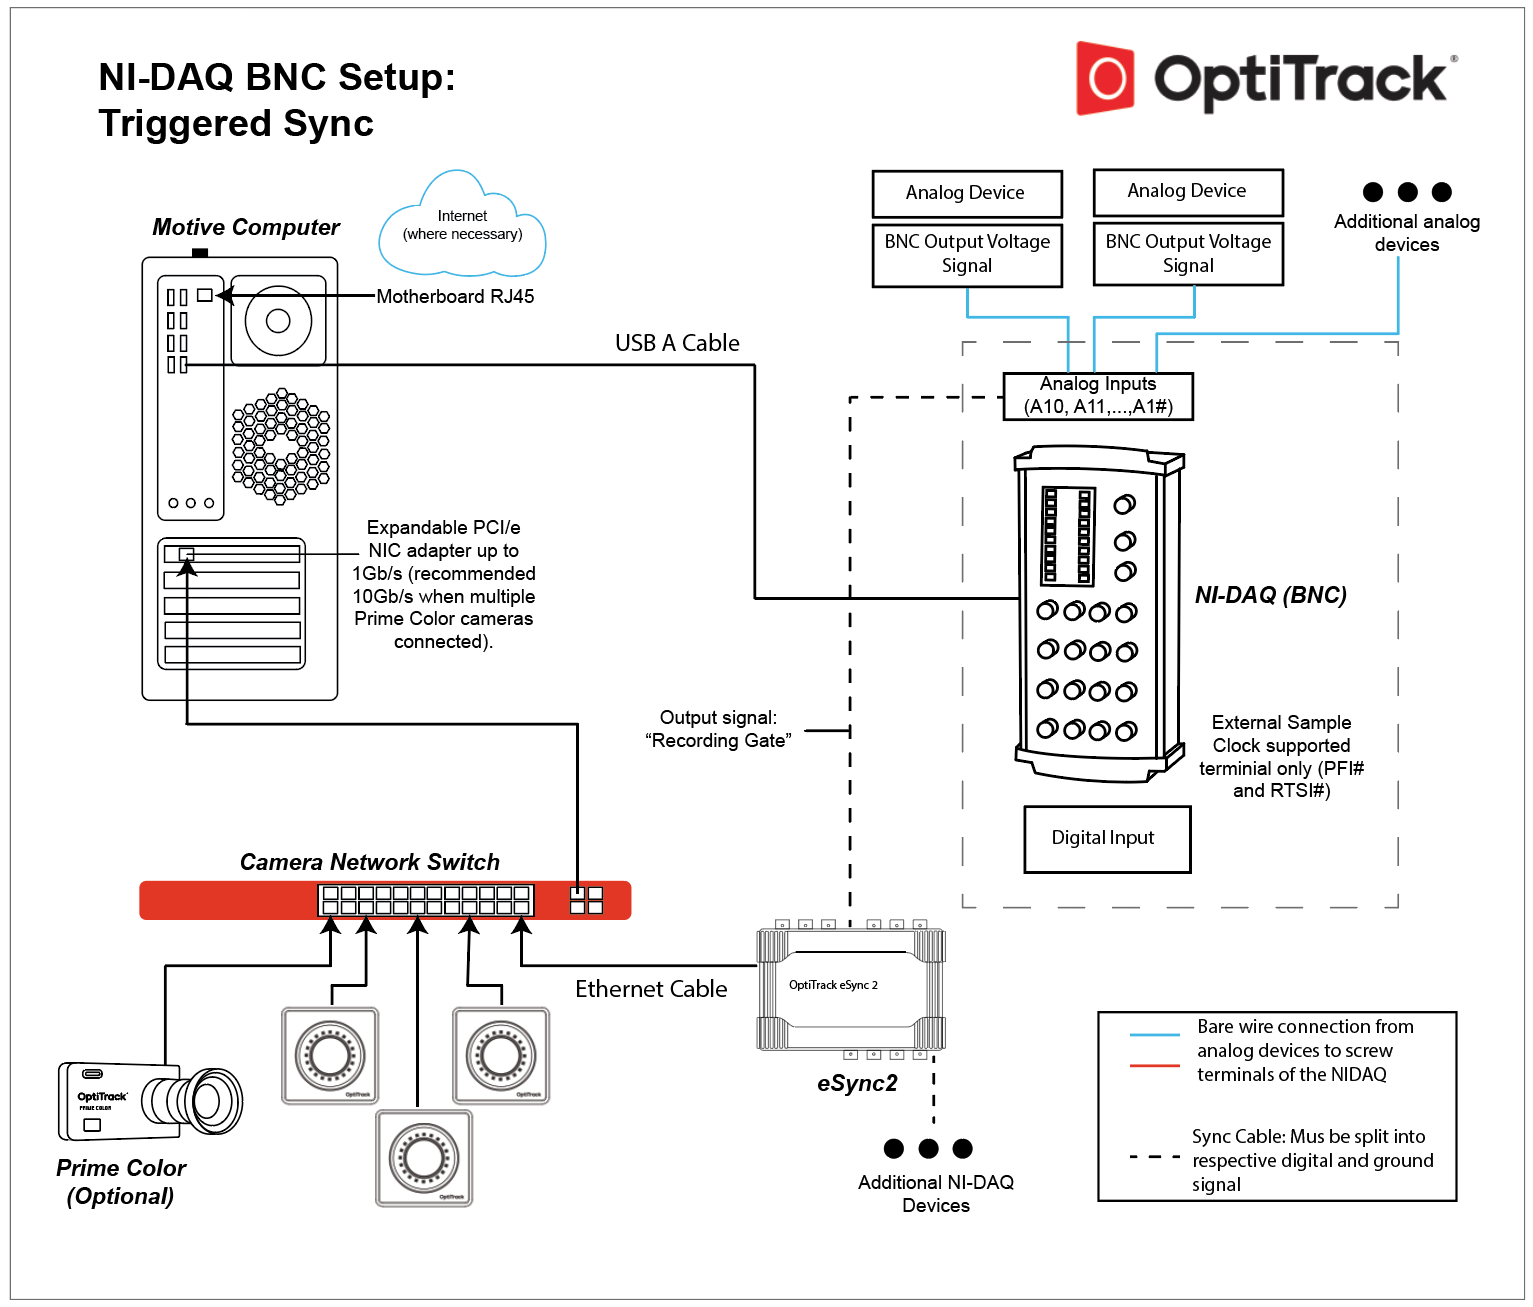
The following diagrams show wiring setups for connecting and synchronizing NI-DAQ devices with Prime series motion capture systems. Please note that NI-DAQ devices can be synchronized either through reference clock sync or through recording trigger sync, and both approaches are shown below. For most precise synchronization, using external clock signal as the reference is recommended.
Reference Clock Sync
OptiTrack mocap systems use the eSync 2 to provide highly accurate synchronization. When synchronizing the NI-DAQ device through an external clock signal or the reference clock signal, the eSync 2 generates and outputs clock signal to the NI-DAQ device(s), so that it can be used as the master reference clock that the connected devices can synchronize to. This approach is referred to as the reference clock sync, and in this approach, the data samples collected from two systems will be aligned on a per frame basis.
Wiring the eSync 2 and the NI-DAQ device: Connect one of the output ports of the eSync 2 into a programmable function interface (PFI) terminal of the NI-DAQ device that supports external sample clock inputs. For screw input terminals, ground signals must be separated from the BNC output of the eSync 2 and relayed into a digital ground terminal.
Wiring analog devices with the NI-DAQ device: Connect the output of an analog device(s) into one of the analog input channels of the NI-DAQ device. For screw terminals, a corresponding ground signal needs to be connected to an analog ground channel. For BNC terminals, wiring the ground signal is not necessary, but the input ports should be configured to either FS (Floating Source) or GS (Ground Source) setting depending on the characteristic of the signal source. For more information on connecting peripheral devices into a NI-DAQ device, visit NI support.
Screw Terminal Device Cabling
BNC Terminal Cabling
Sample Clock Support
Required for setups using reference clock synchronization
In order to utilize the clock signal, a NI-DAQ device(s) that supports external sample clock input must be used. When using DAQ devices without the sample clock support, they will not be able to reference the clock signal. In this case, the device will have to sync at the start of the recording through the triggered sync and operate in the Free Run mode with independent acquisition rate which may result in synchronization drift over time.
NI-DAQ models supporting external sample clock:
X Series: (e.g. PCIe 6320, USB 63XX Series)
Bus-Powered M Series: ( e.g. USB 6210)
M Series: (e.g. USB 6221, PCI 6220)
Non-USB B Series: (e.g. PCI-6010)
NI-DAQ models NOT supporting external sample clock:
Low cost USB Series (e.g. USB-6002)
Recording Trigger Sync
For best results, the reference clock sync approach is recommended to achieve per-sample basis synchronization between two systems; however, there are cases where this is not applicable. For example, you may need to use the clock signal to sync other devices that are sampling at a different rate than the sampling rate of the NI-DAQ device you wish to achieve. In such cases, you can use recording signal to trigger sync both systems at the start of the recording and have them free-run at their own sampling rates. This will align the recorded samples from two systems, but long recordings may be susceptible to phase shift.
Wiring the eSync 2 and the NI-DAQ device: Connect one of the output ports of the eSync 2 into an analog input terminal (e.g. ai0) of the NI-DAQ device. For screw input terminals, ground signals must be separated from the BNC output of the eSync 2 and relayed into an analog ground terminal.
Wiring analog devices with the NI-DAQ device: Connect the output of an analog device(s) into one of the analog input channels of the NI-DAQ device. For screw terminals, a corresponding ground signal needs to be connected to an analog ground channel. For BNC terminals, wiring the ground signal is not necessary, but the input ports should be configured to either FS (Floating Source) or GS (Ground Source) setting depending on the characteristic of the signal source. For more information on connecting peripheral devices into a NI-DAQ device, visit NI support.
Screw Terminal Device Cabling
BNC Terminal Cabling
Software Setup
For Motive to communicate with NI-DAQ devices, the OptiTrack Peripheral Modules must be installed along with Motive and NI-DAQ device drivers. The OptiTrack Peripherals Module is a software plugin package that installs required drivers and plugin DLLs for integrating external devices, including NI-DAQ devices and force plates (AMTI and Bertec). The following section describes the steps on integrating NI-DAQ device(s) within Motive.
Installation Steps
1. Install the Peripherals Device module
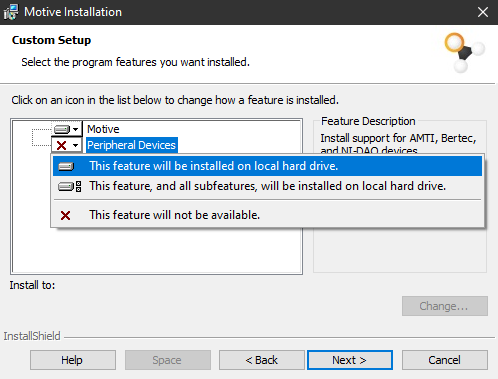
During the Motive installation process, optional program features will be listed in the Custom Setup section. Here, change the setting for the Peripherals Device, as shown in the below image, so that the module is installed along with Motive.
2. Install the NI-DAQ device drivers
After agreeing to install the Peripheral Device, the installer will ask to install NI-DAQmx 15.1.1 driver. You will need to install this driver for MS Windows to recognize the connected NI-DAQ devices. Press Yes to initiate the NI-DAQmx installation and follow the instructions to set up the driver.
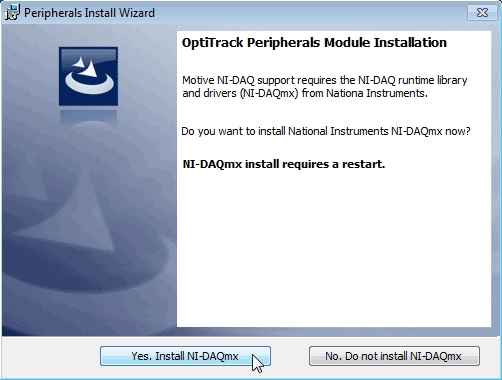
Installation Note: For integration into Motive, the NI-DAQmx 15.1.1 or later runtime driver must be installed. If you are already using an older version of the NI-DAQmx runtime and Motive is having problems recognizing the connected device, update the driver or uninstall and re-install the packaged version of the driver before contacting Support. In Motive, you can inspect device connection status via the Log Pane which can be accessed under the View tab in Motive.
3. Check device connection
Ensure the NI-DAQ device is powered and detected by MS Windows. For USB DAQ devices, you could also use the installed NI Device Monitor software to confirm and monitor the connection. The NI Device Monitor can be accessed from the Windows taskbar tray when a USB DAQ device is connected.
4. Launch Motive
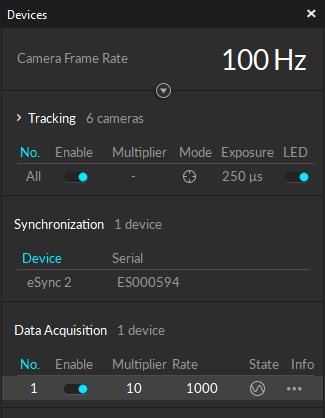
In the Devices pane, all of the connected NI-DAQ devices will be listed along with respective analog input channels (up to 32) under the Data Acquisition group.
5. Verify device operation
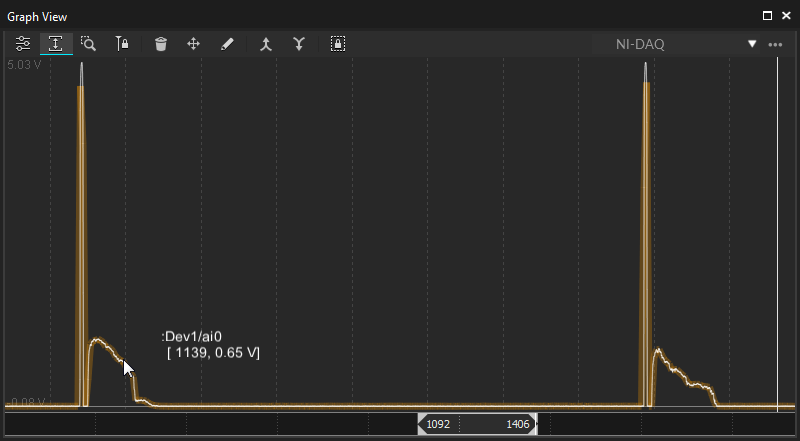
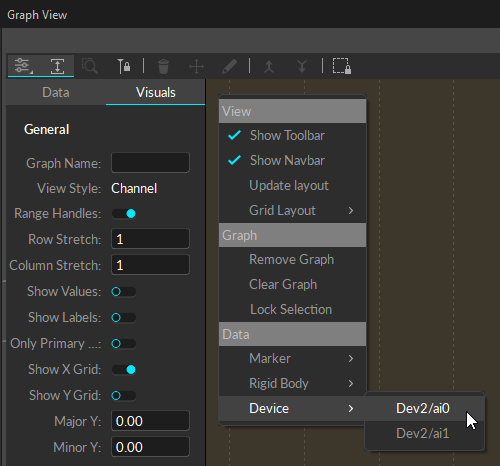
Once the NI-DAQ device is recognized properly, you will be able to observe the real-time signal on the Graph View pane.
First, make sure the NI-DAQ device and its operating analog input channels are enabled under the Devices pane. Then, open the Graph pane and create a custom layout for monitoring live-analog data; create a new layout, right-click on the graphs, and select the device channel you wish to plot. Then, open the graph editor (![]() ) and make sure View Style is set to Live under the Visuals tab. Configured analog channels will be plotted on the graphs.
) and make sure View Style is set to Live under the Visuals tab. Configured analog channels will be plotted on the graphs.
a. Device Pane: Select a NI-DAQ channel with an active signal.
b. Device Pane: Toggle the NI-DAQ device to begin sampling.
c. Device Pane: Select the active channel.
d. Graph Pane: Show the 'Scope' View.
6. Zero the DAQ device
Detected voltage signals from a NI-DAQ input channels can be zeroed. Right-click on a NI-DAQ device from the Devices pane and click Zero. Doing this will zero all of the enabled channels for the selected NI-DAQ device.
NI-DAQ Settings
Now that the device is detected in Motive, you can select and configure settings for the device and its analog channels through Motive. When a data acquisition device or an analog channel is selected in the Devices pane, their respective properties will be displayed on the Properties pane or on a separate pop-up for the analog channels.
Device Properties
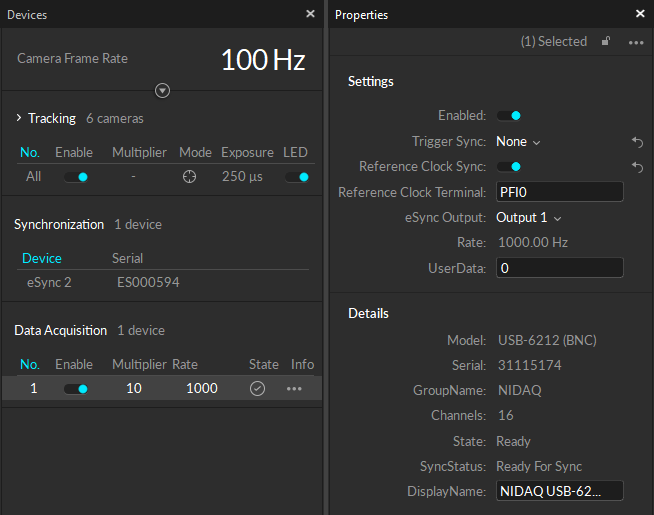
Properties of connected NI-DAQ devices get listed in the Properties pane when a device is selected in the Devices pane. These properties need to be configured in order to properly synchronized the data acquisition device and the camera system together. Details about appropriate property settings will be covered in the following section.
For specific details about each properties, visit Properties: NI-DAQ page.
Device Channel Properties
Properties of individual channels can be configured directly from the Devices pane. As shown in the image, you can click on the ![]() icon to bring up the settings and make changes.
icon to bring up the settings and make changes.
Depending on the model, NI-DAQ devices may have different sets of allowable input types and voltage ranges for their analog channels. Refer to your NI-DAQ device User's Guide for detailed information about supported signal types and voltage ranges.
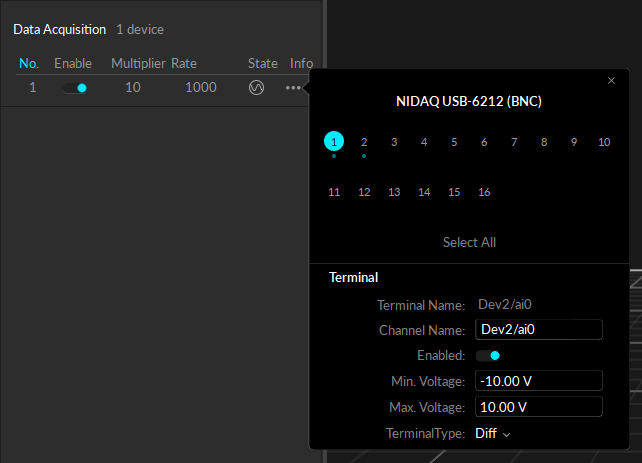
Min Voltage
(Default: -10 volts) Configure the terminal's minimum voltage range.
Max Voltage
(Default: +10 volts) Configure the terminal's maximum voltage range.
Terminal Type
Configures the measurement mode of the selected terminal. In general, analog input channels with screw terminals use the single-ended measurement system (RSE), and analog input channels with BNC terminals use the differential (Diff) measurement system. For more information on these terminal types, refer to NI documentation.
Terminal: RSE Referenced single ended. Measurement with respect to ground (e.g. AI_GND) (Default)
Terminal: NRSE NonReferenced single ended. Measurement with respect to single analog input (e.g. AISENSE)
Terminal: Diff Differential. Measurement between two inputs (e.g. AI0+, AI0-)
Terminal: PseudoDiff Differential. Measurement between two inputs and impeded common ground.
Notes on devices with Diff terminals
Motive will report all terminals detected through the device. Some BNC NI-DAQ models wrap two RSE terminals into each BNC Diff terminals (e.g. USB-6212: 16 RSE terminals into 8 Diff terminals), and it will report all RSE terminals into Motive. This means the actual number of channels reported in Motive may be more than the actual number of Diff terminals on the device. In this case, there will be an error message when attempting to enable channels that are not available. Please be aware of the device specification and enable only the Diff channels that are available on the device.
Synchronization Configuration: eSync 2
In order to precisely synchronize the motion capture system with NI-DAQ devices, the eSync 2 must be used. This section walks through the steps on configuring the settings of the eSync 2 and the NI-DAQ in order to synchronize two systems together through the reference clock sync or the recording trigger sync.
Reference clock synchronization keeps Motive and your device continuously synchronized every few frames. In Motive 3.0+ achieving this level of synchronization is easier than ever with new right click menus in the Devices pane.
1. [Hardware]: Connect one of the eSync 2 Output(N) ports into the NI-DAQ digital input terminal.
2. [Motive]: Open the Devices pane.
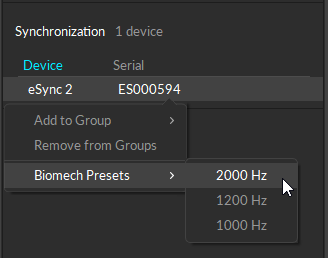
3. [Motive: Devices pane]: Right click the eSync 2 in the Devices pane and choose one of the "Biomech Presets".
4. [Motive: Devices pane] Right click the eSync 2 in the Devices pane, hover over the "Reference Clock" option, hover over the eSync 2 Output # used in step 1, then choose the corresponding DAQ PFI #.
5. [Motive: Control Panel] Record. The recorded NI-DAQ device samples will be synchronized with the external clock signal outputted from the eSync 2.
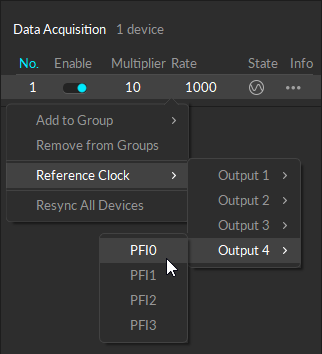
The internal clock signal is generated from the eSync 2 and outputted to the NI-DAQ device(s) for precisely synchronizing two systems together. This approach is referred to as the synchronization through reference sample clock signal, and in this setup, all of the data samples will be synchronized per-frame basis.
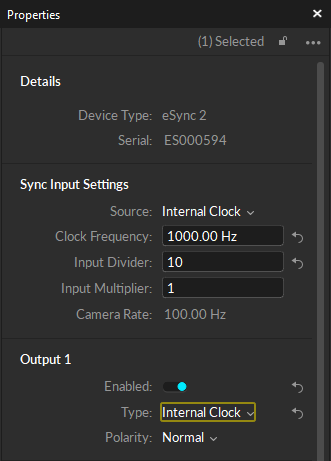
To configure this, set the Source to Internal Clock in the Sync Input Settings section under the eSync properties. Here, the clock frequency of the internal clock signal will basically set the sampling rate of the NI-DAQ device(s). Then, the input divider/multiplier can be adjusted to achieve desired camera frame rate, and the final camera system framerate will be calculated and indicated under the eSync properties and in the Devices pane. The following steps summarize the reference sample clock sync setup steps:
1. [Hardware]: Connect one of the eSync 2 Output(N) ports into the NI-DAQ digital input terminal.
2. [Motive]: Open the Devices pane and the Properties pane.
3. [Motive: Devices pane]: Select the eSync 2 in the Devices pane and the corresponding properties will be displayed in the Properties pane
4. [Motive: Properties pane (eSync 2)]: Configure the Sync Source to Internal Clock.
5. [Motive: Properties pane (eSync 2)] Set the Clock Freq to desired acquisition rate of the NI-DAQ device(s).
6. [Motive: Properties pane (eSync 2)] Adjust the Input Divider/Multiplier to set the final frame rate for the camera system. In order to accurately sample analog signals, the acquisition rate of the NI-DAQ device(s) should not be greater than X16 of the configured camera frame rate. In other words, the Input Divider should not exceed 16. The final camera system frame rate will always be displayed under the Devices pane and the eSync properties.
7. [Motive: Properties pane (eSync 2)] For the eSync 2 output ports connected to the NI-DAQ devices, set the Output(N) Type to Internal Clock. Now the internal clock signal is configured to be outputted through the output(N) port into the connected NI-DAQ channel.
8. [Motive: Devices pane] Select the NI-DAQ device in the Devices pane and the corresponding properties will be displayed in the Properties pane.
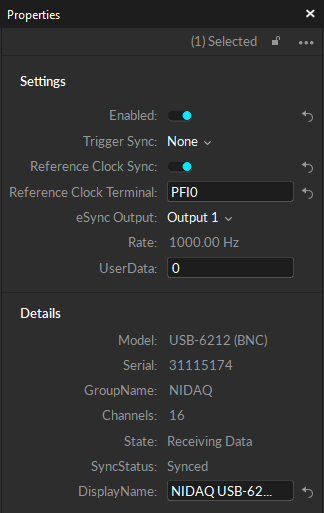
9. [Motive: Properties pane (NI-DAQ)] Within the NI-DAQ device property, set the Reference Clock Sync to True. At this point, the sampling rate of the NI-DAQ device in the Device Panel should be set to the same frequency as the internal clock signal configured for the eSync 2.
10. [Motive: Properties pane (NI-DAQ)] Under the NI-DAQ device properties, designate the Reference Clock Terminal to the NI-DAQ digital input terminal connected in Step 1.
11. [Motive: Control Panel] Record. The recorded NI-DAQ device samples will be synchronized with the external clock signal outputted from the eSync 2.
For best results, use the external clock sync approach to achieve per-sample basis synchronization between two systems. However, there are cases where this is not applicable. For example, you may need to use the external clock signal to sync other devices that are sampling at a different rate than the sampling rate of the NI-DAQ device you wish to achieve. In such cases, you can use recording signal to trigger sync both systems at the start of the recording and have them free-run at their own sampling rates. This will align the recorded samples from two systems, but long recordings may be susceptible to phase shift.
1. [Hardware]: Connect one of the eSync 2 Output(N) ports into the NI-DAQ analog input terminal.
2. [Motive]: Open the Devices pane and the Properties pane.
3. [Motive: Devices pane]: Select the eSync 2 in the Devices pane and the corresponding properties will be displayed in the Properties pane
4. [Motive: Properties pane (eSync 2)]: Configure the Sync Source under the Sync Input Settings. You can set it to either Internal Free Run or Internal Clock.
When this is set to Internal Clock, the camera system will reference the clock signal from the eSync 2 to determine the system frame rate. You will be able to configure the clock frequency and apply dividers and multipliers as necessary under the eSync 2 properties.
When this is set to Internal Free Run, the camera system will not reference the clock signal but will operate at its own rate which can be adjusted directly from the Devices pane.
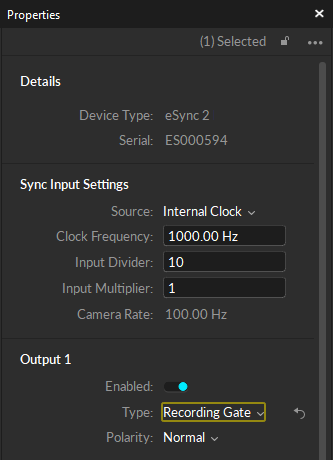
5. [Motive: Properties pane (eSync 2)] For the eSync 2 output ports connected to the NI-DAQ devices, set the Output(N) Type to Recording Gate. This will configure the respective output ports to send out a signal into the connected NI-DAQ channel when Motive is recording.
6. [Motive: Devices pane] Select the NI-DAQ device in the Devices pane and the corresponding properties will be displayed in the Properties pane.
7. [Motive: Properties pane (NI-DAQ)] Within the NI-DAQ device property, set the Recording Trigger to Device.
8. [Motive: Properties pane (NI-DAQ)] Within the NI-DAQ device property, set the Reference Clock Sync to False.
9. [Motive: Properties pane (NI-DAQ)] Within the NI-DAQ device property, set a value for the Multiple section. This will set the NI-DAQ to sample at a rate multiple of the master system rate, which was configured in step 4. Since NI-DAQ will be free running after the initial trigger sync, it is important that it samples at a whole multiple of the master rate.
10. [Motive: Properties pane (NI-DAQ)] Under the NI-DAQ device properties, designate the Trigger Terminal to the analog input terminal connected in Step 1.
11. [Motive: Control Deck] Click the record button to initiate the recording, and both the camera system and NI-DAQ will start recording simultaneously using the trigger signal.
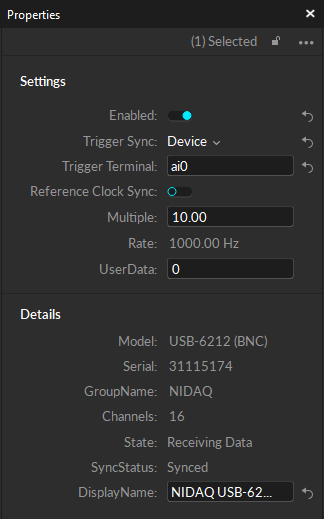
Collecting Data
The following steps describe a general workflow on collecting signals from connected NI-DAQ channels in Motive. Make sure the camera system is calibrated before recording if you wish to collect tracking data along with the analog signals.
1. [Motive : Device pane] Open the Devices pane and one of the data channels in the data acquisition device. Once it's selected, its properties will be listed out in the Properties pane.
2. [Motive : Device pane] Configure NI-DAQ collection channels properties (terminal type, voltage range) as described in the channel properties section above.
3. [Motive : Device pane] Enable the channels to collect by checking the box next to each channel.
4. [Motive : Properties pane] Now, select the NI-DAQ device in the Devices pane, and configure device properties (Acquisition rate, external clock).
5. [Motive : Devices pane] Make sure the NI-DAQ device enabled by checking the box next to the device.
6. [Motive : Graph View] In Live mode, scope the timeline to verify the recorded channel/terminal signals appear correctly.
7. [Motive : Control Deck] Start Recording.
Notes on the analog samples at the end of the recording:
Please note that the integration is not stop-aligned. At the end of the recording, there may be a few more NI-DAQ samples recorded beyond the recorded mocap frames because NI-DAQ reports samples in a batch and records at a much higher acquisition rate.
Data Playback
Captured analog signals are recorded within the Take file and they can be played back in Motive. When in Edit mode, the integrated NI-DAQ device will be shown under the Assets pane, and its Analog measurements can be plotted on the Graph View pane. You will need to create a custom graph layout and enable plotting of analog channels:
Graph Layout with Analog Plots
Right-click on the graph view and set the desired layout dimensions.
On one of the graphs, right-click and under the Devices section, select the analog channels you wish to plot.
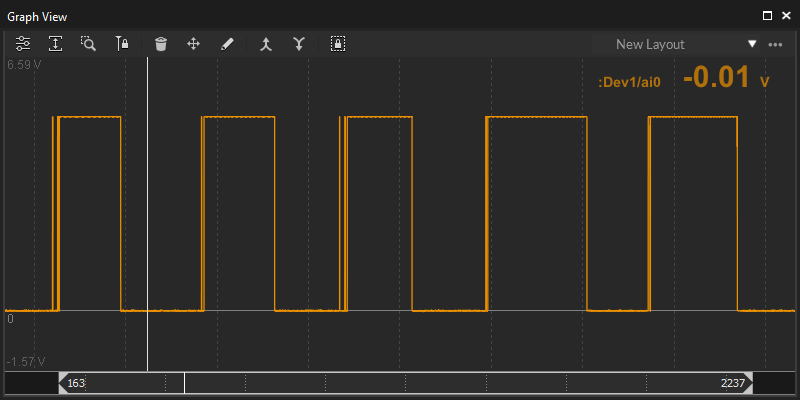
Analog Data Export
Recorded NI-DAQ analog channel data can be exported into C3D and CSV files along with the mocap tracking data. You can just follow the normal the tracking data export steps, and if the analog data exists in the TAK, they will also be exported.
C3D Export: Both mocap data and the analog data will be exported onto a same C3D file. Please note that all of the analog data within the exported C3D files will be logged at the same sampling frequency. If any of the devices are captured at different rates, Motive will automatically resample all of the analog devices to match the sampling rate of the fastest device. More on C3D files: https://www.c3d.org/
CSV Export: When exporting tracking data into CSV, additional CSV files will be exported for each of the NI-DAQ devices in a Take. Each of the exported CSV files will contain basic properties and settings at its header, including device information and sample counts. The voltage amplitude of each analog channel will be listed. Also, mocap frame rate to device sampling ratio is included since analog data is usually sampled at higher sampling rates.
Note that the coordinate system used in Motive (y-up right-handed) may be different from the convention used in the biomechanics analysis software.
Common Conventions
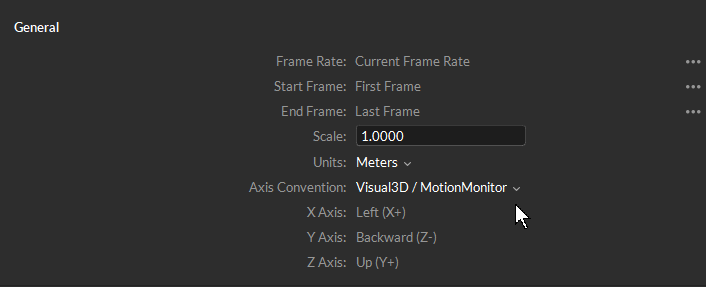
Since Motive uses a different coordinate system than the system used in common biomechanics applications, it is necessary to modify the coordinate axis to a compatible convention in the C3D exporter settings. For biomechanics applications using z-up right-handed convention (e.g. Visual3D), the following changes must be made under the custom axis.
X axis in Motive should be configured to positive X
Y axis in Motive should be configured to negative Z
Z axis in Motive should be configured to positive Y.
This will convert the coordinate axis of the exported data so that the x-axis represents the anteroposterior axis (left/right), the y-axis represents the mediolateral axis (front/back), and the z-axis represents the longitudinal axis (up/down).
Troubleshooting / FAQ
Q: Connected NI-DAQ device is not detected in Motive
A**:**
1) Confirm the NI-DAQ device is detected by the MS Windows system (Devices Manager) and by the NI Device Monitor (task tray) that installs with your NI-DAQ software.
2) If the device is still not detected in Motive even after confirming the connection from the above step, completely uninstall the National Instruments Software drivers and re-install Motive. Make sure to choose 'Yes' to install packaged OptiTrack Peripheral Module and the NI-DAQmx runtime. After installing the drivers, it is essential to restart your computer.
3) After launching Motive, check the Status Log panel (View tab → Status Log) and confirm the following:
a. The Peripheral Device module, or the OptiTrack Peripherals Module (OPM), is loaded by checking the Motive Status Log panel during startup.b. The NI-DAQ device is detected and created.
The Loaded Plugin message indicates the plugin was successfully loaded.
The Plugin Device Registered message indicates the devices is registered in Motive.
The Plugin Device Created message indicates the device is detected and initialized.
4) If the Status Log shows that it failed to load the plugin, make sure the BiomechDevicePlugin.dll is located within the devices folder in Motive's install directory.
Q: I have the NI-DAQmx driver installed for my DAQ device, but they are not the recommended version.
A: This is fine as long as the NI-DAQmx driver version is 15.1.1 or later. If you are experiencing connection difficulties, try uninstalling your current driver and re-installing the driver that ships with Motive.
Q: When installing the device NI-DAQmx driver, I get to a screen that indicates no changes will be made and I can't proceed.
A: This indicates the driver for your device is already installed. Hit cancel to exit the installer, and ensure the driver version is at least 15.1.1 or later. If not, update your driver. You can also re-install the driver that ships with Motive, but make sure the previous install is completely removed before the re-installation.
Q: I can't change the multiplier for my DAQ from the Devices pane in Motive.
A: If the device is configured to use reference clock signals, the option to change the acquisition rate for NI-DAQ devices within Motive will be disabled. Set Reference Clock Sync to False to use the Free Run mode.
Q: Motive warns that the sampling rate is too high for my device.
A: This warning indicates that the sampling may be out of the allowable range for the DAQ device. Some devices share the allowable sample rate across all channels, and each channel takes up a portion of the total allowable sample rate of the device. Other devices have dedicated sample rates for each channel, and the allowable sample rate can be set for each channel in this case. For detailed specification on how your device samples incoming signals, refer to the respective NI-DAQ User's Guide.
Q: The analog input value does not appear to be correct.
A: Ensure that the appropriate channel type is selected. If your signal increases or decreases, with a steady baseline, your ground is not set correctly. See the section on channel types for more information.
Q: In the Device pane, I can't enable my device when checking the box next to it.
A: A device can't be enabled until one of it's channels is made active. Activate at least one channel under the device to enable the device itself. Only the channels that are active, and have the associated device enabled, will be recorded.
Q: No really, my analog input is incorrect.
A: Input channels can be verified using NI's Device Monitor and opening up a configuration session. Within the device monitor, the channel input can be observed. If the observed output is different from what appears in Motive, there may be an issue. This may also be due to aliasing of the sampled signal. Ensure that the signal is captured at the appropriate sampling frequency. A low sampling frequency may inaccurately capture high-frequency signals.
Q: Voltages from one channel seem to affect another channel.
A: Crosstalk or ghosting is a normal occurrence in a digital acquisition device, and can be caused by a variety of sources. For detailed information on crosstalk, and steps you can take to minimize it, please refer to your NI-DAQ documentation. National Instrument also provides some steps on reducing unwanted voltages here: http://digital.ni.com/public.nsf/allkb/B9BCDFD960C06B9186256A37007490CD?OpenDocument.
Q: Motive crashes on startup.
A: When you have Peripheral Devices installed along with Motive, the NI services must be running when you first launch Motive. If these services from National Instruments are disabled, Motive may crash while attempting to load the peripheral device libraries
Q: There are more NI-DAQ samples beyond the last frame of motion capture data at the end of recording.
A: OptiTrack / NI-DAQ integration is not synchronized for recording stop. NI-DAQ reports samples in batches and collects data at a higher sampling rate usually. Thus, there may be a few more NI-DAQ samples reported beyond last frame of the mocap data as shown in the image below.
Was this helpful?

