Autodesk MotionBuilder: OptiTrack Skeleton Plugin
Overview
This page provides instructions on how to use the OptiTrack MotionBuilder Skeleton plugin. This plugin allows you to map Motive 6DOF Skeleton joint angle data directly onto a MotionBuilder character.
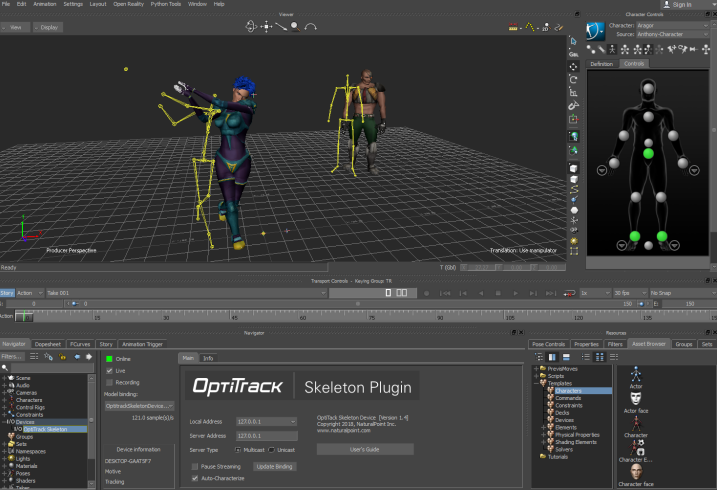
Before following the walkthrough below, please refer to Autodesk MotionBuilder Plugin page for initial steps for setting up motive and downloading the OptiTrack MotionBuilder plugin.
Motive Data Streaming Setup (Server)
First, you'll want to follow the instructions below to set up the data streaming settings in Motive. Once this is configured, Motive will be broadcasting tracking data onto a designated network interface where client applications can receive them.
Streaming Settings
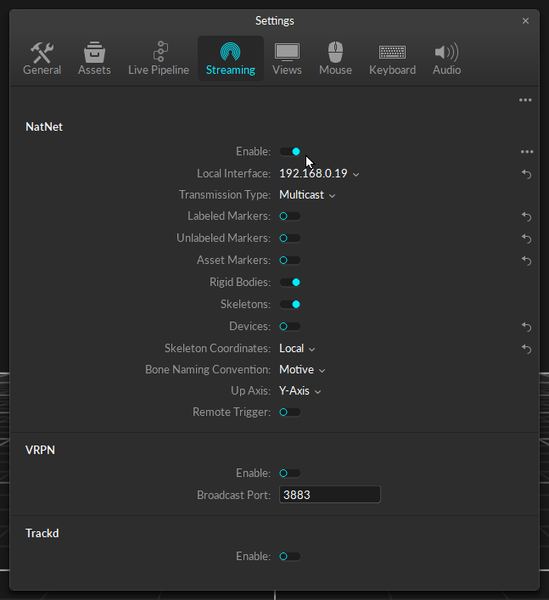
Open the Data Streaming Pane in Motive's Settings window and set the following settings:
Enable - Turn on the Enable setting at the top of the NatNet section.
Local Interface - Choose the desired IP network address from this dropdown to stream data over.
Loopback
This is the local computer IP address (127.0.0.1 or Localhost).
Used for streaming data locally on the PC you are running Motive on that does not interact with the LAN.
Good option for testing network issues.
192.168.0.1x (typical, but may be different depending on which interface is used to establish a LAN connection)
This IP address is the interface of the LAN either by Wi-Fi or Ethernet.
This will be the same address the Client application will use to connect to Motive.
Transmission Type
For streaming over a Wi-Fi network, setting the Transmission Type to Unicast is strongly advised.
Select desired data types to stream under streaming options:
Rigid Bodies - Enabled (required).
Skeletons - Optional for Skeleton tracking.
Markers (Labeled, Unlabled, Asset) - Disabled for HMDs (advised).
Devices - Disabled.
Skeleton Coordinates
Set to Global.
Bone Naming Convention
When streaming Skeletons, set to FBX.
Additional Tips
For best results, it is advised to run Motive and MotionBuilder separately on different computers, so that they are not competing for processing resources.
When streaming the data over a Wi-Fi network, Unicast transmission must be used.
In order to stream data from the Edit mode, a capture-recording must be playing back in Motive.
For additional information on data streaming in general, read through the Data Streaming page.
MotionBuilder Setup (Client)
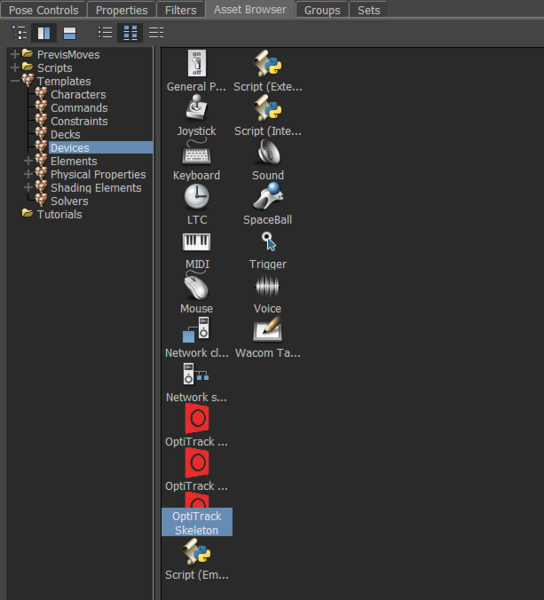
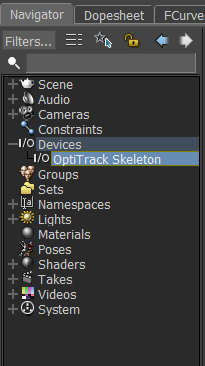
To get started, drag the OptiTrack Skeleton plugin from the Motion Builder Asset Browser tab > Devices into the Viewer window. This will create a dropdown menu called I/O Devices in the Navigator tab. Click the + button next to I/O Devices and select OptiTrack Skeleton. This will populate the plugin's settings tab if it hasn't already auto-populated from the drag and drop step from earlier.
Device Settings
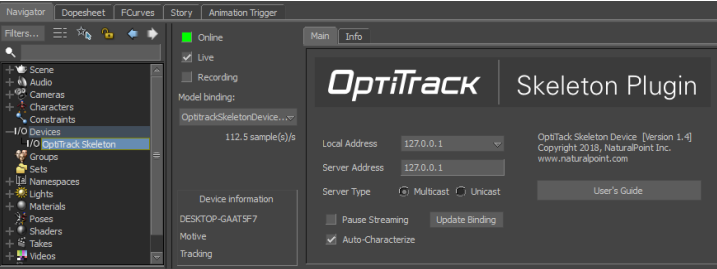
Local address - IP address of the MotionBuilder computer. In situations where multiple network adapter cards are present, select the adapter that is on the same network as the Motive application.
127.0.0.1
This is the local computer IP address (127.0.0.1 or Localhost).
Use this loopback address if Motive is running on the same machine as MotionBuilder.
192.168.0.1x (typical, but may be different depending on which interface is used to establish a LAN connection)
This IP address is the interface of the LAN either by Wi-Fi or Ethernet.
Use this if Motive is running on a different computer, but on the same network as the MotionBuilder computer.
169.xxx.x.xx
This address is assigned when a DHCP server could not be reached.
This address can be ignored for our application.
Server Address - IP address of computer that is running Motive
127.0.0.1
Use this IP when both Motive and MotionBuilder are running on the same computer.
Server Type
Multicast (default) or Unicast
Must match what is selected in the Motive Streaming settings.
Multicast is default and recommended.
Pause Streaming
Pauses the live stream.
Useful when characterizing from a Live T-Pose
Update Bindings
Use to update model bindings when the actively tracked models list in Motive changes.
Only necessary if the plugin has not automatically detected the tracking list change (e.g. if the tracking list change and data was not streaming).
Auto-Characterize
Automatically characterize each generated Skeleton based on the scaled neutral pose of the performer.
It will create a new MotionBuilder character with the same name as the mocap performer/MotionBuilder Skeleton pairing.
Once the above settings are input appropriately, you'll want to click the box next to Online. This indicate whether or not Motive is successfully streaming to MotionBuilder.
Online color indicator
Green - Connected and streaming.
Yellow - Connected but not streaming.
Red - Not connected or streaming.
Live
Indicates to MotionBuilder that data is coming from a live source (checked) or from a recorded take.
Recording
Indicates to MotionBuilder that data from this device should be recorded when MotionBuilder is recording.
Model Binding
The Skeleton Device plugin uses model binding to map Motive Skeleton data to MotionBuilder animation nodes. There can be multiple model binding templates in a MotionBuilder scene. The active model binding is indicated in the model binding combo box on the Device tab.
Automatic Binding Update
The MotionBuilder plugin monitors the tracking model list it is receiving from the server (e.g. Motive). If it detects a change in the tracking model list, it will automatically update the current MotionBuilder Skeleton list to match, creating new Skeletons when necessary, or re-connecting to existing Skeletons where possible, based upon the Skeleton/tracking model name. It will not remove existing MotionBuilder Skeletons.
Manual Binding Update
If the plugin is unable to automatically update the model template, you must update your model binding in the Skeleton Device plugin to a model binding that matches the tracked model. To do this:
[Motive] Change the actively tracked models list by checking/unchecking the desired asset in the Asset pane.
[MotionBuilder Plugin] Press the Update Bindings button on the Skeleton Device tab.
[MotionBuilder Plugin] Select a valid model binding in the Model Binding dropdown.
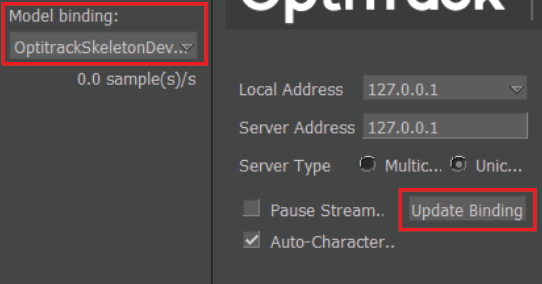
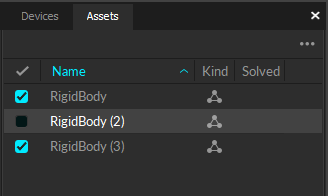
If the active model list in Motive changes, the MotionBuilder Plugin Device Information panel will show Tracking Models Changed and the Info Tab will indicate whether a suitable template was found.
Auto-Characterize
The Auto-Characterize button on the Skeleton Device will automatically characterize each generated Skeleton based on the scaled neutral pose of the performer. It will create a new MotionBuilder character with the same name as the mocap performer/MotionBuilder Skeleton pairing. The advantages of using this approach are:
Does not require Performers to be in T-Pose.
Simplifies the number of steps required to map mocap Skeleton onto your rigged MotionBuilder character.
Can result in improved retargeting results, if performs typically do not present a good T-Pose, since the characterization is on a scale neutral, or ‘zeroed’ pose.
When using Auto-Characterize, you must be streaming from Motive before enabling the OptiTrack Skeleton device for correct pose scale detection. Otherwise, when the auto-characterized Skeleton is used as the input to a target character, the character may incorrectly scale. This does not apply if the target character’s Match Source or Actor Space Compensation is adjusted.
Auto-Characterize is an optional feature and is not required for character retargeting.
Step-By-Step Example
Motive Skeleton Streaming Step-by-step
[Motive]
Configure Motive for Streaming Data
From the Motive Streaming Pane:
Select Enable
Select Bone Naming Convention to FBX. (The plugin device will automatically reconfigure this if not already set to FBX.)
Choose Local Interface IP address from dropdown. If same computer is running both OptiTrack and MotionBuilder use the Loopback option.
Be sure to configure any Firewall software first (either disable or permit MotionBuilder as an exception).
[MoBu]
Create an OptiTrack Skeleton device
In the MotionBuilder Asset Browser Window -> Devices window. You should see:
OptiTrack Skeleton
Within MotionBuilder, drag the OptiTrack Skeleton device into the Navigator(or Viewer) pane. An instance will be created under the Devices node.
[MoBu]
Connect Skeleton Device to Motive
In the Navigator window, select OptiTrack Skeleton from the Devices node
On the OptiTrack Skeleton pane, set the IP address of the OptiTrack server (e.g. Motive).
Click on the 'Online' checkbox - it should change from red to yellow (or green if data from the OptiTrack Server is currently streaming).
[MoBu]
Create a Motive to MoBu Skeleton binding
Click the Live checkbox
Click the Model Binding Combo and select Create New
In the Navigator window, under the Scene node, you should see a new the Skeleton nodes that match the currently tracked Motive Skeletons.
[MoBu]
Begin streaming marker data
From Motive, start live capture or data playback
From MotionBuilder, ensure the Viewer window is active (MotionBuilder will not update otherwise).
The Skeleton(s) should be animating in the MotionBuilder Viewer window.
The MotionBuilder Online check boxes should be green, indicating data is live and actively streaming.
Recording Skeleton Data
The OptiTrack Skeleton device can record optical data to the current MotionBuilder take. Please refer to the Autodesk MotionBuilder: OptiTrack Optical Plugin page for steps on how to record from devices into MotionBuilder.
Playing Back Recorded Data
The OptiTrack Skeleton device can be used show live data or blend live data with a recorded take. Please refer to Playing Back Recorded Data section for steps on how to record from devices into MotionBuilder.
MotionBuilder Skeleton Character Setup QuickStart
One approach to quickly stream Motive Skeletons onto MotionBuilder characters:
[Motive] - Setup a streaming session as outlined above under Motive Setup (Server). Set Data Streaming > Bone Naming Convention > FBX. If this is not set to FBX, the plugin will change this automatically when connected to the server.
[MoBu] - Connect to Motive and create a model binding as described in Step-By-Step above.
[MoBu] - Make sure the Auto-Characterize feature is enabled under the OptiTrack Skeleton Device.
[MoBu] - Import a rigged model. Be sure rigged model is in T-Pose facing +Z.
[MoBu] - Characterize rigged model.
[MoBu] - Rigged Model Character > Input Type > Character
[MoBu] - Rigged Model Character > Input Source > Select a Motive Character from Step 2.
[MoBu] - Rigged Model Character > Check Active. Model should snap to Motive Skeleton position.
Begin streaming/playback from Motive. Rigged model should now animate with Motive Skeleton.
Note for saving into FBX When a MoBu character is associated with a streamed Skeleton and it is set to Active, only the mapped segments of the character will be saved in exported FBX files, and segments that were not mapped will not be saved. In order to fully preserve the character including unassociated segments, uncheck Active (from Step 8) before saving out the FBX file.
Was this helpful?

