OptiTrack Unity Plugin
Overview
The OptiTrack Unity3D Plugin allows you to stream real-time Rigid Body, Skeleton, and HMD tracking data from Motive into Unity. Using the streamed data, objects and characters in the scene can be animated. The plugin contents are distributed in unitypackage format, and you can simply load this file into Unity projects to import its contents. Once imported, included C# scripts can be used for instantiating a client origin and receiving the tracking data. This article focuses on how to set up and use the plugin.
Versions Requirements
Unity 2022 LTS through Unity 6 LTS
Visual Studio 2019 or latest Visual C++ Redistributable
Notes on HMD Integration
The HTC VIVE, VIVE Pro, VIVE Pro 2, Valve Index, and HP Reverb HMDs can be integrated through the OptiTrack OpenVR Driver.
To download the driver, visit the Plug-ins section of the OptiTrack Downloads page.
Motive Setup (Server)
Streaming Setup
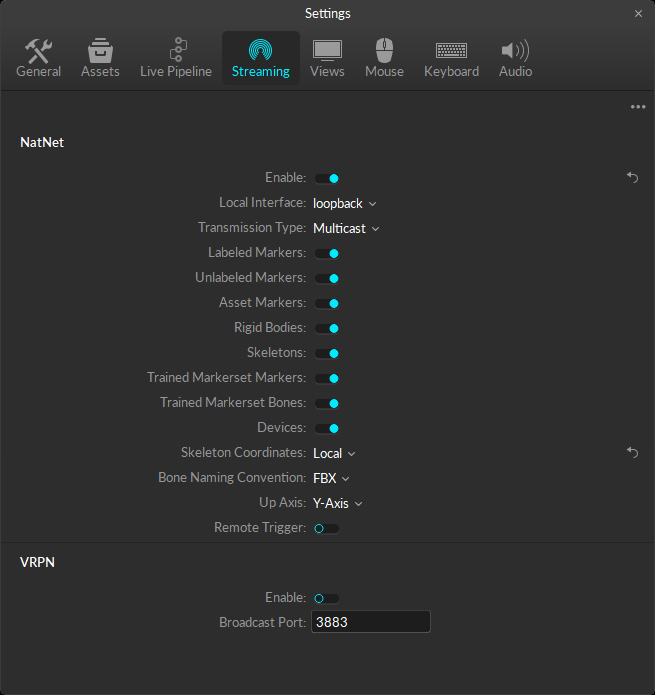
From Motive, tracking data can be streamed in real-time, either from a live capture (Live Mode) or recorded data (Edit Mode). Settings are configured in Application Settings, on the Streaming Settings tab.
Streaming in Motive
Click the ![]() button in the lower right corner of the Control Deck to open the Streaming Settings. Configure the settings below:
button in the lower right corner of the Control Deck to open the Streaming Settings. Configure the settings below:
Enable - Turn on the Enable setting at the top of the NatNet section.
Local Interface - Choose the desired IP network address from this dropdown to stream data over.
Transmission Type
Unicast subscribes only to the data selected and normally uses less network bandwidth. Use this method when only streaming Rigid Bodies and/or Skeletons. This is especially advised if streaming data over WiFi.
Multicast transmission is required when streaming Trained Markersets. This method requires more bandwidth, therefore we recommend enabling only the desired data types. For example, When tracking HMDs, we recommend disabling Marker streaming.
Additional Streaming Tips
To stream data from Edit mode, a capture recording must be playing back in Motive.
We recommend running Motive and Unity on different computers, so the applications are not competing for processing resources.
When streaming the data over a WiFi network, Unicast transmission must be used.
Unity Setup (Client)
Import Plugin Package
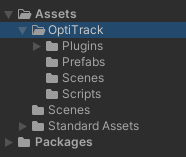
While in the Unity project, double-click on the plugin unitypackage file and import the plugin assets into the project. When the package has been successfully imported, the following contents will be available within the project:
Plugin Contents
Assets/OptiTrack
All of the Unity plugin contents are included in this folder.
Assets/OptiTrack/Scripts
This is the folder that you will mainly use. It contains plugin C# script components that can be imported into Unity objects for receiving streamed data.
Assets/OptiTrack/Plugins
This folder contains the plugin libraries and header files.
Assets/OptiTrack/Prefabs
This is the easiest place to get started. This folder contains premade objects for setting up a streaming client, tracking a Rigid Body, and retargeting a Skeleton.
Assets/OptiTrack/Scenes
This folder contains sample Unity scene that includes pre-configured client, Rigid Body, and Skeleton objects.
Setting Up the Client Object
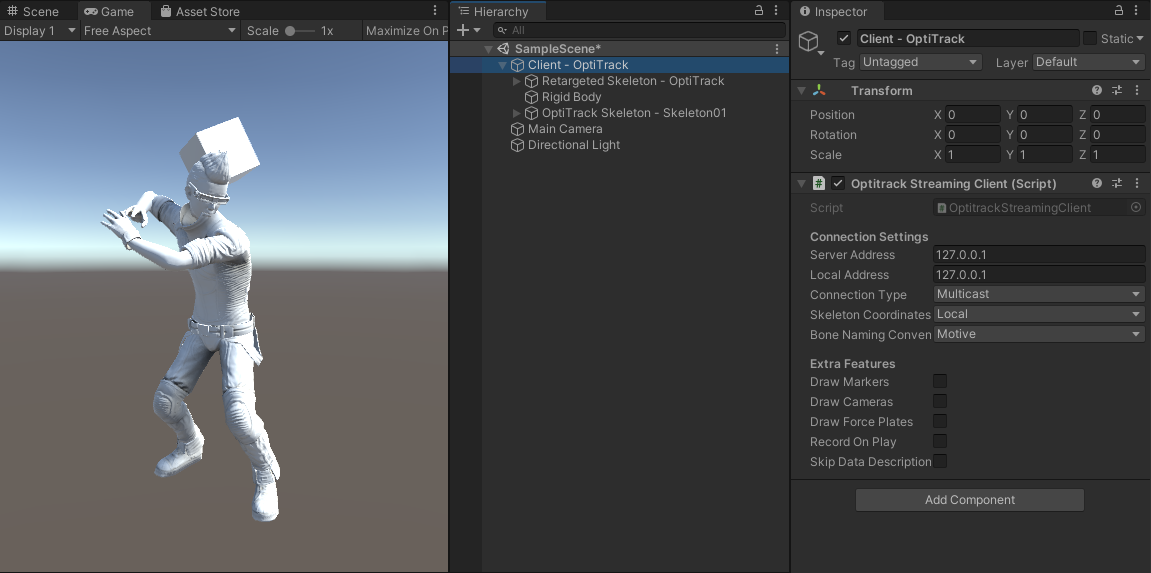
In order to receive tracking data from a server application (e.g. Motive), a client object must be set up. The OptitrackStreamingClient.cs script can be attached to any object to stream data relative to that object. Typically, this script is attached to an empty object or loaded in using the "Client - OptiTrack" prefab object in the Assets/Optitrack/Prefabs folder.
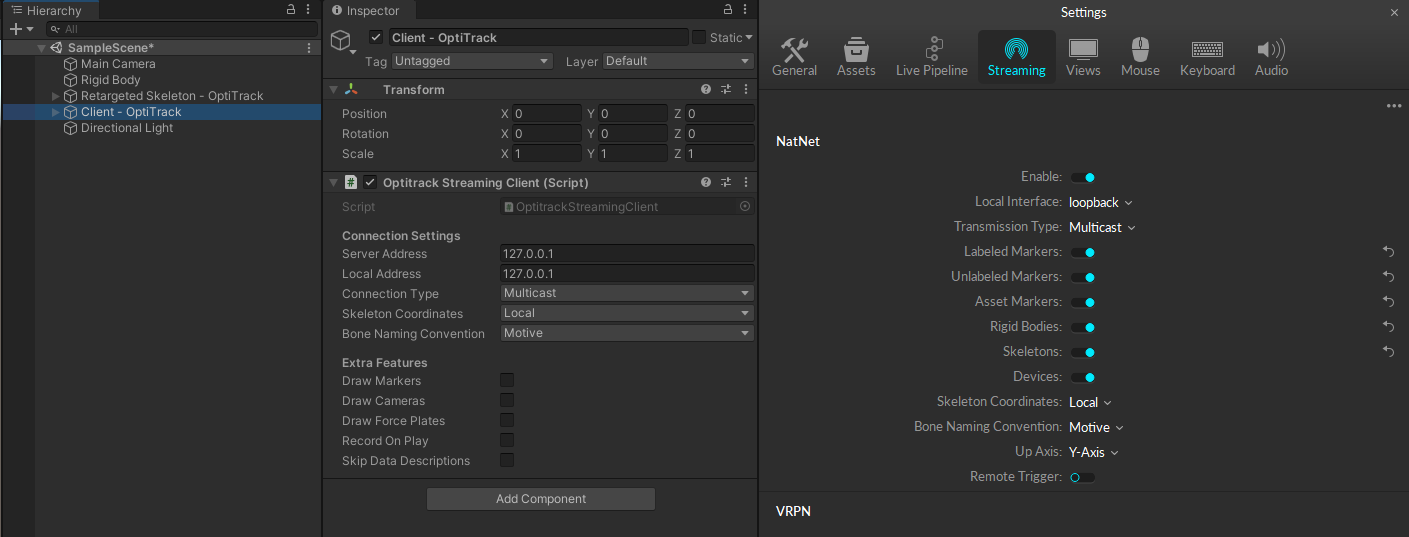
[Motive] In the Streaming Settings, configure the desired connection settings.
[Unity] Under the Prefabs folder, import the "Client - OptiTrack" prefab object into the scene, or attach OptitrackStreamingClient.cs script onto an empty object.
[Unity] In the streaming Client object, configure the connection settings to match the streaming settings in Motive.
Server Address - IP address of the PC that the server application (Motive) is running on.
Local Address - Local IP Address of the PC that the client application (Unity) is running on. (Typically, this looks similar to the Server Address except maybe the last digits.)
Connection Type - Must match Motive. Unicast is recommended.
[Unity] If you wish to receive tracking data from more than one server instances, you may create multiple objects with the client script attached.
Position Data in Unity
Although it is not strictly necessary, you may find it helpful to organize your tracked objects as children of the streaming Client object. This will allow you to adjust the position of the Client object to adjust the position of all streamed objects relative to the Client object.
Animating a Rigid Body
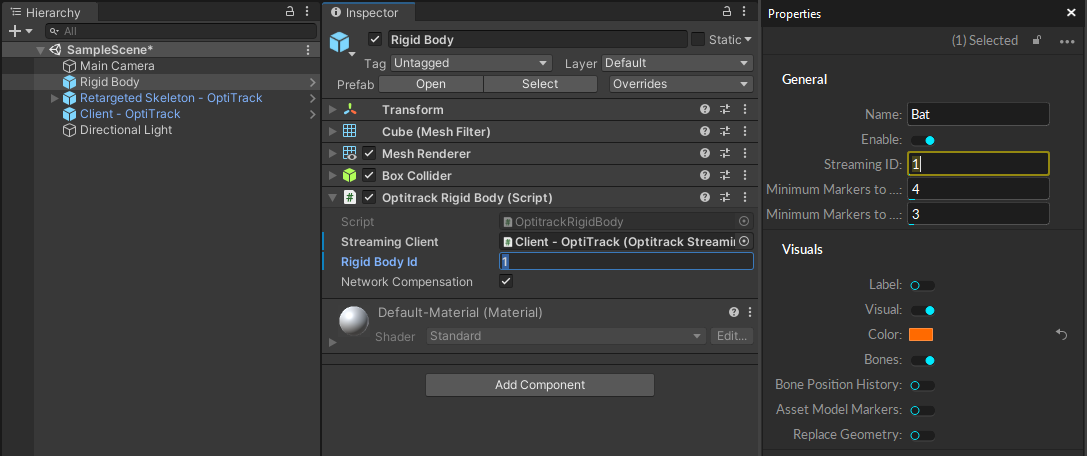
[Unity] On an object that you wish to animate, attach the OpitrackRigidBody.cs script.
[Unity] In the Streaming Client entry, link the Client object in which the OptitrackStreamingClient.cs script is attached. By default, it searches for an existing client instance, but this must be specified when there are more than one streaming client objects.
[Unity] For the Rigid Body ID entry, input the streaming ID of corresponding Rigid Body asset in Motive. The streaming ID can be found, and changed, under the Rigid Body properties.
[Motive] Make sure Motive is tracking and streaming the data.
[Unity] Play the scene. The linked object will be animated according to the associated Rigid Body movement in Motive.
Animating a Skeleton
By integrating with Unity's animation system, Mecanim, the Unity3D plugin allows Motive to stream full body Skeleton data. The Skeleton tracking data from Motive is streamed out as hierarchical bone segment orientations, and this data is fed into the Unity's Mecanim system which allows animating characters with different proportions.
Note: At the time of writing, Mecanim does not support explicit goals for inverse kinematics end-effectors when using real-time retargeting. In addition, you may observe a difference in the overall scale of the position data between the retargeted skeletal animations and streamed Rigid Bodies. These two limitations may lead to inconsistencies with actors interacting with Rigid Body props, and will hopefully be addressed in a future version of the integration.
Steps
[Unity] On Unity characters, attach OptitrackSkeletonAnimator.cs script as one of its components.
[Unity] For the Streaming Client entry, link the Client object in which the OptitrackStreamingClient.cs script is attached. By default, it searches for an existing client instance, but this must be specified when there are more than one streaming client objects.
[Unity] Enter Skeleton Asset Name which is assigned in Motive
[Unity] For the Destination Avatar entry, link to the character's avatar component.
[Motive] Make sure Motive is tracking and streaming the data.
[Unity] Play the scene. When everything is set up properly, the linked avatar in Unity will be animated according to the streamed Skeleton in Motive. The position of the actor will be in its reference position as explained above.

Animating a Trained Markerset
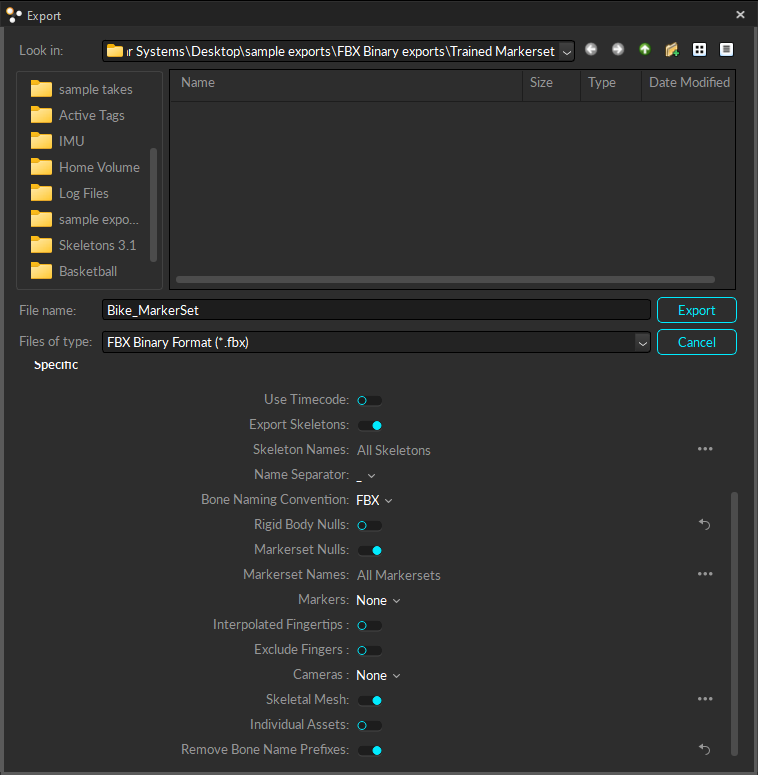
[Motive] Export the asset using the FBX Binary format, with the following settings:
Export Skeletons is Enabled
Bone Naming Convention is set to FBX
Markerset Nulls is Enabled
Skeletal Mesh is Enabled
Remove Bone Naming Prefix is Enabled
Make note of the asset name in Motive to ensure the same name is used for the asset after it's imported into Unity.
[Motive] On the Streaming tab of the Settings panel, set the following properties:
Transmission type is set to Multicast
Skeleton Coordinates is set to Local
Trained Markersets have their own bone naming convention and are not affected by the Bone Naming Convention setting on the Streaming tab.
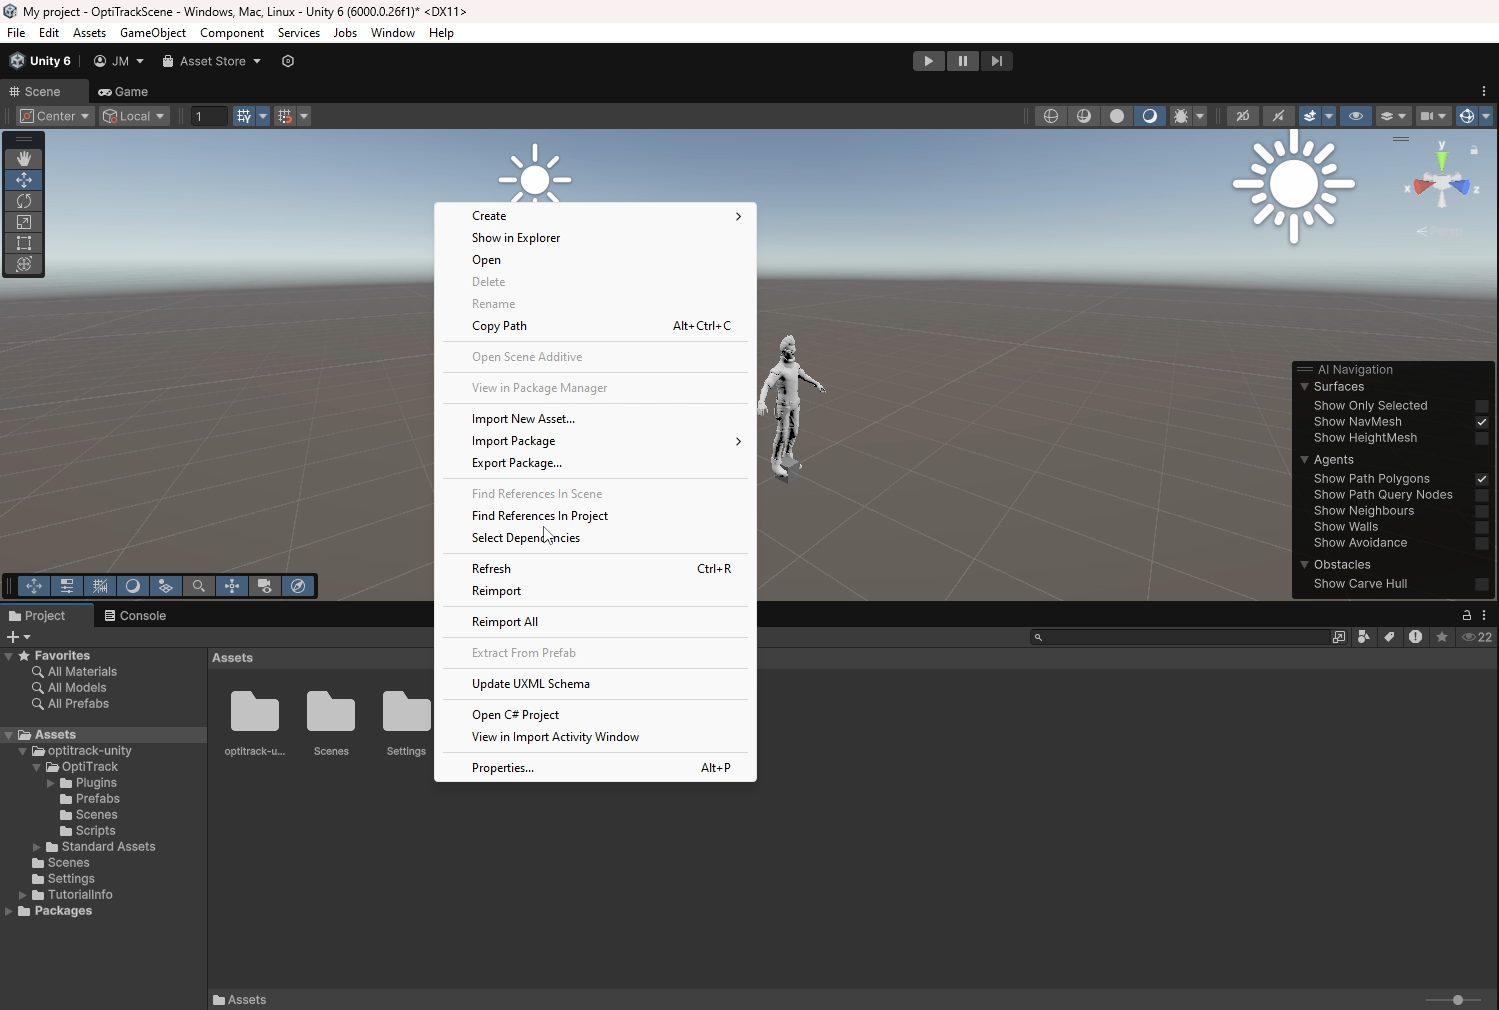
[Unity] Select Assets in the Project tab then right-click in the Assets pane and select Import New Asset... from the context menu. Import the Asset exported in step 1.
[Unity] Drag the newly imported asset into the scene. In the Hierarchy tab, drag the asset to nest under the Origin for the Scene.
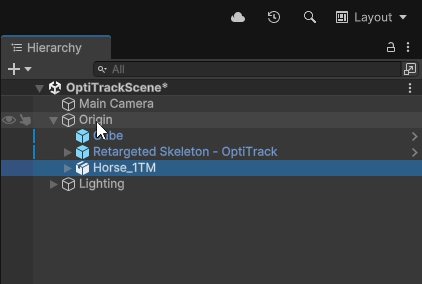
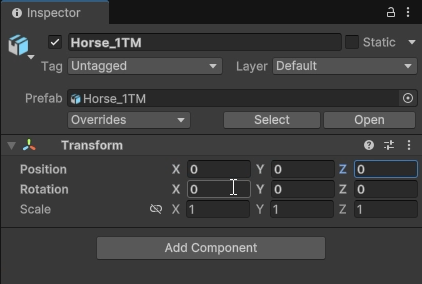
[Unity] Select the imported asset from the Hierarchy tab. In the Transform section of the Inspector tab, zero out the position and rotation values to place the asset at the local origin.
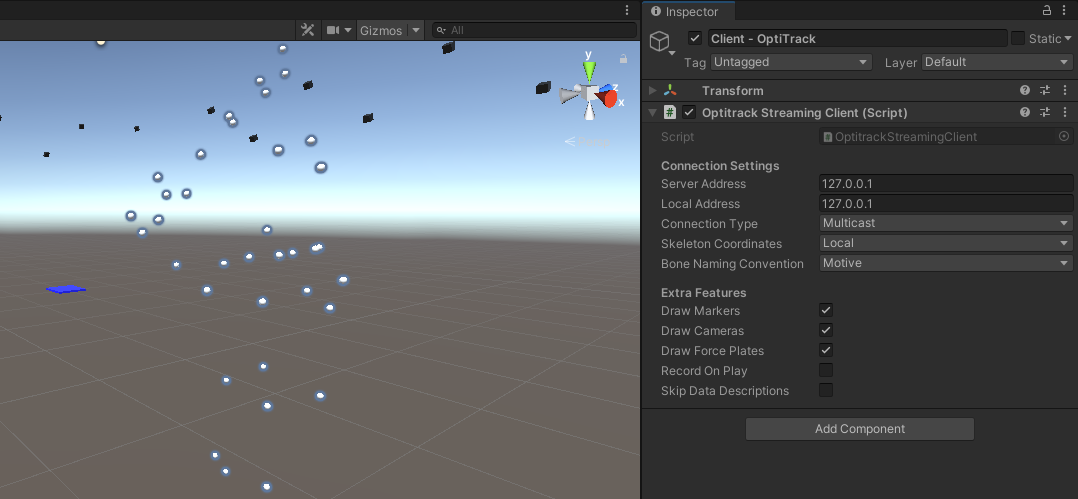
[Unity] Select the origin from the Hierarchy tab. The OptiTrack Streaming Client (Script) section will appear in the Inspector tab. Ensure the following properties are set:
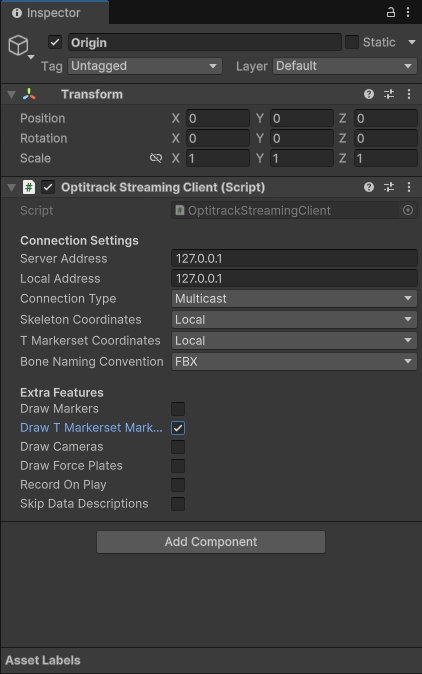
Server Address is set to the IP address for the Motive PC. Use 127.0.0.1 for loopback transmission.
Local Address is set to the IP address for the Unity PC. Use 127.0.0.1 for loopback transmission.
Connection type is Multicast.
Skeleton and T Markerset Coordinates are both set to Local.
Bone Naming Convention is set to FBX by default. This setting does not apply to trained markerset assets.
Draw T Markerset Markers is checked (enabled).
Trained Markerset will not stream into Unity in unicast or using global coordinates.
[Motive] Ensure that NatNet streaming is enabled.
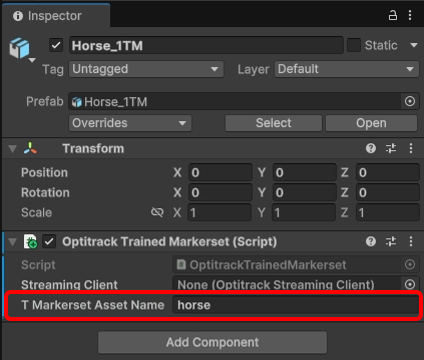
[Unity] With the asset selected in the Hierarchy tab, click the Add Component button in the Inspector tab. Search for OptiTrack, then select OptiTrack Trained Markerset from the list of available options.
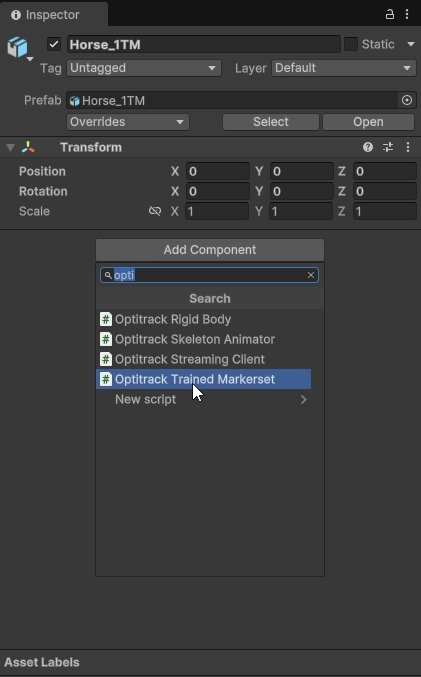
[Unity] In the T Markerset Asset Name field, rename the imported asset to match the name in Motive.
Unity does not include a simple method for retargeting trained markersets. Many Unity users perform retargeting functions using third-party applications.
Animating Markers, Etc.
[Unity] On the OptiTrack Streaming instance, enable the Draw Markers, "Draw Cameras", or "Draw Force Plates" setting(s).
[Motive] Make sure that marker streaming is enabled in Motive if you wish to visualize markers.
[Unity] Make sure the streaming setting is set up correctly, and play the scene.
[Unity] Each marker, camera, or force plate will be drawn in the scene, as shown in the screenshot below. (Note: Only markers will animate.)\
Integrating HMDs
OptiTrack motion capture systems can be used to track head mounted displays (HMD) and integrate the tracking data into Unity for unique VR applications. For instructions on integrating HMD tracking data into Unreal Engine, please refer to the corresponding page Unity: HMD Setup.
Supported HMDs
At the time of writing, the following HMDs are supported:
HTC VIVE
HTC VIVE Pro
HTC VIVE Pro 2
Valve Index
HP Reverb
Wireless Multiplayer Setup
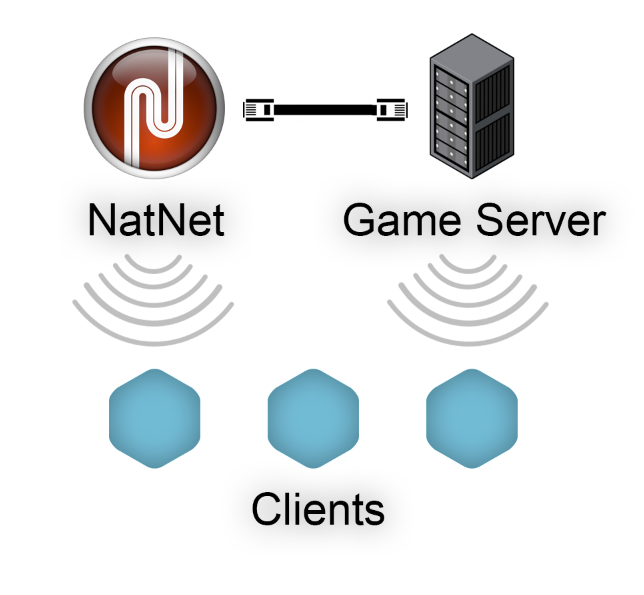
When setting up multiplayer games with wireless clients, it is more beneficial for each client to make direct connection to both the tracking-server (Motive) and the game-server, rather than rebroadcasting the streamed tracking data through the game-server. Then, any of the game related actions that interacts with the tracking data can be processed on the game-server, and this server can send out the corresponding updates to the wireless clients. This allows the wireless clients to only receive both the tracking data or updates without having to send back any information; in other words, minimizing the number of data transfers needed. If wireless clients are sending data there will be a minimum of two transfers on the wireless network, and each transfer of data through wireless network is at risk of latency or lost packets.
Was this helpful?

