LogoLogo
WebsiteSupportDownloadsForumsQuick LinksContact Us
v3.3
v3.3
  • OptiTrack Documentation
  • WHAT'S NEW
    • What's New in Motive 3.3
  • QUICK START GUIDES
    • Quick Start Guide: Getting Started
    • Quick Start Guide: Prime Color Camera Setup
    • Quick Start Guide: Precision Capture
    • Quick Start Guide: Tutorial Videos
    • Quick Start Guide: Active Marker Tracking
    • Quick Start Guide: Outdoor Tracking Setup
  • HARDWARE
    • Cameras
      • Ethernet Cameras
        • PrimeX 120
        • PrimeX 41
        • PrimeX 22
        • PrimeX 13
        • PrimeX 13W
        • SlimX 13
        • Prime Color
        • VersaX 22
        • VersaX 41
        • VersaX 120
      • USB Cameras
        • Slim 3U
        • Flex 13
        • Flex 3
        • V120:Duo
        • V120:Trio
        • Adjusting Global Origin for Tracking Bars
    • Prepare Setup Area
    • Camera Mount Structures
    • Camera Placement
    • Ethernet Camera Network Setup
      • General Overview and Specs
      • Windows 10 Network Settings
      • Cabling and Load Balancing
      • Switch Configuration for PrimeX 120
      • NETGEAR ProSafe GSM7228S: Disabling the Broadcast Storm Control
      • White/Blacklisting Cameras
    • USB Camera System Setup
      • USB Camera Network Overview and Specs
      • V120:Duo and Trio Setup
      • Tracking Bar Coordinate System
        • Transforming Coordinate System: Global to Local
    • Aiming and Focusing
    • Camera Status Indicators
  • MOTIVE
    • Installation and License Activation
    • Motive Basics
    • Calibration
      • .mcal XML Calibration Files
      • Continuous Calibration
      • Continuous Calibration (Info Pane)
      • Calibration Squares
    • Markers
    • Assets
      • Gizmo Tool: Translate, Rotate, and Scale
    • Rigid Body Tracking
      • Aligning Rigid Body Pivot Point with a Replicated 3D Model
    • Skeleton Tracking
    • Trained Markersets
    • IMU Sensor Fusion
    • Data Recording
      • Data Types
    • Labeling
    • Data Editing
    • Data Export
      • Data Export: BVH
      • Data Export: C3D
      • Data Export: CSV
      • Data Export: FBX
      • Data Export: TRC
    • Data Streaming
    • Camera Video Types
    • Audio Recording
    • Motive HotKeys
    • Measurement Probe Kit Guide
    • Motive Batch Processor
    • Reconstruction and 2D Mode
  • MOTIVE UI PANES
    • Settings
      • Settings: General
      • Settings: Assets
      • Settings: Live Pipeline
      • Settings: Streaming
      • Settings: Views
      • Settings: Mouse and Keyboard
      • Settings: Audio
    • Assets Pane
    • Builder Pane
    • Constraints Pane
      • Constraints XML Files
    • Calibration Pane
    • Data Pane
    • Devices Pane
    • Edit Tools Pane
    • Graph View Pane
    • Info Pane
    • Labels Pane
    • Log Pane
    • Probe Pane
    • Properties Pane
      • Properties Pane: Camera
      • Properties Pane: Force Plates
      • Properties Pane: NI-DAQ
      • Properties Pane: OptiHub2
      • Properties Pane: Rigid Body
      • Properties Pane: Skeleton
      • Properties Pane: Take
      • Properties Pane: Trained Markerset
      • Properties Pane: eSync2
    • Status Panel
    • Toolbar/Command Bar
    • Control Deck
    • Viewport
  • PLUGINS
    • OptiTrack Blender Plugin
      • OptiTrack Blender Plugin
    • OptiTrack Unreal Engine Plugin
      • Unreal Engine: OptiTrack Live Link Plugin
        • Quick Start Guide: Real-Time Retargeting in Unreal Engine with Live Link Content
        • Unreal Editor for Fortnite (UEFN): OptiTrack Plugin for Live Link Hub
        • Unreal Engine: Live Link Camera Stream Setup
        • Live Link Content: Active Puck Static Meshes
      • Unreal Engine: MotionBuilder Workflow
      • Unreal Engine: HMD Setup
      • Unreal Engine VCS Inputs
    • OptiTrack Unity Plugin
      • Unity: HMD Setup
    • OptiTrack OpenVR Driver
    • OptiTrack MATLAB Plugin
    • Autodesk Maya
      • Autodesk Maya: OptiTrack Insight VCS Plugin
    • Autodesk MotionBuilder
      • Autodesk MotionBuilder Plugin
      • Autodesk MotionBuilder: OptiTrack Skeleton Plugin
      • Autodesk MotionBuilder: OptiTrack Optical Plugin
      • Autodesk MotionBuilder: OptiTrack Insight VCS Plugin
      • Autodesk MotionBuilder: Timecode Data
    • OptiTrack Peripheral API
    • External Plugins
      • Houdini 19 Integration
  • ACTIVE COMPONENTS
    • Active Components Hardware
      • Active Puck
      • Wired AnchorPuck
      • CinePuck
      • Wired CinePuck
      • BaseStation
      • Information for Assembling the Active Tags
      • Manus Glove Setup
    • Configuration
      • Active Batch Programmer
      • Active Hardware Configuration: PuTTY
      • Active Component Firmware Compatibility
    • Active Marker Tracking
      • Active Finger Marker Set
  • SYNCHRONIZATION
    • Synchronization Hardware
      • External Device Sync Guide: eSync 2
      • External Device Sync Guide: OptiHub2
    • Synchronization Setup
    • OptiTrack Timecode
  • VIRTUAL PRODUCTION
    • Unreal Engine: OptiTrack InCamera VFX
    • Entertainment Marker Sets
    • PrimeX 41
  • MOVEMENT SCIENCES
    • Movement Sciences Hardware
      • General Motive Force Plate Setup
      • AMTI Force Plate Setup
      • Bertec Force Plate Setup
      • Kistler Force Plate Setup
      • Delsys EMG Setup
      • NI-DAQ Setup
      • Multiple Device Setup
    • Movement Sciences Marker Sets
      • Biomechanics Marker Sets
      • Biomech (57)
      • Rizzoli Marker Sets
    • For Visual3D Users
    • Prime Color Camera Setup
      • Prime Color Setup: Required Components
      • Prime Color Setup: Hardware Setup
      • Prime Color Camera Setup: Camera Settings
      • Prime Color Camera Setup: Prime Color FS Calibration
      • Prime Color Setup: Data Recording / Export
      • Prime Color Camera Setup: FAQ / Troubleshooting
      • Prime Color Camera Setup: Windows Network Settings
  • VIRTUAL REALITY
    • VR Plugins
      • VR Unreal Engine
        • OptiTrack Unreal Engine Plugin
        • Unreal Engine: OptiTrack Live Link Plugin
          • UE5.1 Live Link Retarget External Workaround
        • Unreal Engine VCS Inputs
      • VR Unity
        • OptiTrack Unity Plugin
      • VR OpenVR
        • OptiTrack OpenVR Driver
    • VR HMD Setup
      • Unreal Engine: HMD Setup
      • Unity: HMD Setup
      • Manually Calibrating the HMD Pivot Point
      • Sync Configuration with an HTC Vive System
    • SlimX 13
    • Active Marker Tracking
      • Active Finger Marker Set
    • Synchronization Hardware
      • External Device Sync Guide: eSync 2
      • External Device Sync Guide: OptiHub2
  • ANIMATION
    • Autodesk Maya
      • Autodesk Maya: OptiTrack Insight VCS Plugin
    • Autodesk MotionBuilder
      • Autodesk MotionBuilder Plugin
      • Autodesk MotionBuilder: OptiTrack Skeleton Plugin
      • Autodesk MotionBuilder: OptiTrack Optical Plugin
      • Autodesk MotionBuilder: OptiTrack Insight VCS Plugin
      • Autodesk MotionBuilder: Timecode Data
  • ROBOTICS
    • MoCap4ROS2 Setup
    • OptiTrack Robot Applications
    • Outdoor Tracking Setup
  • DEVELOPER TOOLS
    • Developer Tools Overview
    • Camera SDK
      • Class: cCameraModule
      • Class: cUID
    • Motive API
      • Motive API: Quick Start Guide
      • Motive API Overview
      • Motive API: Function Reference
      • Motive API Camera Calibration
    • NatNet SDK
      • NatNet 4.1
      • NatNet: Class/Function Reference
      • NatNet: Creating a Managed (C sharp) Client Application
      • NatNet: Creating a Native (C++) Client Application
      • NatNet: Data Types
      • NatNet: Matlab Wrapper
      • NatNet: Migration to NatNet 3.0 libraries
      • NatNet: Remote Requests/Commands
      • NatNet: Sample Projects
      • NatNet: Unicast Data Subscription Commands
      • Latency Measurements
    • VRPN Sample
    • Peripheral API: Glove Devices
  • SKELETON MARKER SETS
    • Full Body
      • Baseline (41)
      • Core (50)
      • Biomech (57)
      • Conventional (39)
    • Full Body + Fingers
      • Baseline + Passive Fingers (49)
      • Baseline + Active Fingers (57)
      • Core + Passive Fingers (54)
      • Core + Active Fingers (62)
    • Upper
      • Baseline Upper (25)
      • Conventional Upper (27)
    • Lower
      • Baseline Lower (20)
      • Helen Hayes Lower (19)
      • Conventional Lower (16)
    • Hand and Fingers
      • Left/Right Hand (4) Active
      • Left/Right Hand (10) Active + Passive
      • Active Finger Marker Set
    • Glove Device Setup
      • Manus Glove Setup
      • StretchSense Glove Setup
    • Rizzoli Marker Sets
    • Entertainment Marker Sets
    • Rigid Body Skeleton Marker Set
  • GENERAL TROUBLESHOOTING
    • Licensing Troubleshooting
    • Windows 11 Optimization for Realtime Applications
    • Network Troubleshooting
    • Troubleshooting Q&A
    • Running Motive on High DPI Displays
    • Firewall Settings
Powered by GitBook
On this page
  • Overview
  • Export Log
  • Clear Log
  • Status Messages
  • Informational Messages
  • Error Messages
  • Critical Messages

Was this helpful?

Export as PDF
  1. MOTIVE UI PANES

Log Pane

PreviousLabels PaneNextProbe Pane

Was this helpful?

Overview

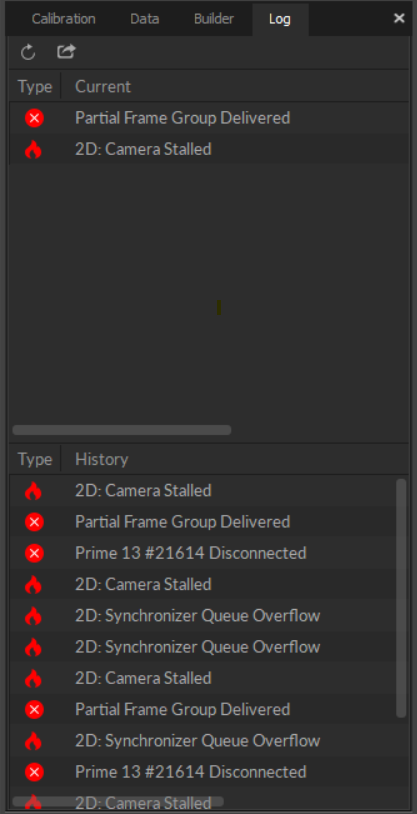
The status Log pane displays important events or statuses of the camera system operation. Events that are actively occurring are shown under the Current section, with all of the logged events saved in the History section for the record.

Open the status Log pane from the or by clicking the icon on the main toolbar.

Export Log

Clear Log

Status Messages
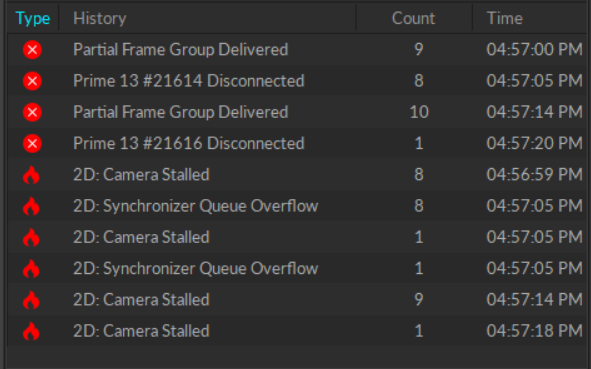
Status messages are categorized into five categories: Informational, Warning, Error, Critical, and Debugging. Logged status messages in the history list display in chronological order by default. The log history can be sorted by any field by clicking the column header. The sorted column is indicated with a cyan header.

Symbol Convention

Informational Messages


Device already added

Peripheral Devices: Attempting to add a device with an already existing serial number.

Troubleshooting steps: Check hardware configuration and make sure all is setup correctly.


Device factory count mismatch

Peripheral Devices: Device reported a different number of attached devices than were created.

Troubleshooting steps:

  • Check hardware configuration and make sure all is setup correctly.

  • Contact support for the affected peripheral device (e.g., AMTI force plate).


Error resolving entry point

Peripheral Devices: Plugin does not contain the required creation functions.

Troubleshooting steps: Try reinstalling peripheral DLLs and plugins.


Error: no active channels

Peripheral Devices: Unable to start plugin device because there are no active channels enabled on the device.

Troubleshooting steps: Contact support for the affected peripheral device (e.g., AMTI force plate).


Error: no devices enabled

Peripheral Devices: Unable to start collecting from plugin devices. Devices are present but not enabled.

Troubleshooting steps: Check hardware configuration and make sure all is setup correctly.


Error: no devices.

Peripheral Devices: Motive attempted to start device collecting but the previously available device(s) are no longer present.

Troubleshooting steps: Check hardware configuration and make sure all is setup correctly.


Hotplug Remove Device Serial : { Serial# }

Peripheral Devices: A plugin device with the specified serial number was removed or is no longer responding.

Troubleshooting steps: Check hardware configuration and make sure all is setup correctly.


Loaded Plugin : { File Name }

Peripheral Devices: Plugin DLL {File Name} has been loaded.

Troubleshooting steps: Informational only. No troubleshooting required.


No plugins loaded

Peripheral Devices: No plugin devices were loaded.

Troubleshooting steps: Check hardware configuration and make sure all is setup correctly.


Plugin Device Created : { Device Name }

The plugin device object for an external device (e.g., force plate or NIDAQ) has been successfully created.

Troubleshooting steps: Informational only. No troubleshooting required.


Plugin Device Registered : { Device Name }

The plugin device has been registered in Motive.

Troubleshooting steps: Informational only. No troubleshooting required.


Remove Device { Device Name }

Peripheral Devices: The specific device was removed.

Troubleshooting steps: Informational only. No troubleshooting required.


The selected device has no enabled channels. Please enable at least one channel first.

Peripheral Devices: The peripheral device requires manual channel enabling before recording.

Troubleshooting steps:

  • Check Ni-DAQ channels and make sure they are enabled.

  • Make sure connections to the NI-DAQ are correct.


Unable to add device

Peripheral Devices: A Plugin device was detected, but Motive was unable to add it.

Troubleshooting steps: Check hardware configuration and make sure all is setup correctly.


Error Messages


[Load Plugins] Unable to find exported function

Peripheral Devices: The peripheral device manager was unable to find a required function in the device plugin dll.

Troubleshooting steps:

  • Check that the plugin was installed correctly.

  • Test on another machine.


[Load Plugins] Unable to load dll

Peripheral Devices: The peripheral device manager was unable to find a required function in the device plugin dll.

Troubleshooting steps: Make sure the device plugin peripheral DLL was installed during Motive installation.


[Unload Plugin] Error occurred unloading plugin

Peripheral Devices: The peripheral device manager encountered an error when unloading a the device plugin dll.

Troubleshooting steps: Contact Support for further troubleshooting.


[Unload Plugin] Error resolving unload entry point

Peripheral Devices: The peripheral device manager was unable to find the unload function from the plugin device dll.

Troubleshooting steps: Contact Support for further troubleshooting.


[Unload Plugin] Unable to unload plugin

Peripheral Devices: The peripheral device manager was unable to unload the plugin device dll.

Troubleshooting steps: Contact Support for further troubleshooting.


{ Device } Disconnected

Camera System: A mocap camera or other OptiTrack device (e.g., an eSync) was disconnected from the system.

Troubleshooting steps:

  • Try replacing the cable or device if possible;

  • Connect to another port on switch or PC;

  • Try connecting the device (e.g., an eSync) directly to the aggregator switch and auxiliary power;

  • Make sure the correct power adapter is being used.


Dropped Frame

Camera System: A mocap camera dropped a frame of data, either because of incomplete packet delivery, buffer overflow, or it was not able to provide the frame in the time required to be part of the current frame group.

Troubleshooting steps:

  • General networking troubleshooting;

  • Check if PC specs are sufficient for system;

  • Check if Windows background processes are causing any interruption;

  • Monitor system performance using the Windows Task Manager;

  • Validate if the dropped frame was in 2D or 3D. Data can be reconstructed in Edit mode unless 2D data is missing.


ERROR: failed to stop { Device }

Peripheral Devices: The peripheral device manager encountered an error while attempting to stop a peripheral device.

Troubleshooting steps: Check hardware configuration and make sure all is setup correctly.


Partial Frame Group Delivered

Camera System: the delivered frame group is missing a frame from one or more cameras.

Troubleshooting steps:

  • General network troubleshooting;

  • Identify if there is a faulty camera;

  • Disable any managed features on the switch.


There was an attempt to synchronize a peripheral device to an eSync device that is not currently present

Peripheral Devices: Devices was set to hardware sync, but no eSync was present.

Troubleshooting steps: Check hardware configuration and make sure all is setup correctly.


Unable to restart device after configuration update [ Error : { Device Name } ]

Peripheral Devices : Device did not restart after configuration.

Troubleshooting steps: Check hardware configuration and make sure all is setup correctly.


Unable to start { Device }

Peripheral Devices : Unable to start peripheral device collecting.

Troubleshooting steps: Check hardware configuration and make sure all is setup correctly.


Critical Messages


Out Of Band FrameID

Camera System: A specified camera's current frame ID is more than the default buffer size's (100 by default) frames difference from the group.

Troubleshooting steps: General networking troubleshooting.


Synchronizer Queue Overflow

Camera System: The camera frame group synchronizer's queue is full and is unable to add a new frame group to the queue, so it is delivering a partial frame group instead.

Troubleshooting steps: General networking troubleshooting.


Missing synchronization telemetry

Camera System: The eSync dropped a frame of telemetry data.

Troubleshooting steps:

  • Check that eSync settings are correct for the setup;

  • Confirm that the eSync is plugged in correctly;

  • Verify sync source signal is strong and the volume is up.


Out Of Order Frame Group

Camera System: The current camera frame group is older than the previous camera frame group (out of order).

Troubleshooting steps: Contact Support for further troubleshooting.


In general, when there are no errors in the system operation, the Current section of the log will remain free of warning, error, or critical messages. Occasionally during system operations, the error/warning messages (e.g., Dropped Frame, Discontinuous Frame ID) may pop-up momentarily and disappear afterward. This could occur when Motive is changing its configuration, for example, when switching between Live and Edit modes or when re-configuring the synchronization settings. This is a common behavior and does not necessarily indicate system errors as long as the messages do not persist in the Current section. If the error message persists under the Current section or there is an excessive number of events, there may be an issue with the system operation.

To export the log history to a text file, click the button at the top left of the log pane. Open the file in Notepad or the text editor of your choice. The file can also be opened in Excel.

To reset the log history, click the button in the upper left corner of the log pane.

: Informational

: Warning

: Error

: Critical

: Debugging

Informational messages are noted with the icon.

Error messages are noted with the icon.

Critical messages are noted with either the or the icon.

View menu
Status messages indicating a disconnected camera.
Sample log file export.
The status log panel, sorted by message type.
Sample of a log file exported to a text file.