Autodesk Maya: OptiTrack Insight VCS Plugin
Overview
The Insight VCS: Maya plugin is an Autodesk® Maya® plugin designed for live virtual camera work directly within the Maya® environment.
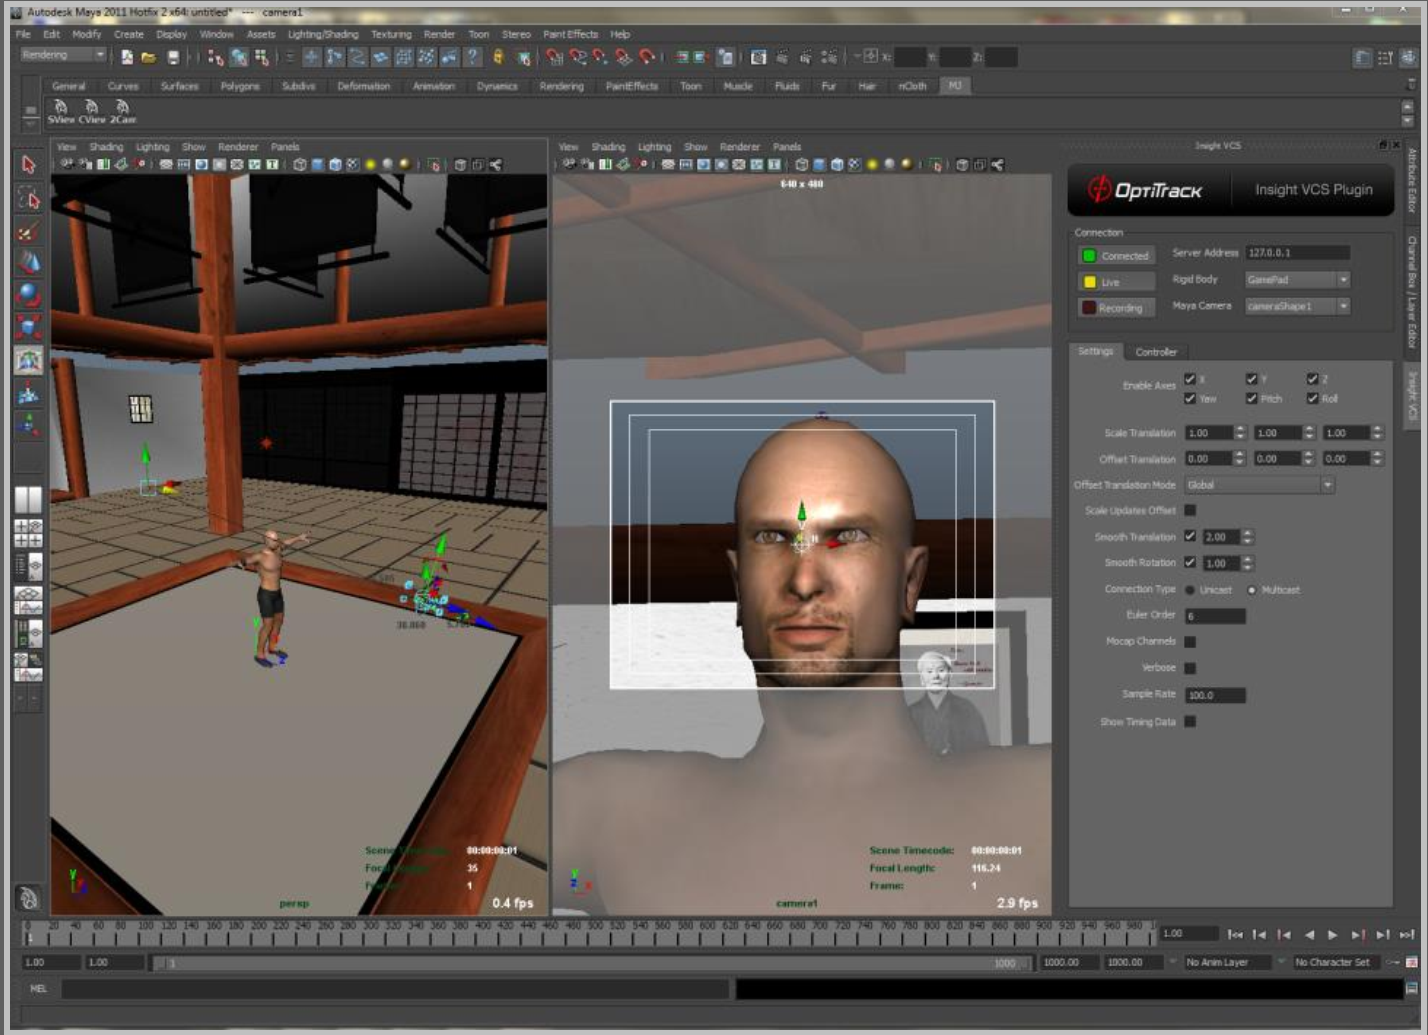
The Insight VCS plugin works in conjunction with Motive and the Insight VCS Controllers to provide real-time 6 DOF camera position, orientation, and virtual camera controls, including:
Insight VCS Features
Pan / Dolly / Boom
Use VCS controls to Pan Left/Right and Up/Down. Pan in local, world, or a combination of coordinate systems. Adjust pan speeds on the fly with controls or scripts.
Pitch / Tilt / Roll
Absolute orientation at all times from the OptiTrack optical system
Free Move
Absolute position at all times from the OptiTrack optical system. Scale movement in real-time with controllers or from script.
Zoom
Fully control camera zoom / FOV and zoom rates using the controller's analog thumbsticks and speed adjusters.
Smooth
Advanced kalman filtering allows for customizing a "steadicam" feeling.
Play / Record
Control common actions like recording and playback using the controller.
Custom Commands
Customize the controller by mapping controller inputs to execute scripts for complete control and on-person camera operation.
Installation and Licensing
Supported Platforms
The Insight VCS Plugin for Maya works on the following platforms:
Autodesk Maya 2011®, 32-bit for Microsoft Windows®.
Autodesk Maya 2011®, 64-bit for Microsoft Windows®.
Autodesk Maya 2014®, 64-bit for Microsoft Windows®.
Autodesk Maya 2015®, 64-bit for Microsoft Windows®.
Autodesk Maya 2016®, 64-bit for Microsoft Windows®.
Autodesk Maya 2017®, 64-bit for Microsoft Windows®.
Autodesk Maya 2018®, 64-bit for Microsoft Windows®.
Installation
[Maya] - Load plugin - Maya -> Window -> Settings/Preferences -> Plugin-In Manager -> InsightVCS -> Check
[Maya] - Start plugin - Maya -> Window -> InsightVCS
Licensing
The VCS:Maya plugin requires a valid Insight VCS:Maya license to run. This license is managed by your OptiTrack server application (Motive) and should be installed in the same license folder as that application.
Please refer to your order confirmation and/or Quick Start Guide for specific licensing instructions. Additional information on licensing can be found in our Licensing and Activation FAQ.
Using the Insight VCS: Maya Plugin
The following steps outline the basic process for virtual camera work using the Insight VCS plugin within Maya®:
Load a Maya scene
Create any Maya cameras that will be controlled by the Insight VCS
Connect to an OptiTrack data server for 6-DOF data
Select or create a "Controller Profile", which controls how buttons and axes on the tracking controller are used
Start laying down camera moves!
Connecting to Motive [Server]
Refer to the following step-by-step for bringing live mocap data in from an OptiTrack Motion Capture server application, Motive.
Connecting to the Mocap Data : Step-by-Step
[Motive]
Create a Rigid Body from you tracking controller's markers.
Be sure to orient your tracking controller down the -Z axis. This will be the camera's "Neutral" position.
For more information regarding streaming in Motive, please visit the Data Streaming wiki article.
Open the Data Streaming Pane in Motive's Settings window and set the following settings:
Enable - Turn on the Enable setting at the top of the NatNet section.
Local Interface - Choose the desired IP network address from this dropdown to stream data over.
Loopback
This is the local computer IP address (127.0.0.1 or Localhost).
Used for streaming data locally on the PC you are running Motive on that does not interact with the LAN.
Good option for testing network issues.
192.168.0.1x (typical, but may be different depending on which interface is used to establish a LAN connection)
This IP address is the interface of the LAN either by Wi-Fi or Ethernet.
This will be the same address the Client application will use to connect to Motive.
Transmission Type
For streaming over a Wi-Fi network, setting the Transmission Type to Unicast is strongly advised.
Select desired data types to stream under streaming options:
Rigid Bodies - Enabled (required).
Skeletons - Optional for Skeleton tracking.
Markers (Labeled, Unlabled, Asset) - Disabled for HMDs (advised).
Devices - Disabled.
Skeleton Coordinates
Set to Local.
Bone Naming Convention
Set the appropriate bone naming convention for the client application. For example, if the character uses the FBX naming convention, this will need to be set to FBX.
[Maya]
Open the Insight VCS Plugin panel by selecting Window -> Insight VCS from the Maya main menu.
[Insight VCS Panel]
Set the IP address to match Motive's (i.e. 127.0.0.1 if running Motive and Maya on the same machine) using the Server Address Edit Box.
Click the Connected Button. If a connection was made, the green indicator light on this button will change to bright green.
Select the mocap source object from the Rigid Body Dropdown.
Select the Maya camera to be controlled using the Maya Camera Dropdown.
Click the Live Button to begin streaming data from the mocap Rigid Body to the Maya camera. If live data is streaming, the indicator light on this button will change to bright yellow.
You should now see your Maya camera moving within the Maya viewport:
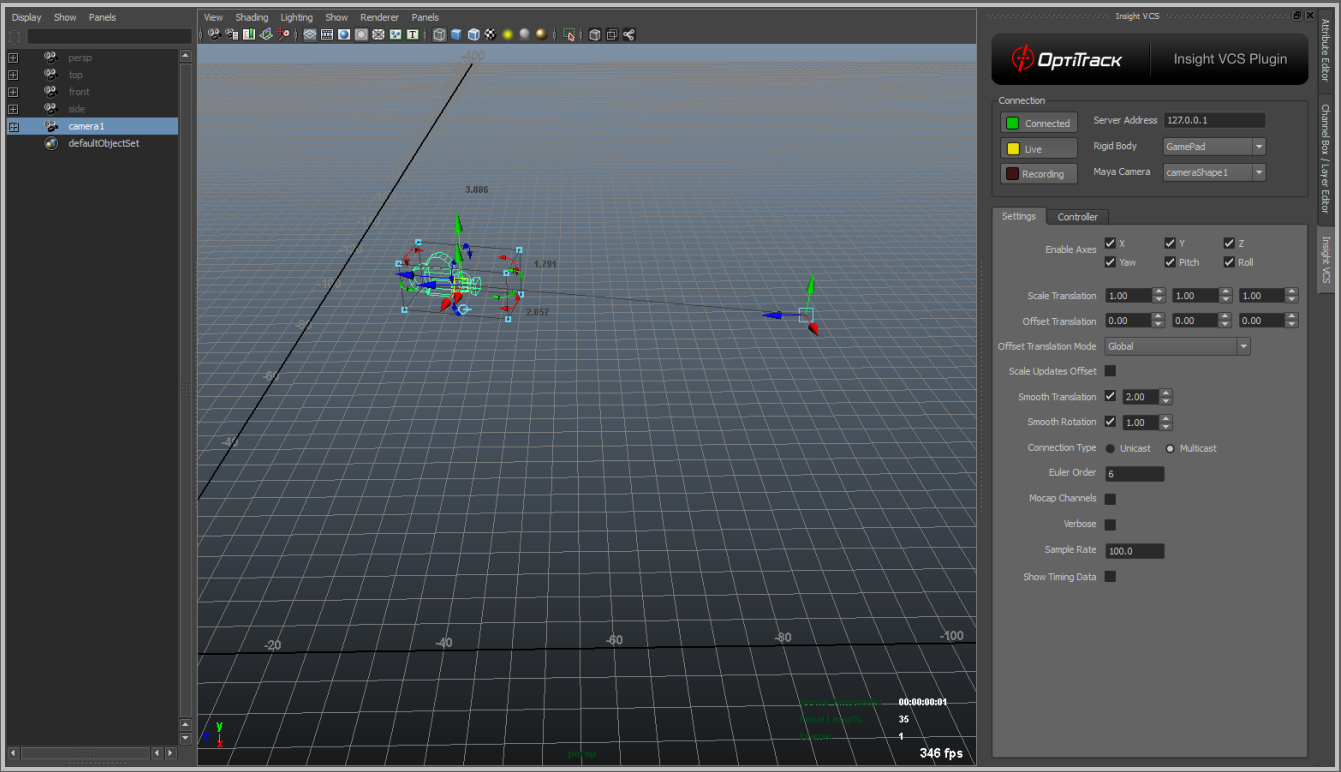
Connection Settings
Virtual Camera connection settings are managed by the main interface tab on the Insight VCS plugin panel:
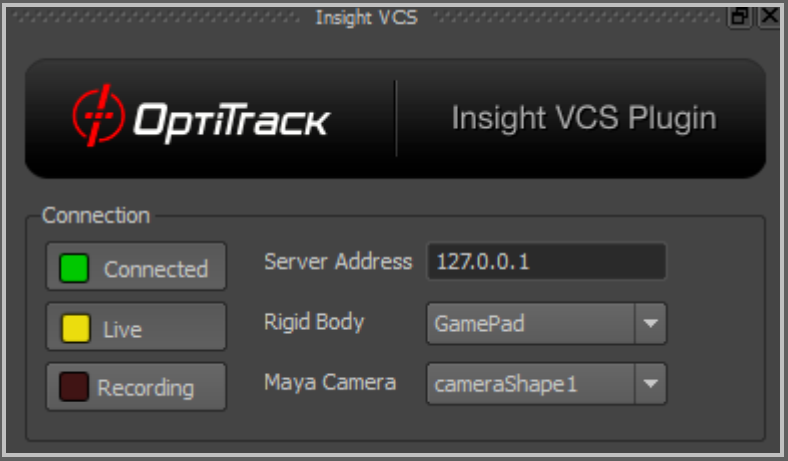
Connected
Click this box to connect to Motive.
Dark Green - Not Connected
Light Green - Connected and streaming
Refer to the Maya status window for details about connection errors.
Live
Indicates whether camera position/orientation data should be coming from a live mocap source (checked) or from a recorded take. Disable this when playing back recorded camera moves.
Dark Yellow - Camera not using live data
Light Yellow - Camera using live mocap data
Recording
Starts recording.
Dark Red - Not Recording
Light Red - Recording
Server Address
IP Address of the OptiTrack Server
Rigid Body
Indicates which Motive's Rigid Body to use for controlling the camera.
Maya Camera
Indicates which Maya camera to control.
Controllers
The Insight VCS plugin supports any DirectInput compatible joystick or USB device. Controllers can then be configured to perform actions or control the camera using Controller Profiles.
Controller Profiles
Virtual Camera controls are managed by a Control-to-Event mapping system called the Controller Profile. The controller profile is configured in the Controller Tab. The Insight VCS plugin allows you to create and swap between multiple controller profiles, allowing you to create any number of custom button/axis configurations depending upon the scene, particular move types, different physical VCS controllers or HID devices, etc.
Profiles can be saved and then later swapped out using the Profile Dropdown. Profiles are saved into <VCS Maya install folder>\Profiles folder.
The VCS plugin ships with 2 default profiles:
The 2 controller VCS Pro (<VCS Maya install folder>\Profiles\VCSProDefault.xml).
The XBox based VCS Mini (<VCS Maya install folder>\Profiles\VCSMiniDefault.xml).
When the Insight VCS plugin is first launched, it will attempt to detect any compatible controllers. It will then attempt to match the detected controllers with an existing Controller Profile, beginning with the last used ("preferred") profile.
Profile Setup
The VCS plugin supports 2 types of controller inputs and 2 types of actions:
Axis Inputs / Actions: Axis inputs are analog inputs and represent the range of values. This range has been scaled to [0, 1000]. Axis inputs can be assigned to Axis actions. PTZ operations (Pan, Tilt, Zoom) are good examples of typical Axis Actions.
Button Inputs / Actions: Button inputs are the button inputs on the controller. These are “one shot” events that occur when the button is pressed. Timeline commands such as Play, Record, and Rewind are typical examples of “one shot” events.
Some Insight VCS controllers have a dial that is represented in the Axis list as a "Wheel". This is a special form of an axis, and can be used to modify existing actions, such as zoom speed, pan speed, and motion scale amount.
Some Insight VCS controllers have a "Button 7". This is an internal, reserved button, and cannot be directly accessed.
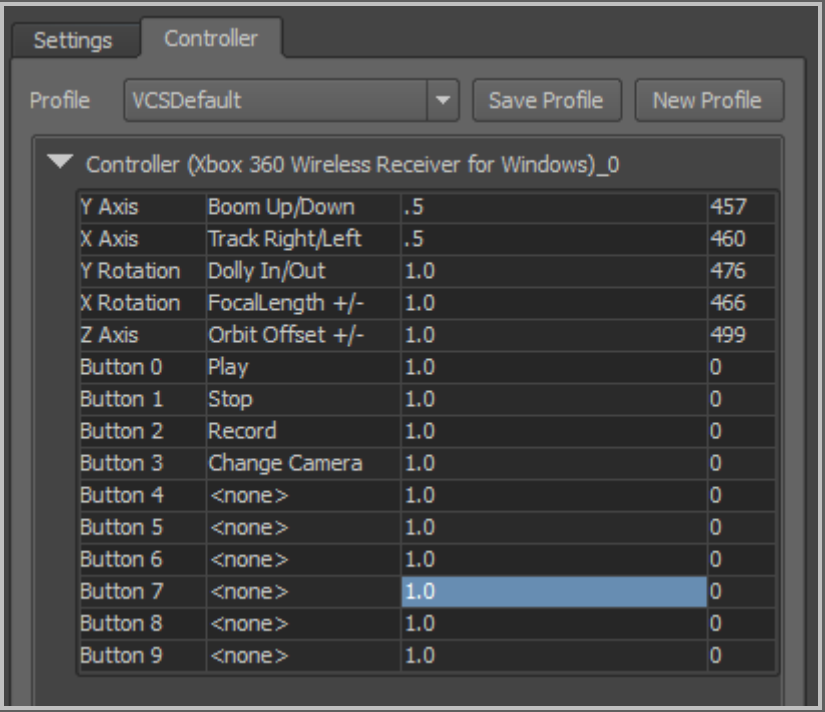
Insight VCS Profile Grid Columns
Action
Action to take or value to change.
Parameter
Input parameter used by some actions to modify the action in some way (i.e. speed up or slow down zooming).
Value
Current value of the controller input.
Action Parameters
Some actions have parameters that modify the way they operate. The following tables list the axis and button actions, and how the parameter value for that action is interpreted.
VCS controller - Axis Actions
Pan Right/Left
[Pan Speed] [Curve Type*]
1.0 [ pan at normal rate, linear curve] 1.0 1 [ pan at normal rate, ease-in curve] 0.5 1 [ pan at half speed, ease-in curve] 2.0 [ pan at 2x speed ]
Dolly In/Out
[Pan Speed] [Curve Type*]
1.0
Pan Up/Down
[Pan Speed] [Curve Type*]
1.0
Focal Length +/-
[Focal length change rate] [Curve Type*]
1.0
Orbit Offset
[Orbit offset change rate] [Curve Type*]
1.0
Focal Distance
[Focal distance change rate] [Curve Type*]
1.0
Wheel Modifier
[VCS Dial controls only] Modify an axis' parameter value (e.g. zoom speed, pan speed, translation scale) by a specified increment. Format: [axis name] [increment]
Examples: X Axis .1 (+/- the X Axis parameter by 0.1) Y Axis .2 (+/- the Y Axis parameter by 0.2) Z Axis .1 (+/- the Z Axis parameter by 0.1) Scale All .5 (+/- all translational scale by .5) Translate All 1.0 (+/- all pan speeds by 1.0)
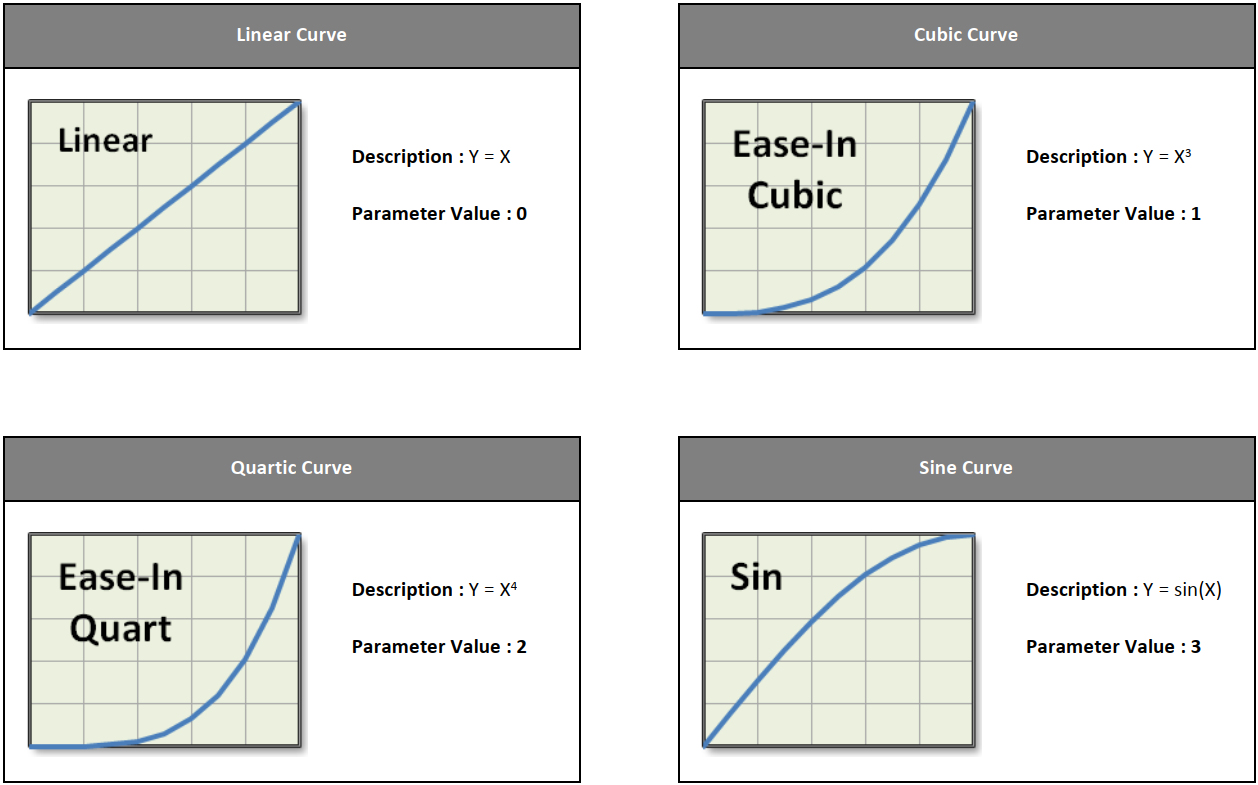
*Curve Type: See explanation below for a definition of the supported curve types.
Curve Types
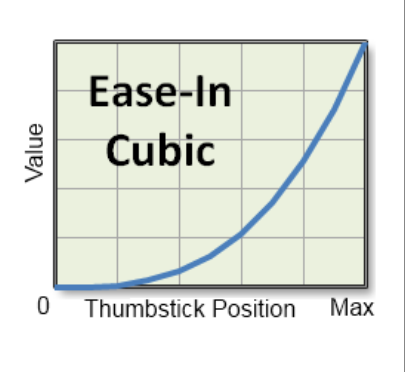
When mapping a controller thumbstick axis to an animatable camera parameter (pan, zoom), you have the option of specifying how the Insight VCS plugin should interpret controller axis movement as a standard animation curve. Instead of modifying the value over time, however, the motion curve modifies the value over the controller span, from neutral/center position (0) to maximum position (Max). The following diagram describes this relationship:
The VCS plugin offers the following built-in curve options:
VCS Controller - Button Actions
Record
None
Play
None
Rewind
None
Scale Translation
Amount to increment/decrement current translation scale
1.0 [scale up by 1.0] -1.0 [scale down by 1.0]
FOV +/-
Amount to increment/decrement current Focal length
1.0 [increase focal length by 1]
MelCommand
Runs a Maya Mel command or script.
NatNextPrimeLense.mel
ResetOffset
[x y z] Optional - specifies the position to reset camera to, otherwise camera is reset to (0.0,0.0,0.0)
10.0 10.0 0.0 [reset camera offset t o10,0,0]
ToggleAxisAction
Toggles a specified axis between 2 actions. [Axis name],[Action1 Index], [Action1 Params],[Action2 Index],[Action2 Params] The example at right toggles the Y Axis behavior between Dolly In/Out at speed 1.0 with a Cubic Curve and Focal Length at 0.1 speed with a Quartic curve. This action can be used to extend axis functionality without swapping profiles.
Y Axis, 3, 1.0 1, 4, 0.1 2
Virtual Camera Settings
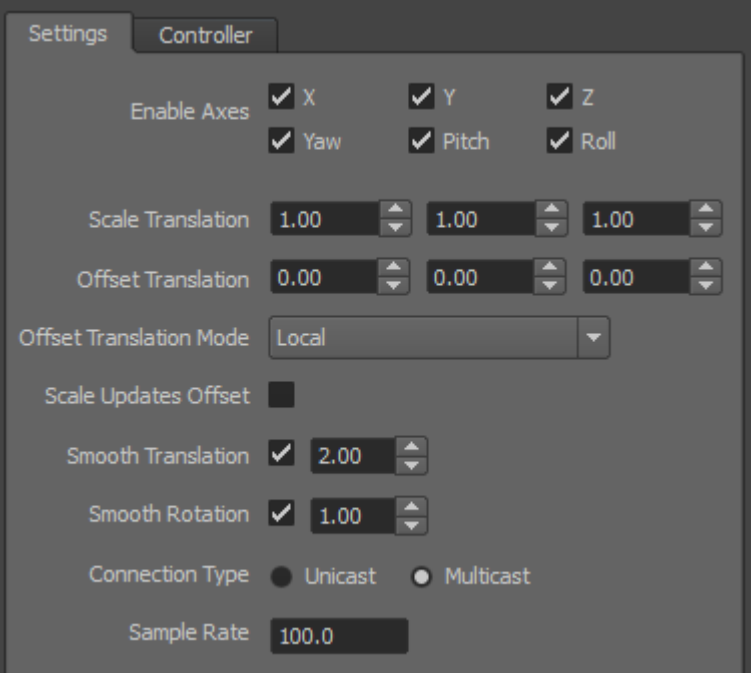
The Insight VCS plugin has several properties that can be used to customize its behavior. The Settings Tab can be used to set these:
VCS General Settings
Enable Axes
Selectively enable/disable individual mocap movement channels.
Scale Translation
Scale the physical movement (when tracking controller is moved).
Offset Translation
Can be used for 2 purposes : 1. To adjust the center of the physical volume to the virtual scene. 2. To effectively pan/truck/dolly the camera. This value is updated by the thumbstick controls for the Pan/dolly/truck operations
Offset Translation Mode
Affects how Offset Translation is applied to the camera: 0 : Global Translates the camera according to the Maya global coordinate system (global). 1 : Local Translates the camera according to the camera’s coordinate system (local). 2 : LocalOnStart Translates the camera according to the camera’s coordinate system when the camera first moves (stick first moves), then keeps that axis (Does not continuously update the coordinate system).
Scale Updates Offset
Instructs whether changes to Scale Translation update the Offset Translation value in order to keep the camera in the same position (true) or does not affect Offset Translation, resulting in camera position moving to new scaled amount
Smooth Translation
Applies smoothing to the camera position values
Smooth Rotation
Applies smoothing to the camera rotation values
Connection Type
Indicates connection interface to use when connecting to an OptiTrack server application. Options are Multicast and Unicast. This setting must be the same as your OptiTrack server application. Default is Multicast
Sample Rate
Indicates the rate, in frames-per-second (fps), the VCS should sample the mocap server application for 6 DOF __ position/orientation value updates. Use this if necessary to match the playback speed of your scene to ensure consistency of controller pans during timeline playback and non-timeline playback
Maya Camera Settings
A Maya Camera controls how you see the 3D scene. Maya's Camera object allow users the ability to model real-world cameras, including settings such as Focal length, aspect ratio, film format, etc.
Refer to the Maya documentation for more information on Camera Settings.
Other Resources
Was this helpful?

