Delsys EMG Setup
Overview
Starting from Motive version 3.0 and above, the digital integration of Delsys Trigno Avanti systems is supported. Through this integration, electromyography (EMG) measurements from the Trigno Avanti EMG sensors can be recorded in Motive along with the tracking data. This page provides instructions on how to set up the Delsys Trigno Avanti platform along with the OptiTrack motion capture system.
Required Components
Prime series Ethernet camera system
eSync synchronization hub
Motive 3.0 or above
Delsys Trigno Avanti Platform with EMG sensors
Delsys Trigger Module for synchronization
Trigno EMGworks OR Delsys SDK server package version 3.5.8 or above.
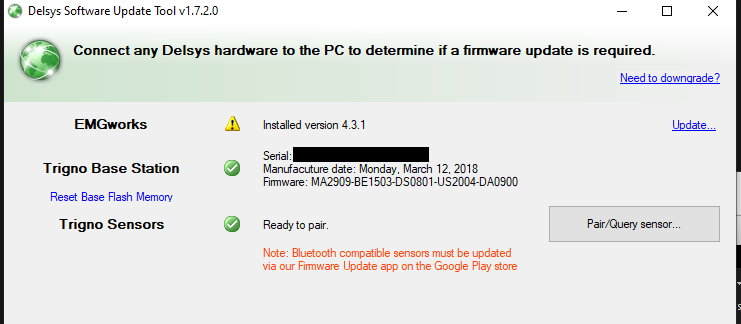
Firmware on both the Trigno base station and the sensors must be updated. If the firmware is installed, use the Software Update Tool to install the latest firmware. For more information, please refer to the manufacturer documentation.
Notes
Supported Sensors: Integration is supported for Delsys Trigno EMG systems with Trigno Avanti sensors only.
Supported Data Channels: Data channels for EMG measurements will be reported in Motive. Data channels for the inertial measurement unit (IMU) and accelerometer are not supported.
Supported Device/Channel Count: Integration supports one Trigno base station with up to 16 EMG data channels. Additional devices and/or data channels above this limit cannot be integrated due to a restriction of the Delsys SDK.
Synchronization: Synchronization with the motion capture system requires the Delsys Trigger Module and the eSync synchronization hub. Supports triggered sync only.
Delsys Trigno Control Utility software must be running prior to launching Motive.
Hardware Setup
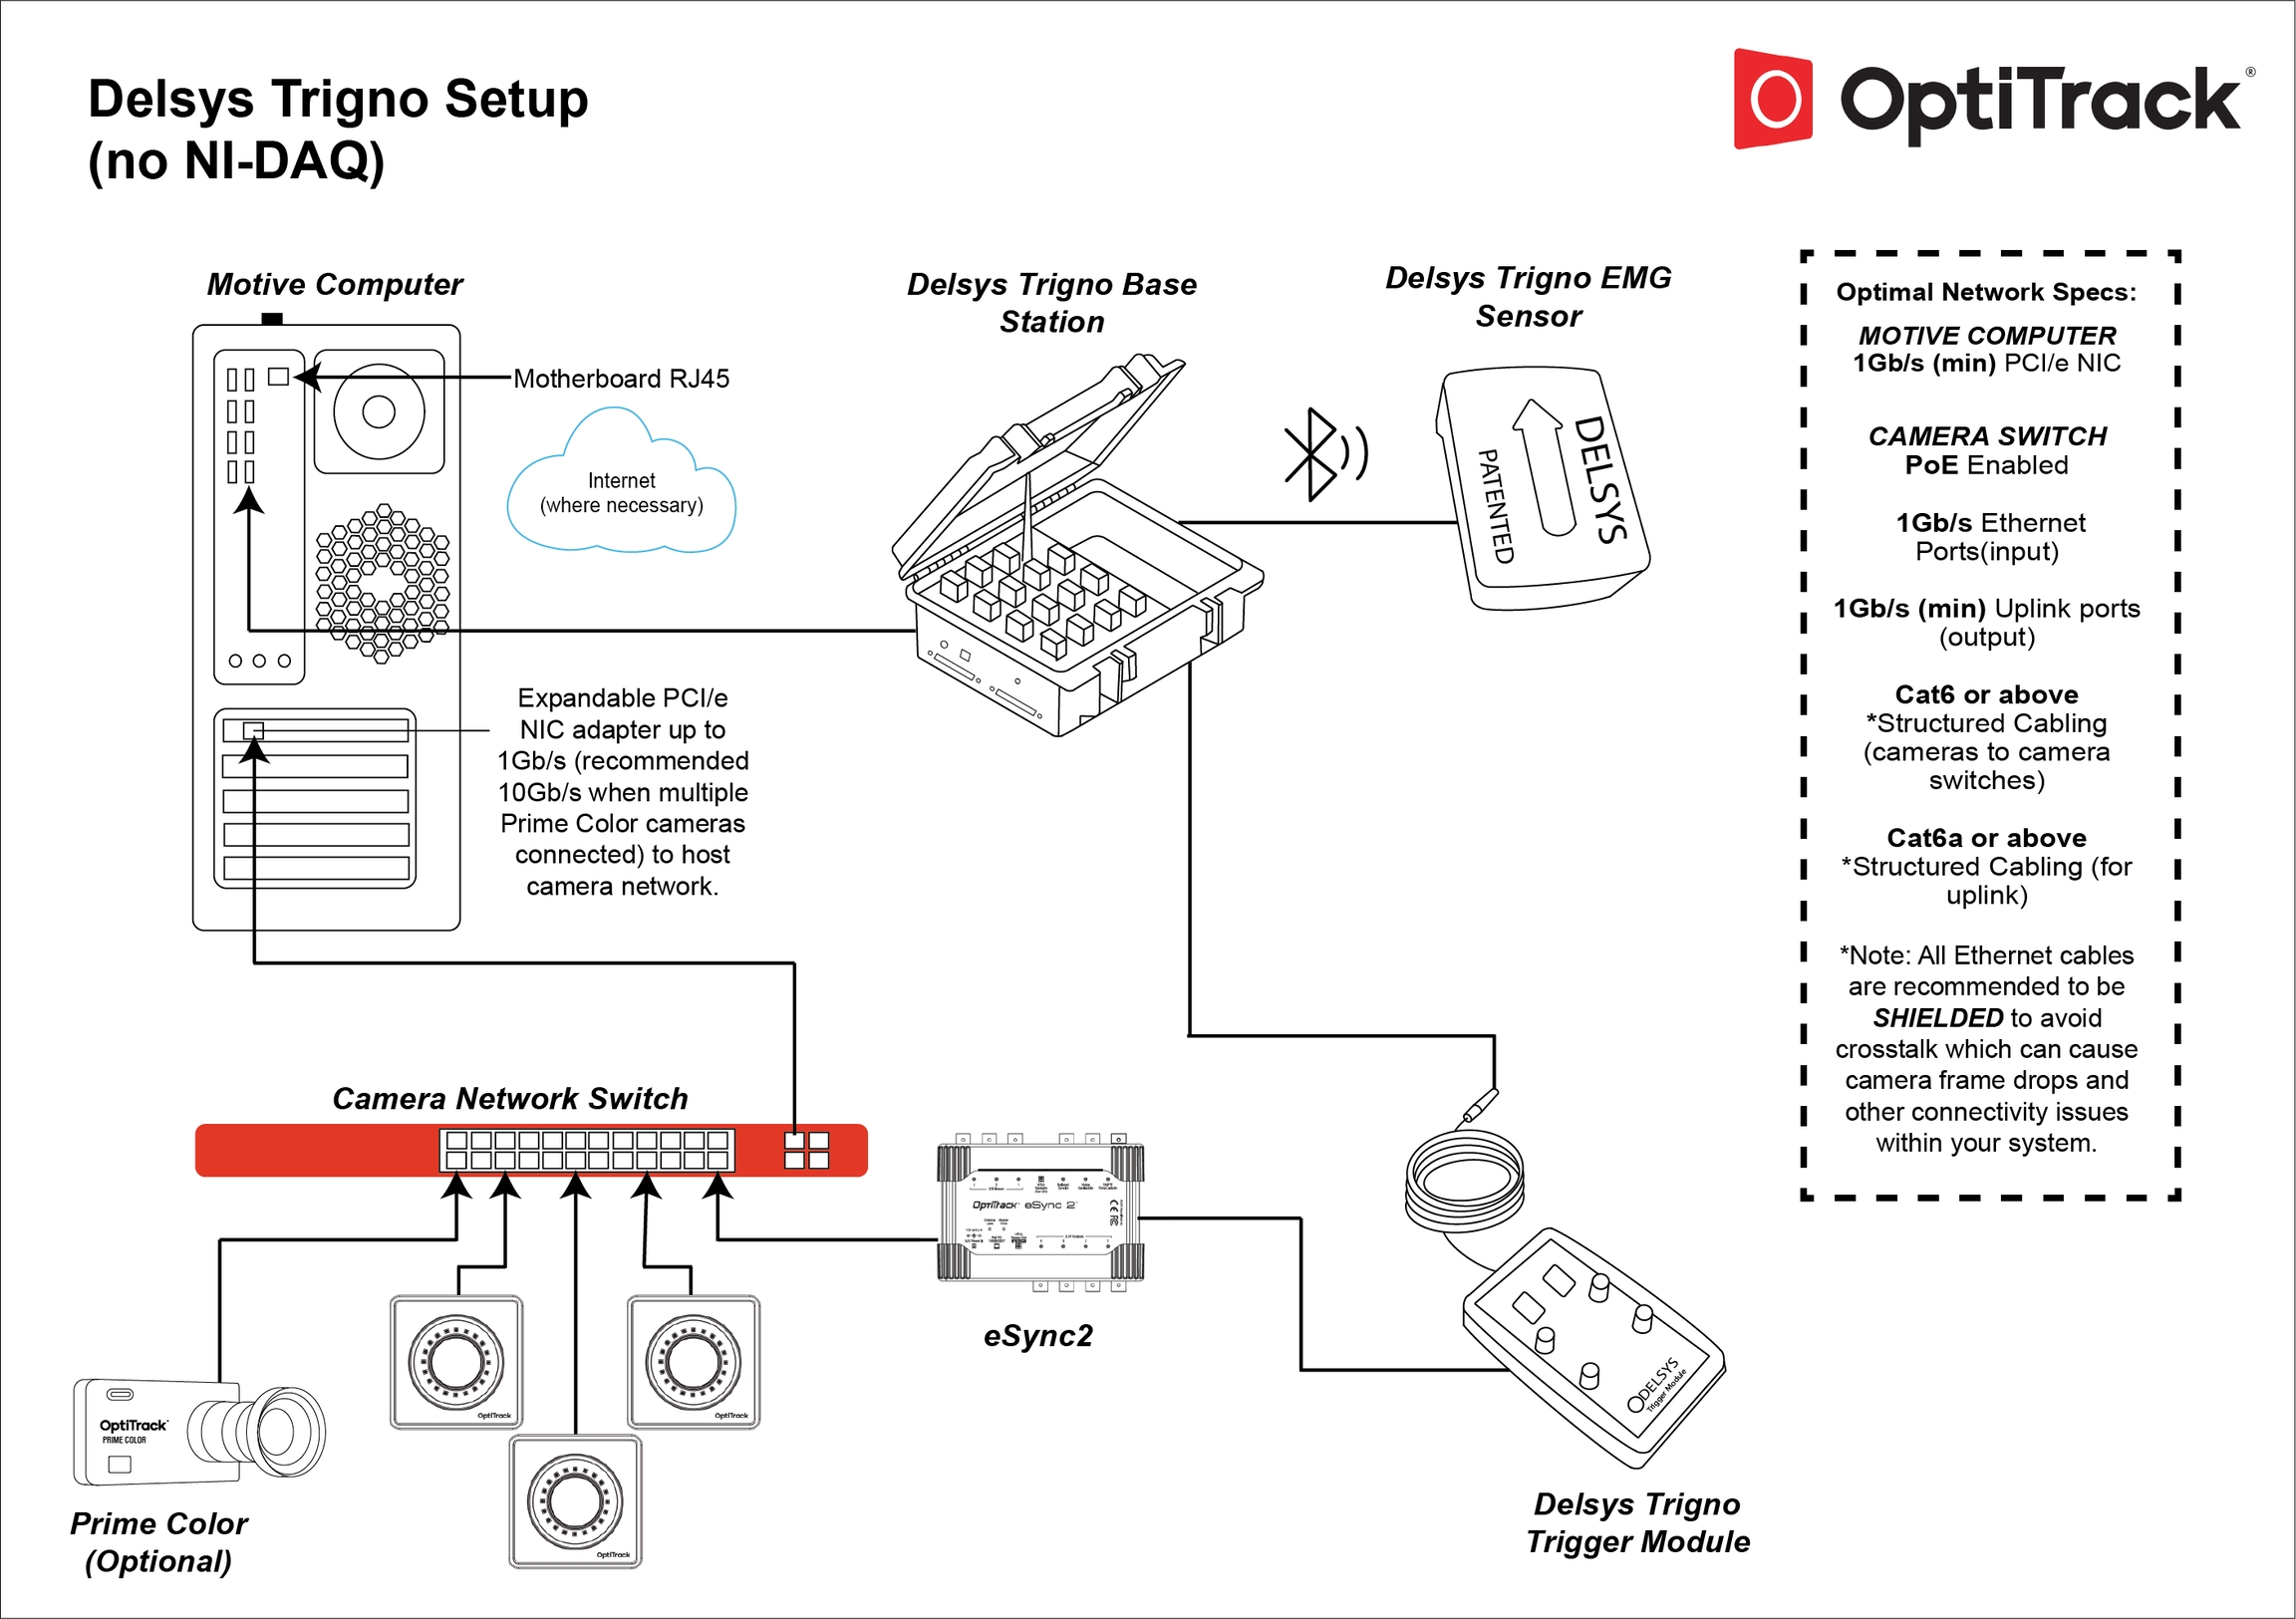
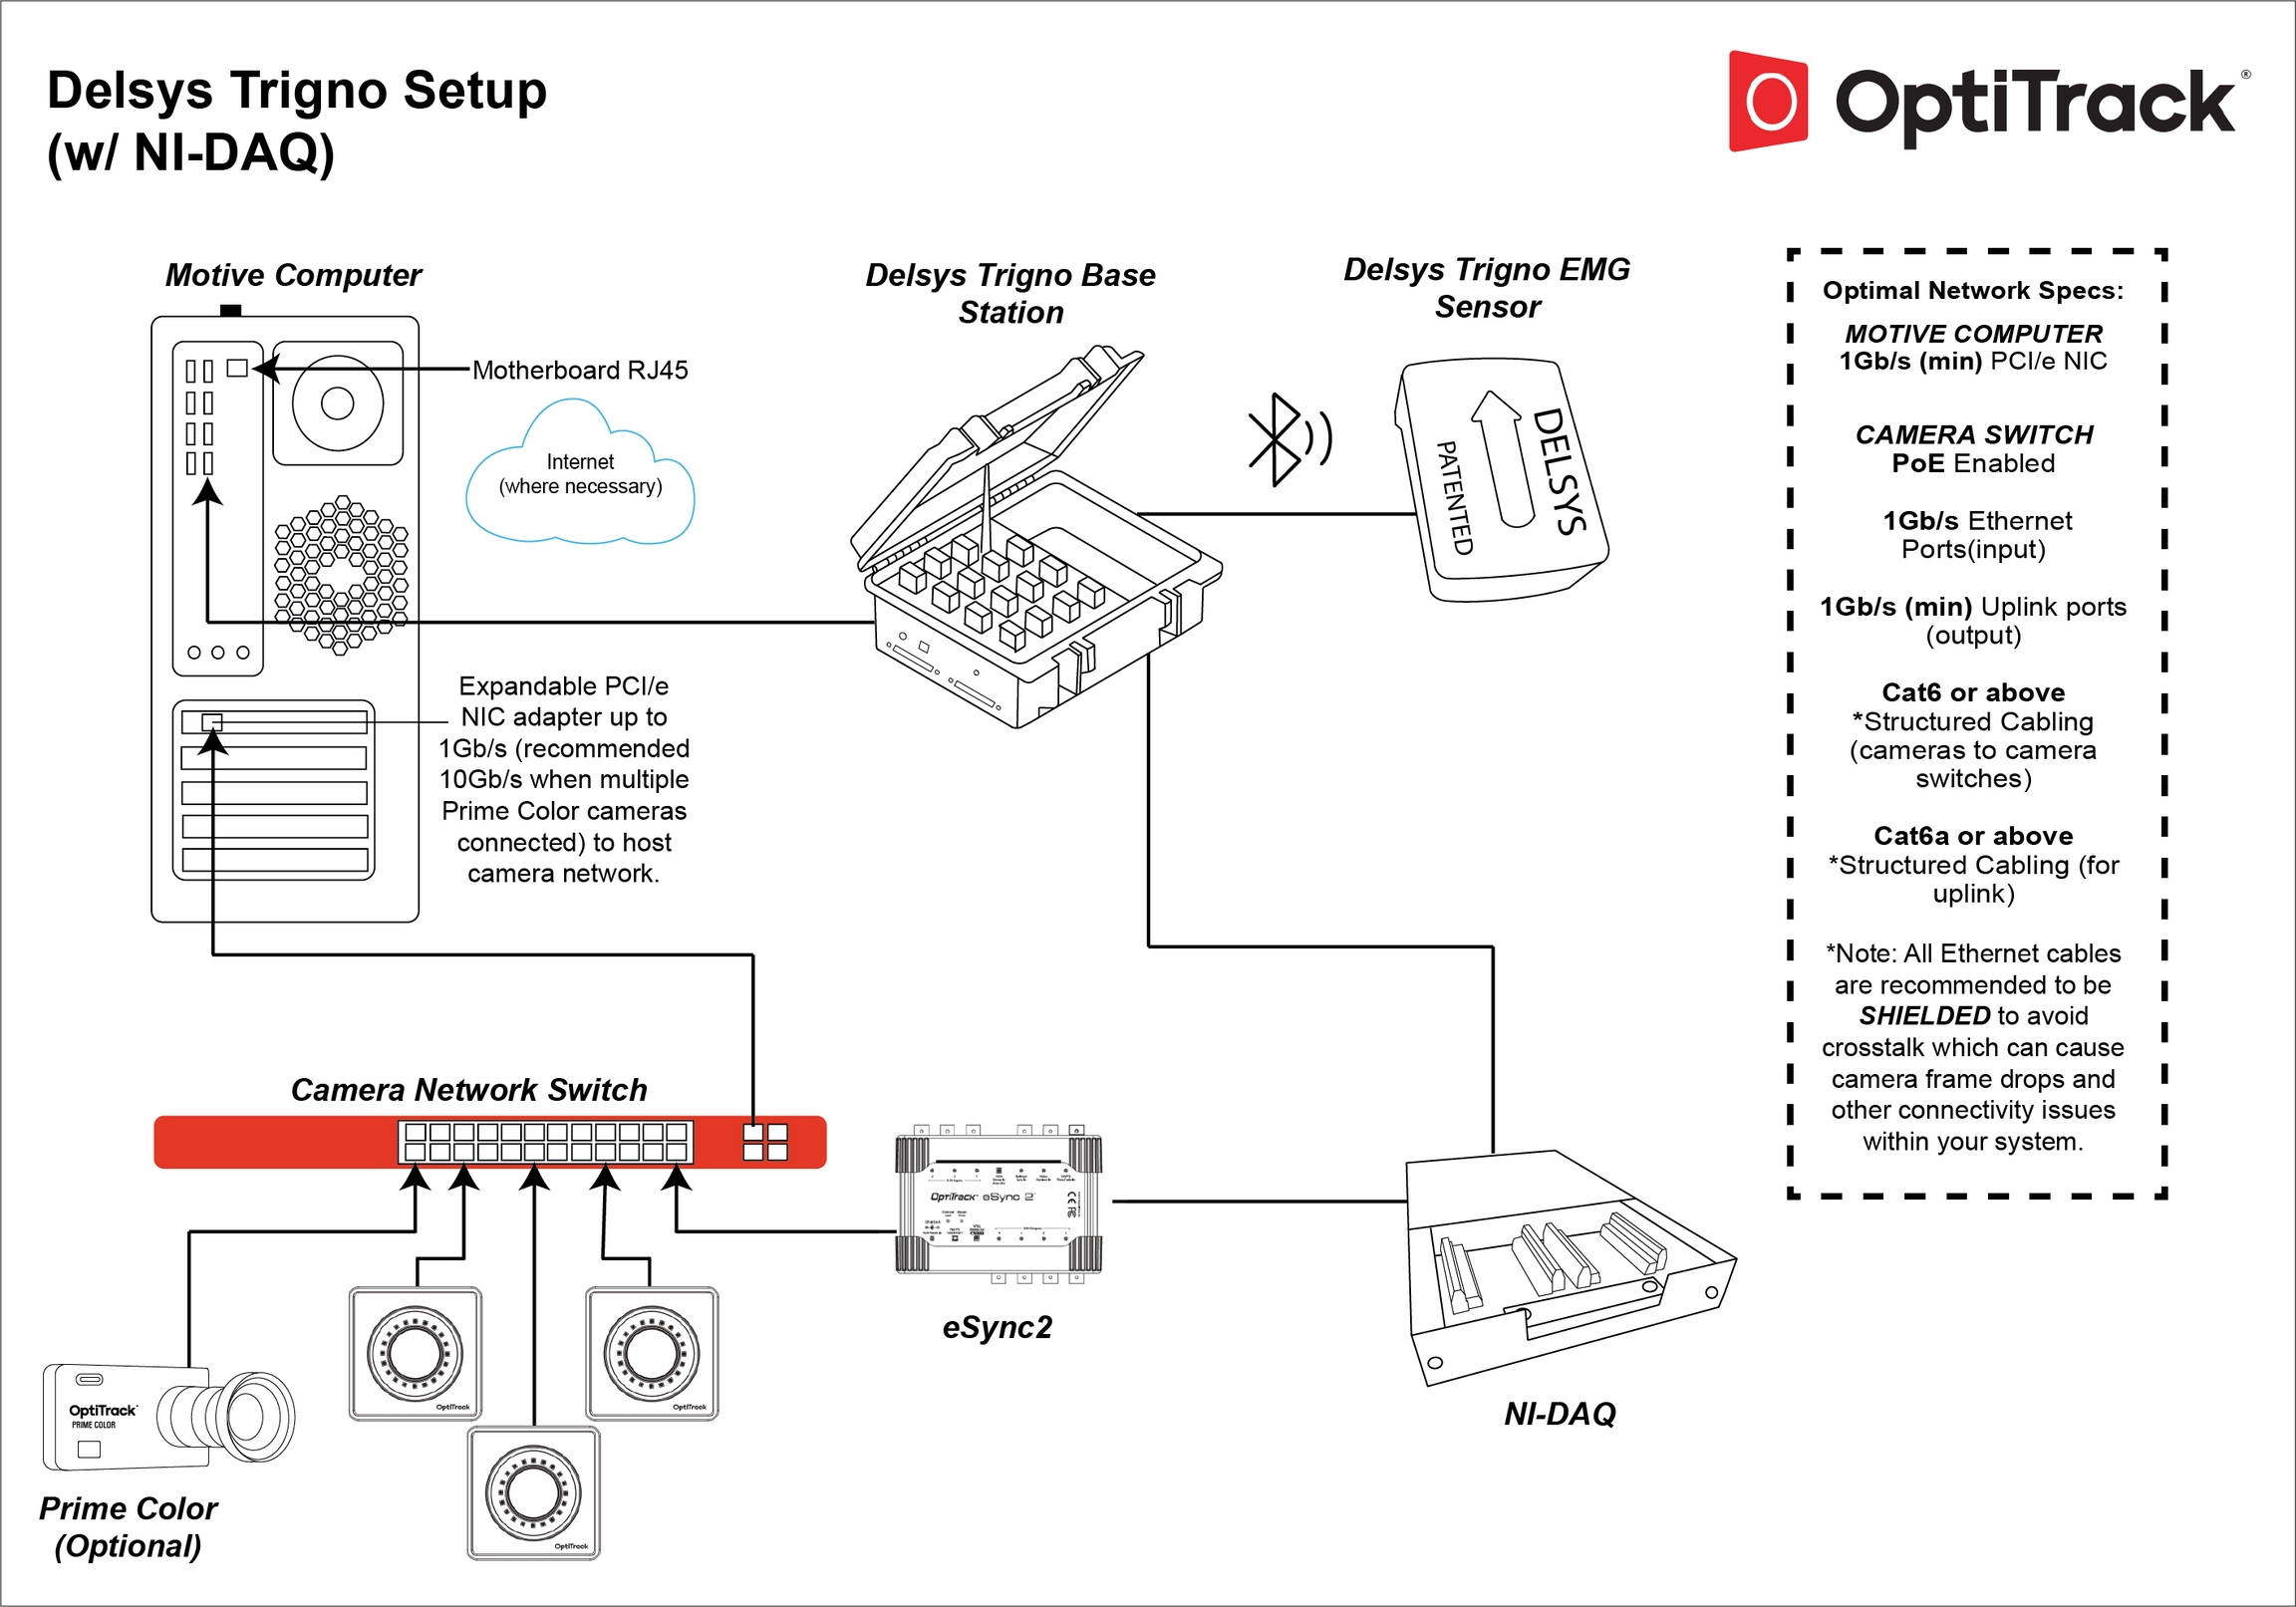
Below are two diagrams depicting two types of Delsys hardware setups. One without a NI-DAQ device, and one with a NI-DAQ device. When setting up a configuration without a NI-DAQ device, you'll use a Delsys Trigger Module. This will only allow the option for Trigger Synchronization. If you use a NI-DAQ configuration, however, you have the option to use either Trigger and Reference Clock Synchronization. For more information about synchronization, please scroll down to the Synchronization section of this page.
Software Setup
Device Firmware
Please make sure the firmwares on both the Trigno Base Station and the EMG sensors have been updated. You can check the firmware version using the Software Update Tool provided by Delsys. For more information, please refer to the user manual.
Delsys Software Setup
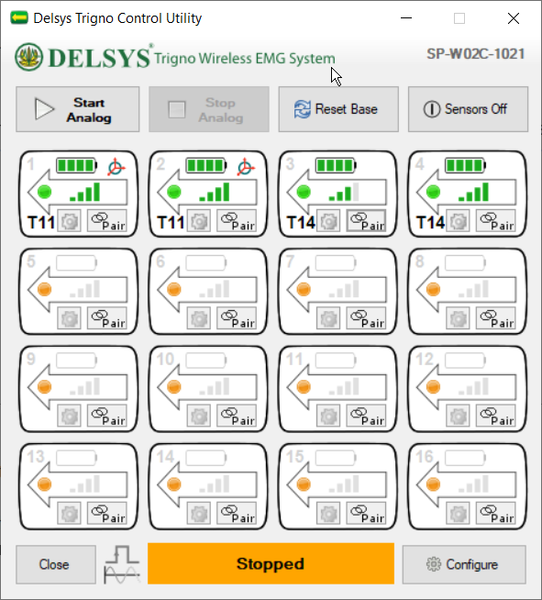
Before proceeding with integrating the EMG system into Motive, please make sure the required software for the Delsys Trigno Avanti sensor system is all set up on the host computer. This includes Trigno Control Utility software which will get along with the Trigno EMGworks or Delsys SDK Server package version 3.5.8. For the sensor to work in Motive they must first be configured and paired in the Delsys Trigno Control Utility (TCU) software.
Peripheral Module Setup
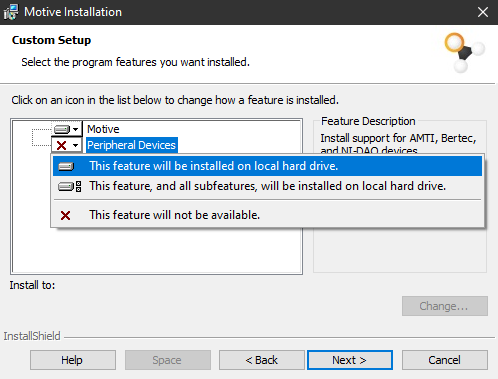
In order to integrate Delsys EMG systems with Motive, you will need to setup the required drivers and plugins. Motive installer is packaged with the Peripheral Device module which can be added. During the Motive installation, a list of program features will be shown in the Custom Setup section. Here, change the setting for the Peripheral Device module, as shown in the below image, so that the module is installed along with Motive Files.
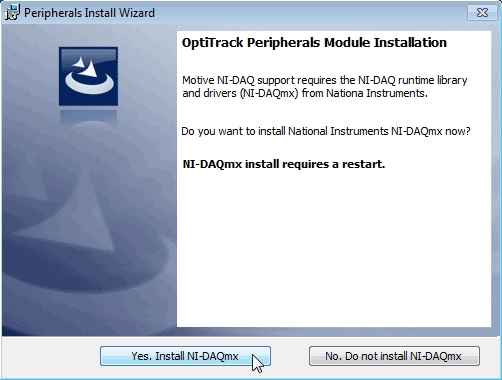
Note : Even if you are not using NI-DAQ, it is still necessary to install NI-DAQmx drivers that come up next in the installer.
Device Setup in Motive
Step 1. Launch Delsys Trigno Control Utility software
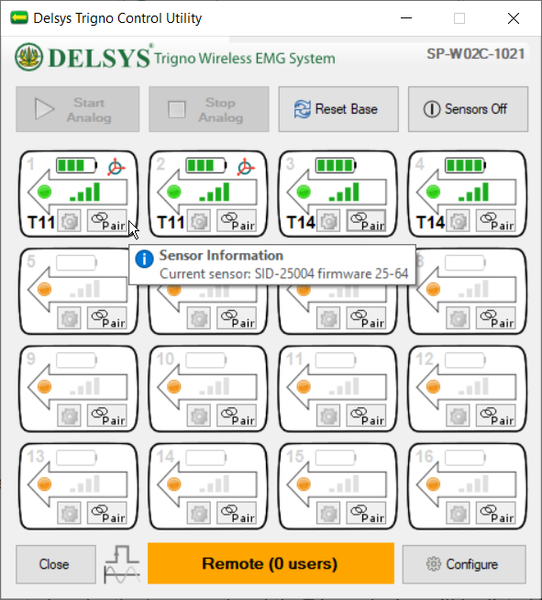
Make sure to launch the Delsys TCU software first. Make sure all of the sensors have been powered and paired in the TCU software. If the sensors are not detected here, they will not be detected in Motive.
Step 2. Start Motive
Once the sensors are detected and running in the Delsys TCU software, launch Motive. If the peripheral module is installed, Motive will attempt to connect to the Delsys system.
Step 3. Confirm connection
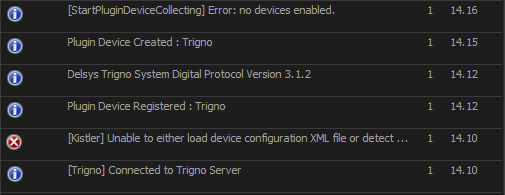
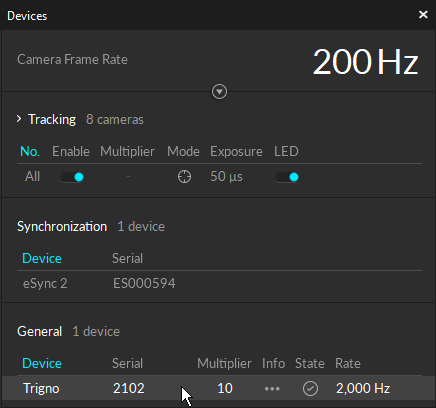
In Motive: If the sensor is connected, it will be reported under the Log panel and the Trigno device will be listed in the Devices pane.
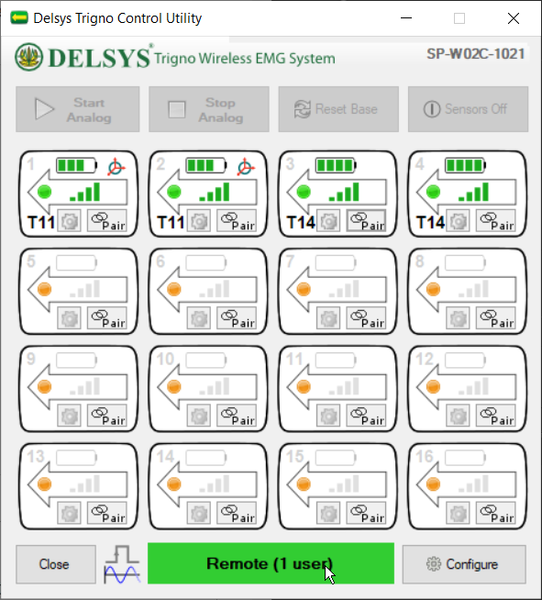
In TCU: If the TCU software is connected to Motive, it will indicate that it has connected to a remote client. As shown in the image below.
Step 4. Enable data channels
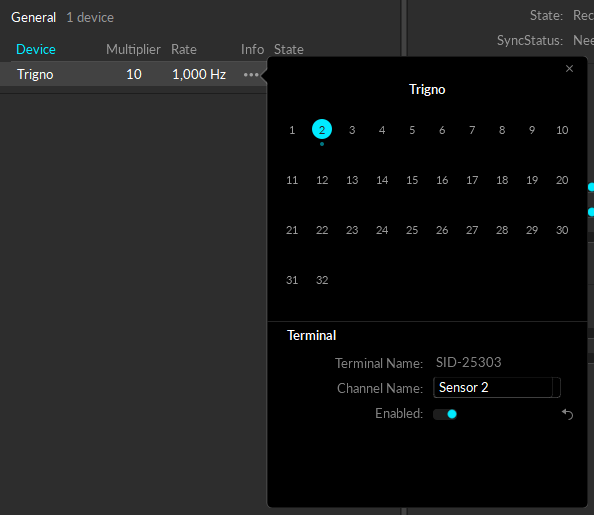
Open the Devices pane in Motive and connected Trigno device will be listed. If you click on the ![]() on the device, and all of the available data channels will be shown in the pop-up. Click on the data channels and enable the ones that will be used.
on the device, and all of the available data channels will be shown in the pop-up. Click on the data channels and enable the ones that will be used.
Data Channels:
Channel 1-16: These are the channels used for reporting raw EMG signals.
Channel 17-32: These are the channels used for reporting RMS envelope for the corresponding EMG signal. For example, channel 17 reports RMS envelope of the EMG signals coming through channel 1, and channel 18 reports RMS envelope for channel 2.
Terminal Name
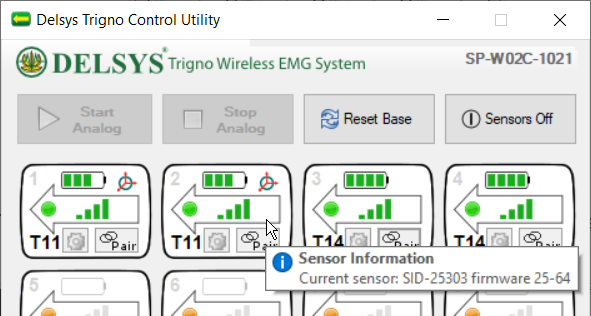
The terminal name in Motive correlates to the physical sensor ID given to a Trigno Avanti sensor in Delsys TCU.
Step 5. Enable device
Once you have enabled all of the desired data channels, enable the Trigno device from the Devices pane.
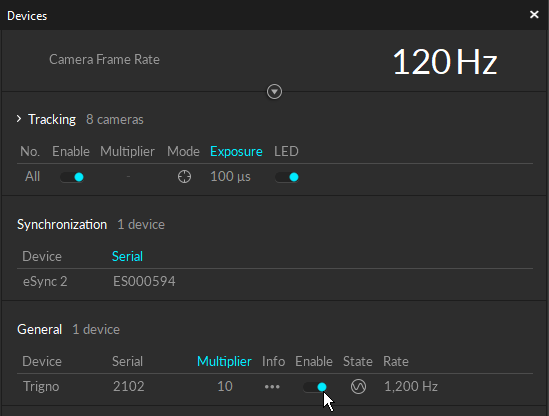
Step 8. Confirm incoming data in Graph pane
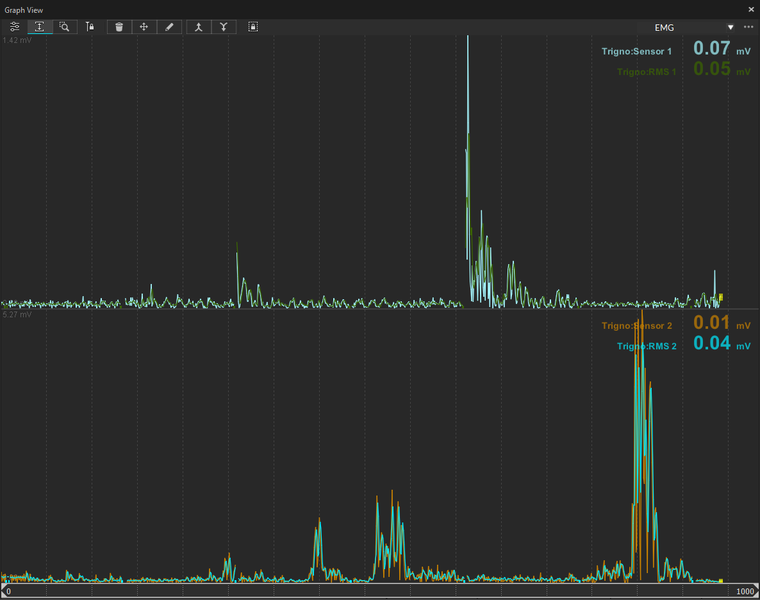
As a last step, use the Graph pane to check the EMG data coming through the enabled channels.
Graph Layout:
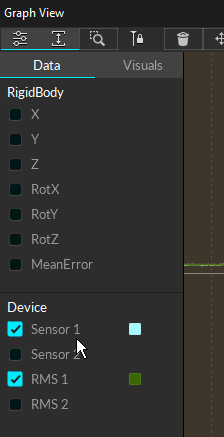
The graph layout may need to be configured for plotting the EMG channel data. To create a new layout, click on the ![]() button in Graph pane and select Create New Layout from the context menu. Once new layout is created, click on the
button in Graph pane and select Create New Layout from the context menu. Once new layout is created, click on the ![]() icon to expand the sidebar, and click on the graph which you wish to plot the graphs onto, and check mark the EMG channels in the sidebar to start plotting the channel data onto the selected graph. Make sure Trigno device is selected under the Devices pane.
icon to expand the sidebar, and click on the graph which you wish to plot the graphs onto, and check mark the EMG channels in the sidebar to start plotting the channel data onto the selected graph. Make sure Trigno device is selected under the Devices pane.
Synchronization
Synchronization of the Delsys Trigno EMG system with the motion capture system is accomplished through triggered sync. Triggered sync, in this situation, refers to the relationship between the Delsys Trigno EMG system and the motion capture system. Meaning, the motion capture system triggers the start of data sampling of the Delsys Trigno EMG system. Once triggered, both the motion capture system and the Delsys Trigno EMG system are truly aligned only during the first frame of recording then each move forward at their own individual sampling rates in an approximation of synchronization. Reference clock synchronization is more precise, however, it is not supported by Delsys systems. This is due to a limitation of the DelsysSDK. For more information regarding Deylsys SDK, please visit their SDK page here.
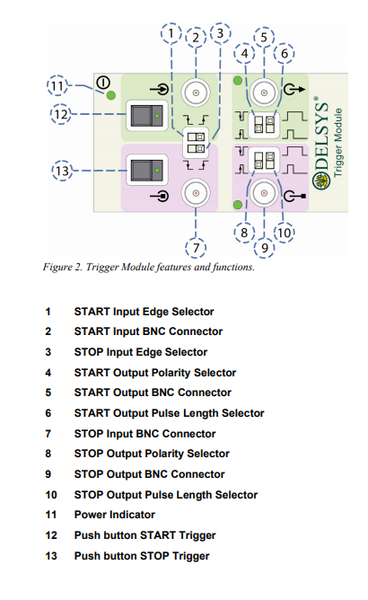
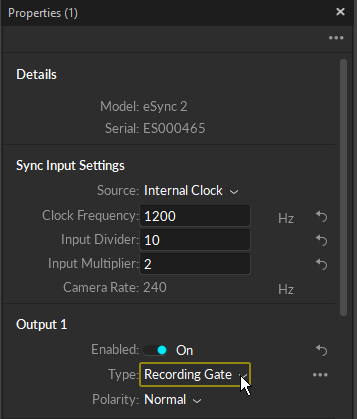
Triggered sync can be set up by connecting one of the eSync outputs to the Delsys Trigger Module. For triggered synchronization, one of the outputs from the eSync will need to be configured to output a Recording Gate signal, and it will need to be connected into the Start Input on the trigger module. The connect input port on the trigger module will also need to be set to detecting a rising edge using the toggle switch on the module.
Refer to the Delsys documentation for more information on setting up the triggered sync using the trigger module: https://www.delsys.com/downloads/USERSGUIDE/trigger-module.pdf
Setting up triggered sync
If not already, connect the Delsys trigger module into the Trigno base station.
Using a BNC cable, connect one of the output ports on the eSync into the Start Input of the triggered sync box.
[Motive] In Motive, select the eSync to access its properties from the Properties pane.
[Motive] Set the Type of the connected output port to Recording Gate.
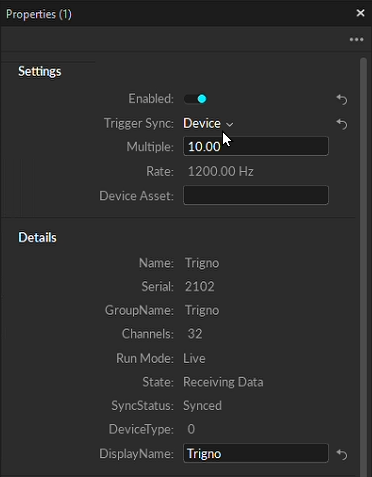
[Motive] Select Trigno device to access its properties.
[Motive] Set the Triggered Sync setting to Device. Note that once Trigno is configured to the Triggered sync mode, EMG data will not be reporting until a recording is started to trigger the Delsys system.
Device Properties: Data Operation
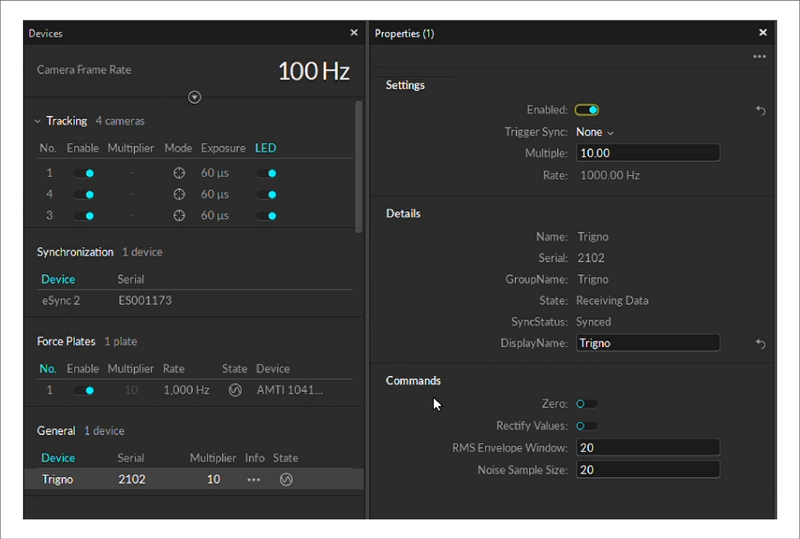
Under Trigno device properties, you can set the following properties to perform data operations to the reported data.
Rectify Values
When enabled, all of the Raw EMG signal coming through channel 1~16 will be rectified and the absolute values of the measurements will be reported.
RMS Envelope Window
RMS is a common way to interpret EMG data. Motive performs RMS envelope calculation when reporting the data just for visualization purposes. For a complete EMG analysis, including additional data filtering for example, the Raw EMG signal should be processed through a separate data analysis software.Size of the RMS envelope can be changed by configuring the RMS Envelope Window property under Trigno device properties. This will set the number of samples used to calculate the RMS reported in Motive. Higher sample size will result in a smoother window and it needs to be adjusted based on the Trigno sampling frequency.
Noise Sample Size
Noise removal can be controlled by the Noise Sample Size property. Set this to 0 to completely disable noise removal.
Data Recording
Once Trigno system is detected in Motive and its channels are enabled, the reported EMG channel data will get recorded along with the motion tracking data. With the triggered sync setup explained above, motion capture system and the EMG system will be synchronized at the start of the recording and they will be running at their own sampling rates after the trigger point. Due to limitation of the triggered synchronization, it is recommended to keep the recordings relatively short.
The Delsys Trigno EMG device samples at a rate of 2000Hz natively, so oftentimes we are down sampling in Motive, and in rare cases, up sampling. We have found that sampling in Motive at a motion capture rate of 100Hz or 200Hz with a multiplier of 10 for the Delsys Trigno EMG device (making its sample rate at 1000Hz or 2000Hz respectively), has shown the best results. When running Motive at 120Hz, however, it has shown to have intermittent frame drops.
For consecutive recordings, please wait at least 5 seconds between each recording to allow the EMG system to get ready for the next recording trigger for proper sync. If not, the data may not get successfully recorded.
Data Playback
Captured analog signals are recorded within the Take file and they can be played back in Motive. When in Edit mode, the integrated EMG device will be shown under the Devices pane, and its Analog measurements can be plotted on the Graph pane. You will need to configure the graph layout and enable plotting of analog channels:
Graph Layout with Device Data Plots
Right-click on the graph view and set the desired layout dimensions.
On one of the graphs, right-click and under the Devices section, select the analog channels you wish to plot.
Data Export
Recorded EMG channel data can be exported into C3D and CSV files along with the mocap tracking data. You can just follow the normal the tracking data export steps, and if the analog data exists in the TAK, they will also be exported.
C3D Export: Both mocap data and the analog data will be exported onto a same C3D file. Please note that all of the analog data within the exported C3D files will be logged at the same sampling frequency. If any of the devices are captured at different rates, Motive will automatically resample all of the analog devices to match the sampling rate of the fastest device. More on C3D files: https://www.c3d.org/
CSV Export: When exporting tracking data into CSV, additional CSV files will be exported separately for each Trigno device in a Take. Each of the exported CSV files will contain basic properties and settings at its header, including device information and sample counts. The voltage amplitude of each analog channel will be listed. Also, mocap frame rate to device sampling ratio is included since analog data is usually sampled at higher sampling rates.
Note that the coordinate system used in Motive (y-up right-handed) may be different from the convention used in the biomechanics analysis software.
Common Conventions
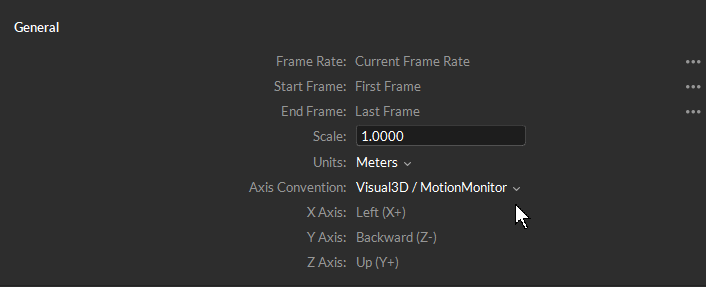
Since Motive uses a different coordinate system than the system used in common biomechanics applications, it is necessary to modify the coordinate axis to a compatible convention in the C3D exporter settings. For biomechanics applications using z-up right-handed convention (e.g. Visual3D), the following changes must be made under the custom axis.
X axis in Motive should be configured to positive X
Y axis in Motive should be configured to negative Z
Z axis in Motive should be configured to positive Y.
This will convert the coordinate axis of the exported data so that the x-axis represents the anteroposterior axis (left/right), the y-axis represents the mediolateral axis (front/back), and the z-axis represents the longitudinal axis (up/down).
Troubleshooting
Please contact us for any issues or questions that are not covered in this wiki page.
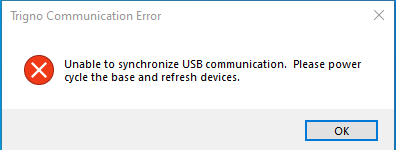
Q - Delsys Trigno Control Utility software not detecting the base station. Unable to synchronize USB communication.
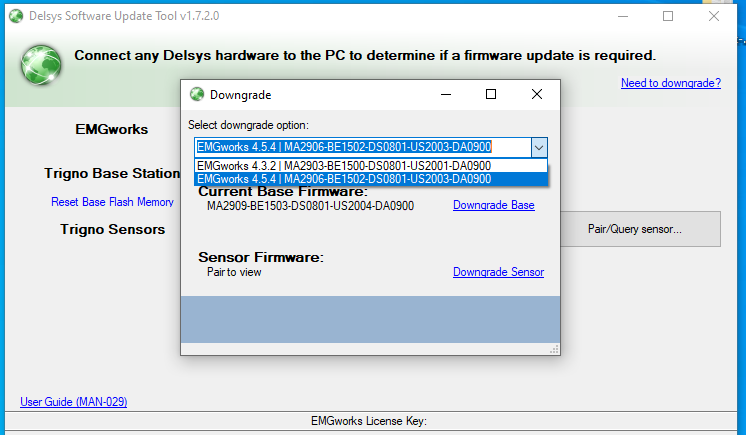
A - This can happen if the version of the firmwares on the Trigno base station and the sensor is not compatibile with the version of the SDK being used (3.1.2). Please use the Delsys Software Update Tool and make sure the compatible version of the firmware is installed. We recommend using 2905 or 2906 firmware as they are most tested, but any newer versions of the firmware should work also.
Troubleshooting
Was this helpful?

