Labels Pane
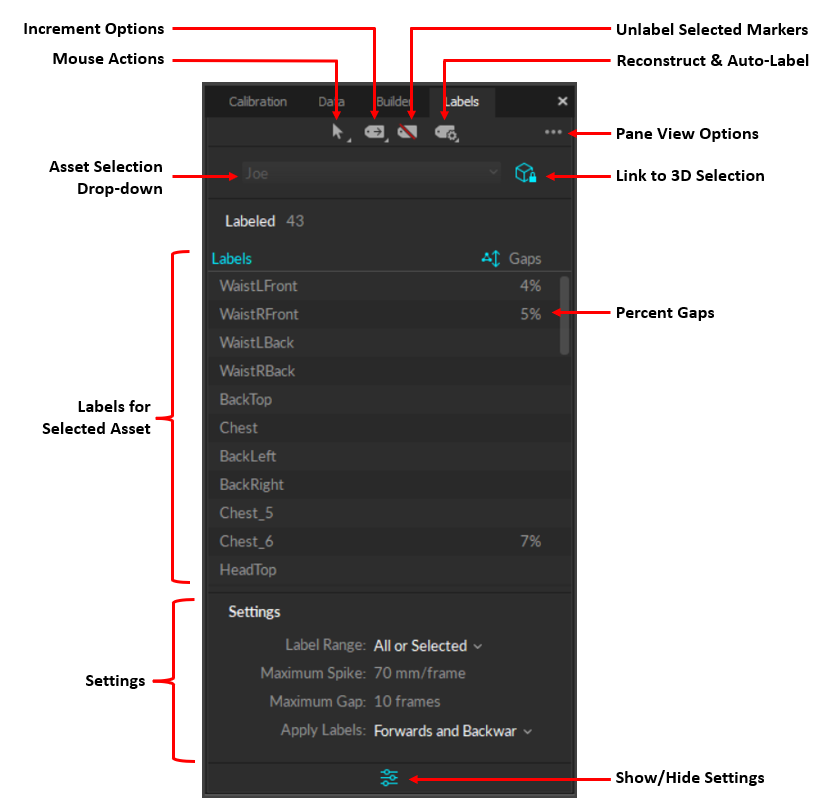
The Labels pane is used to assign, remove, and edit marker labels in the 3D data and is used along with the Editing Tools for complete post-processing. For a detailed explanation of the labeling workflow, read the Labeling page.
Open the Labels pane from the View menu or by clicking the ![]() button on the main toolbar.
button on the main toolbar.
Overview

![]()
Mouse Actions
Switch between Select mode (Hotkey: Q) for normal operations, and Quick Label mode (Hotkey: D), to manually assign labels with just one-click. These options are also available from the Mouse Actions button in the 3D Viewport.
![]()
Increment Options
Determines how the Quick Label mode should behave after a label is assigned:
Do Not Increment keeps the same label attached to the cursor.
Go To Next Label automatically advances to the next label in the list, even if it is already assigned to a marker in the current frame. This is the default option.
Go To Next Unlabeled Marker advances to the next label in the list that is not assigned to a marker in the current frame.
![]()
Unlabel Selected
Removes the label from the selected trajectories.
![]()
Auto-Label
Options to Reconstruct, Auto-label or Reconstruct and Auto-label. Use caution as these processes overwrite the 3D data, discarding any post-processing edits on trajectories and marker labels.
![]()
Pane View Options
Provides different layout options:
Labeled Only: Displays only markers with labels; unlabeled markers are not shown. This is the default view.
Split: Displays labeled markers on the left and unlabeled markers on the right.
Split (Left/Right): Sorts skeleton labels into columns based on marker location. Unspecified markers (e.g., head, chest, etc.) are listed in the left column.
Stacked: Displays labeled markers on the top and unlabeled markers on the bottom.
Combo: Displays the labeled markers in the Split (Left/Right) view with unlabeled markers stacked below.
![]()
Link to 3D Selection
When this button is enabled, asset selection is locked to the selection from the Perspective viewport. When toggled off, the Asset Selection drop-down menu in the Labels pane becomes active.
![]()
Show Range Settings
The Range Settings determine which frames of the recorded data the label will be applied to.
Marker Labels
Labels shown in white are tracked in the current frame. Labels shown in magenta are not.
The Gaps column shows the percentage of occluded gaps values. If the trajectory has no gaps (100% complete), no number is shown.
Labeling Settings
Labeling Range Settings
All or Selected
Assign labels to a selected marker for all, or selected, frames in a capture.


Spike or Fragment
Apply labels to a marker within the frame range bounded by trajectory gaps and spikes (erratic change). The Max Spike value sets the threshold for spikes which will be used to set the labeling boundary. The Max Gap size determines the tolerable gap size in a fragment, and trajectory gaps larger than this value will set the labeling boundary.
Swap Spike or Fragment
Apply labels only to spikes created by labeling swaps. This setting is efficient when correcting labeling swaps.
Max Gap
This sets the tolerable gap sizes for both gap ends of the fragment labeling.
Max Spike
Sets the max allowable velocity of a marker (mm/frame) for it to be considered as a spike.


Apply Labels
When using the Spike or Fragment range setting, the label will be applied until the marker trajectory is discontinued with a gap that is larger than the maximum gap defined above. When using the All or Selected range setting, the label will be applied to the entire trajectory or just the selected ranges.
Forwards
Assigns the selected label onto a marker for current frame and frames forward.
Backwards
Assigns selected label onto a marker for current frame and frames backward.
Forwards & backwards
Assigns selected label onto the marker for current frame, frames forward, and frames backward.
Was this helpful?

