Entertainment Marker Sets
Overview
There are two different Skeleton marker templates that can be used for entertainment applications: Baseline and Core. Both of these Marker Sets provide high-quality tracking, but the Core marker set templates may provide more stable tracking for high-camera count systems.
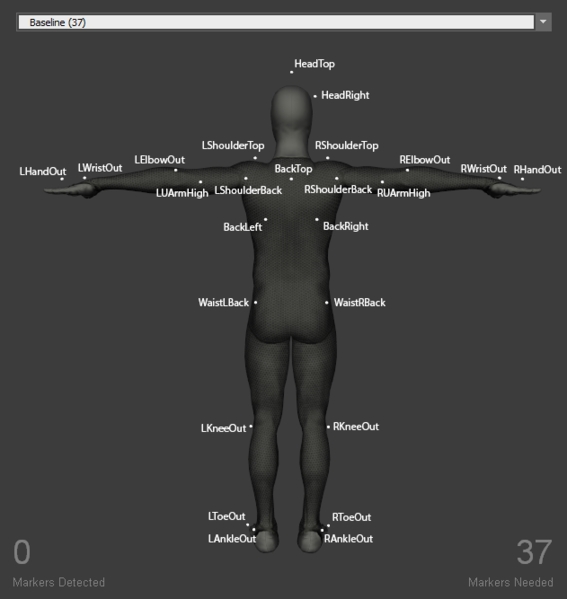
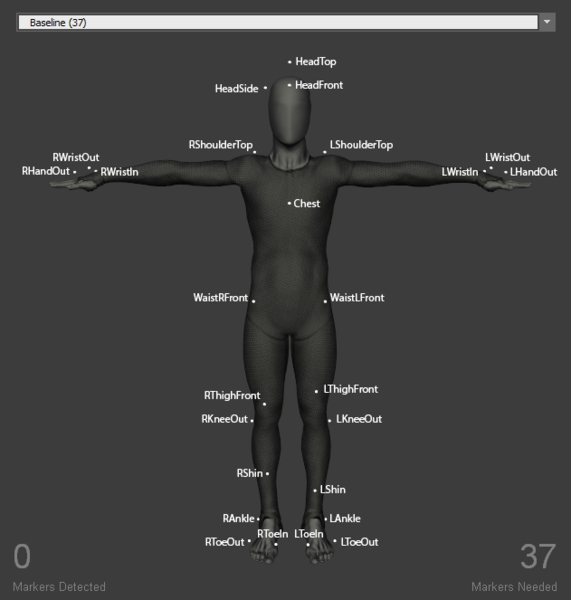
Among these marker sets, some of the placements are shared. For example, the Baseline (41) Marker Sets serves as a starting point, and the other baseline Marker Sets add more markers to it. When attaching the markers, you should reference the Skeleton avatar from the Builder pane for relative locations. The following charts and pages provide additional descriptions to where each marker should be placed, find related markers or click on one of the baseline Marker Sets pages for specific placement descriptions.
Asymmetry
Asymmetry is the key to avoiding the congruency for tracking multiple Marker Sets. When there are more than one similar marker arrangements in the volume, marker labels may be confused. Thus, it is beneficial to place segment makers — joint markers must always be placed on anatomical landmarks — in asymmetrical positions for similar rigid bodies and skeletal segments. This provides a clear distinction between two similar arrangements. Furthermore, avoid placing markers in a symmetrical shape within the segment as well. For example, a perfect square marker arrangement will have ambiguous orientation and frequent mislabels may occur throughout the capture. Instead, follow the rule of thumb of placing the less critical markers in asymmetrical arrangements.
Skeleton Templates
List of Baseline marker set templates
List of Core marker set templates
Baseline Markers
Head Markers
Label
Related Segment
Description
HeadTop
Head
Place the marker on the head tip.
HeadFront
Head
Place the marker at the center of the forehead.
HeadSide
Head
Place the marker on the either side of the head, slightly above the ear. When capturing multiple actors with similar proportions, place the marker on opposite side for clearer distinction.
Torso Markers
Label
Related Segment
Description
BackTop
Torso
Place the marker on the spine right below the neck. For best results, LUArmHigh-LShoulderBack-BackTop-RshoulderBack-RUArmHigh markers should align roughly in a straight line when the actor is in T-pose. Also, note that this marker must be placed at an elevation higher than the chest marker for the torso segment to be tracked properly.
Chest
Torso
Place the marker at the center of the sternum, about 5 cm below where the neck starts.
BackLeft BackRight
Torso
These two markers are located symmetrically on each side of the back, slightly below the lowest end of the shoulder blade (scapular bone).
Waist Markers
Label
Related Segment
Description
WaistLFront
Pelvis
Placed the marker on the protruding bone located on the front of the pelvis (left/right anterior iliac spine bone). The prominence can be palpated from left and right side of the waist.
WaistRFront
Pelvis
WaistLBack WaistRBack
Pelvis
Place the WaistLBack and WaistRBack markers above left/right hip; about 10 cm above the hip joint.
Note that the waist markers are the key markers in modeling the pelvis bone, which is the major segment governing the other subsequent Skeleton segments. For best results, avoid placing the waist markers in a rectangle shape. When tracking multiple actors with similar proportions, introduce an offset to one of the WaistBack marker, or the WaistCMarker (included only with the 13 additional Marker Set), to create an asymmetrical arrangements.
Shoulder Markers
Label
Related Segment
Description
LShoulderBack RShoulderBack
Shoulder
Place the marker on the shoulder joint (glenohumeral joint) on the back.
LShoulderTop RShoulderTop
Shoulder
Place the marker at the top of each shoulder where you can palpate the protruding bone, which is usually located just before where the upper arm start when in T-pose. More specifically, the prominence is on the distal end of the clavicle bone (acrominoclavicular joint).
When placing the shoulder markers, ask the actor to stand in the T-pose in order to place the markers on accurate locations. It could also be helpful to ask the actor to do few rounds of arm abduction and adduction to palpate for the shoulder axis. These markers determine the width of the shoulder and respective relationship with the upper arm segment.
Arm Markers
Label
Related Segment
Description
LElbowOut RElbowOut
Upper Arm
Place the marker on the lateral side of the elbow joint, slightly towards the upper arm. More specifically, on the lateral epicondyle of the distal end of the humerous. Ask the actor to flex and extend the arm few times to confirm that markers are placed along the elbow axis and maintain stationary throughout the range of motion cycles.
LUArmHigh RUArmHigh
Upper Arm
Place the marker on the back of the upper arm near the groove between the triceps. For best results, LUArmHigh, LShoulderBack, BackTop, RshoulderNack, and RUArmHigh should align roughly in a straight line when in T-pose.
Label
Related Segment
Description
LWristOut RWristOut
Fore Arm / Hand
Place the marker on the outside (lateral side) of the wrist axis. (distal end of the radius bone). Note that the wrist axis is not always located on the protruding bone but 1-2 cm more towards the hand.
LWristIn RWristIn
Fore Arm / Hand
Place the marker on the inner prominence (medial side) of the wrist axis (distal end of the ulnar bone).
LHandOut RHandOut
Hand
Place the marker slightly below the pinky knuckle. More specifically, between distal end of the fifth and fourth mertacarpal bones.
For best results, place the hand markers so that the shape of the marker arrangement is asymmetrical itself and also unique to the shape on the other hand. Since the wrist marker placement is fixed along the wrist axis, offset the HandOut or the HandIn markers to create the unique arrangements. For more robust and simple tracking, hand rigid-bodies can be attached on the hand to replace the markers and guarantee the asymmetrical and non-deforming marker placement.
Leg Markers
Label
Related Segment
Description
LThighFront RThighFront
Upper Leg
Place the marker on the front side of the thigh, along the midline. For best results, slightly offset the height of the left and right markers to introduce the asymmetry.
LKneeOut RKneeOut
Upper Leg
Place the marker on the outter prominence of the knee joint; on the lateral epicondyle of the femur. Palpate the knee for the protruding bone from the upper leg, and place it right on the axis. Ask the actor to flex and extend the knee few times to confirm that the markers are placed along the axis and maintain stationary throughout the range of motion cycles.
LShin RShin
Lower Leg
Place the marker on the shin bone; on the midline of the lower leg. For best results, slightly offset the height of the left and right markers to introduce the asymmetry.
Foot Markers
Label
Related Segment
Description
LAnkleOut RAnkleOut
Lower Leg/Foot
Place the marker on the protruding bone outside of the ankle joint; on the lateral end of the malleolus bone.
LToeOut RToeOut
Foot
Place the marker just before the little toe joint; on the distal end of the fifth metatarsal bone.
LToeIn RToeIn
Foot
Place the marker just before the big toe joint; on the distal end of the first metatarsal bone.
Was this helpful?


