LogoLogo
WebsiteSupportDownloadsForumsQuick LinksContact Us
v3.1
v3.1
  • OptiTrack Documentation
  • WHAT'S NEW
    • What's New in Motive 3.1
  • QUICK START GUIDES
    • Quick Start Guide: Getting Started
    • Quick Start Guide: Prime Color Camera Setup
    • Quick Start Guide: Precision Capture
    • Quick Start Guide: Tutorial Videos
    • Quick Start Guide: Active Marker Tracking
    • Quick Start Guide: Outdoor Tracking Setup
  • HARDWARE
    • Cameras
      • Ethernet Cameras
        • PrimeX 120
        • PrimeX 41
        • PrimeX 22
        • PrimeX 13
        • PrimeX 13W
        • SlimX 13
        • Prime Color
      • USB Cameras
        • Slim 3U
        • Flex 13
        • Flex 3
        • Duo 3
        • Trio 3
        • Adjusting Global Origin for Tracking Bars
    • Prepare Setup Area
    • Camera Mount Structures
    • Camera Placement
    • Ethernet Camera Network Setup
      • General Overview and Specs
      • Windows 10 Network Settings
      • Cabling and Load Balancing
      • Switch Configuration for PrimeX 120
      • NETGEAR ProSafe GSM7228S: Disabling the Broadcast Storm Control
      • White/Blacklisting Cameras
    • USB Camera System Setup
      • USB Camera Network Overview and Specs
      • Duo 3 and Trio 3 Setup
      • Tracking Bar Coordinate System
        • Transforming Coordinate System: Global to Local
    • Aiming and Focusing
    • Camera Status Indicators
  • MOTIVE
    • Installation and License Activation
    • Motive Basics
    • Calibration
      • Continuous Calibration
      • Continuous Calibration (Info Pane)
      • Calibration Squares
    • Markers
    • Assets
      • Gizmo Tool: Translate, Rotate, and Scale
    • Rigid Body Tracking
      • Aligning Rigid Body Pivot Point with a Replicated 3D Model
    • Skeleton Tracking
    • Trained Markersets
    • IMU Sensor Fusion
    • Data Recording
      • Data Types
    • Labeling
    • Data Editing
    • Data Export
      • Data Export: BVH
      • Data Export: C3D
      • Data Export: CSV
      • Data Export: FBX
      • Data Export: TRC
    • Data Streaming
    • Camera Video Types
    • Audio Recording
    • Motive HotKeys
    • Measurement Probe Kit Guide
    • Motive Batch Processor
    • Reconstruction and 2D Mode
  • MOTIVE UI PANES
    • Settings
      • Settings: General
      • Settings: Assets
      • Settings: Live Pipeline
      • Settings: Streaming
      • Settings: Views
      • Settings: Mouse and Keyboard
      • Settings: Audio
    • Assets Pane
    • Builder Pane
    • Constraints Pane
      • Constraints XML Files
    • Calibration Pane
    • Data Pane
    • Devices Pane
    • Edit Tools Pane
    • Graph View Pane
    • Info Pane
    • Labels Pane
    • Log Pane
    • Probe Pane
    • Properties Pane
      • Properties Pane: Camera
      • Properties Pane: Force Plates
      • Properties Pane: NI-DAQ
      • Properties Pane: OptiHub2
      • Properties Pane: Rigid Body
      • Properties Pane: Skeleton
      • Properties Pane: Take
      • Properties Pane: Trained Markerset
      • Properties Pane: eSync2
    • Status Panel
    • Toolbar/Command Bar
    • Control Deck
    • Viewport
  • PLUGINS
    • OptiTrack Blender Plugin
      • OptiTrack Blender Plugin
    • OptiTrack Unreal Engine Plugin
      • Unreal Engine: OptiTrack Streaming Client Plugin
      • Unreal Engine: OptiTrack Live Link Plugin
        • Quick Start Guide: Real-Time Retargeting in Unreal Engine with Live Link Content
        • Unreal Editor for Fortnite (UEFN): OptiTrack Plugin for Live Link Hub
        • Unreal Engine: Live Link Camera Stream Setup
        • Live Link Content: Active Puck Static Meshes
      • Unreal Engine: MotionBuilder Workflow
      • Unreal Engine: HMD Setup
      • Unreal Engine VCS Inputs
    • OptiTrack Unity Plugin
      • Unity: HMD Setup
    • OptiTrack OpenVR Driver
    • Autodesk Maya
      • Autodesk Maya: OptiTrack Insight VCS Plugin
    • Autodesk MotionBuilder
      • Autodesk MotionBuilder Plugin
      • Autodesk MotionBuilder: OptiTrack Skeleton Plugin
      • Autodesk MotionBuilder: OptiTrack Optical Plugin
      • Autodesk MotionBuilder: OptiTrack Insight VCS Plugin
      • Autodesk MotionBuilder: Timecode Data
    • OptiTrack Peripheral API
    • External Plugins
      • Houdini 19 Integration
  • ACTIVE COMPONENTS
    • Active Components Hardware
      • Active Puck
      • CinePuck
      • BaseStation
      • Information for Assembling the Active Tags
      • Manus Glove Setup
    • Configuration
      • Active Batch Programmer
      • Active Hardware Configuration: PuTTY
      • Active Component Firmware Compatibility
    • Active Marker Tracking
      • Active Finger Marker Set
  • SYNCHRONIZATION
    • Synchronization Hardware
      • External Device Sync Guide: eSync 2
      • External Device Sync Guide: OptiHub2
    • Synchronization Setup
    • OptiTrack Timecode
  • VIRTUAL PRODUCTION
    • Unreal Engine: OptiTrack InCamera VFX
    • Entertainment Marker Sets
    • PrimeX 41
  • MOVEMENT SCIENCES
    • Movement Sciences Hardware
      • General Motive Force Plate Setup
      • AMTI Force Plate Setup
      • Bertec Force Plate Setup
      • Kistler Force Plate Setup
      • Delsys EMG Setup
      • NI-DAQ Setup
      • Multiple Device Setup
    • Movement Sciences Marker Sets
      • Biomechanics Marker Sets
      • Biomech (57)
      • Rizzoli Marker Sets
    • For Visual3D Users
    • Prime Color Camera Setup
      • Prime Color Setup: Required Components
      • Prime Color Setup: Hardware Setup
      • Prime Color Camera Setup: Camera Settings
      • Prime Color Camera Setup: Prime Color FS Calibration
      • Prime Color Setup: Data Recording / Export
      • Prime Color Camera Setup: FAQ / Troubleshooting
      • Prime Color Camera Setup: Windows Network Settings
  • VIRTUAL REALITY
    • VR Plugins
      • VR Unreal Engine
        • OptiTrack Unreal Engine Plugin
        • Unreal Engine: OptiTrack Live Link Plugin
          • UE5.1 Live Link Retarget External Workaround
        • Unreal Engine: Using the OptiTrack Streaming Client Plugin
        • Unreal Engine VCS Inputs
      • VR Unity
        • OptiTrack Unity Plugin
      • VR OpenVR
        • OptiTrack OpenVR Driver
    • VR HMD Setup
      • Unreal Engine: HMD Setup
      • Unity: HMD Setup
      • Manually Calibrating the HMD Pivot Point
      • Sync Configuration with an HTC Vive System
    • SlimX 13
    • Active Marker Tracking
      • Active Finger Marker Set
    • Synchronization Hardware
      • External Device Sync Guide: eSync 2
      • External Device Sync Guide: OptiHub2
  • ANIMATION
    • Autodesk Maya
      • Autodesk Maya: OptiTrack Insight VCS Plugin
    • Autodesk MotionBuilder
      • Autodesk MotionBuilder Plugin
      • Autodesk MotionBuilder: OptiTrack Skeleton Plugin
      • Autodesk MotionBuilder: OptiTrack Optical Plugin
      • Autodesk MotionBuilder: OptiTrack Insight VCS Plugin
      • Autodesk MotionBuilder: Timecode Data
  • ROBOTICS
    • MoCap4ROS2 Setup
    • OptiTrack Robot Applications
    • Outdoor Tracking Setup
  • DEVELOPER TOOLS
    • Developer Tools Overview
    • Camera SDK
      • Class: cCameraModule
      • Class: cUID
    • Motive API
      • Motive API: Quick Start Guide
      • Motive API Overview
      • Motive API: Function Reference
      • Motive API Camera Calibration
    • NatNet SDK
      • NatNet 4.1
      • NatNet: Class/Function Reference
      • NatNet: Creating a Managed (C sharp) Client Application
      • NatNet: Creating a Native (C++) Client Application
      • NatNet: Data Types
      • NatNet: Matlab Wrapper
      • NatNet: Migration to NatNet 3.0 libraries
      • NatNet: Remote Requests/Commands
      • NatNet: Sample Projects
      • NatNet: Unicast Data Subscription Commands
      • Latency Measurements
    • Peripheral API: Glove Devices
  • SKELETON MARKER SETS
    • Full Body
      • Baseline (41)
      • Core (50)
      • Biomech (57)
      • Conventional (39)
    • Full Body + Fingers
      • Baseline + Passive Fingers (49)
      • Baseline + Active Fingers (57)
      • Core + Passive Fingers (54)
      • Core + Active Fingers (62)
    • Upper
      • Baseline Upper (25)
      • Conventional Upper (27)
    • Lower
      • Baseline Lower (20)
      • Helen Hayes Lower (19)
      • Conventional Lower (16)
    • Hand and Fingers
      • Left/Right Hand (4) Active
      • Left/Right Hand (10) Active + Passive
      • Active Finger Marker Set
    • Glove Device Setup
      • Manus Glove Setup
      • StretchSense Glove Setup
    • Rizzoli Marker Sets
    • Entertainment Marker Sets
    • Rigid Body Skeleton Marker Set
  • GENERAL TROUBLESHOOTING
    • Licensing Troubleshooting
    • Windows 11 Optimization for Realtime Applications
    • Network Troubleshooting
    • Troubleshooting Q&A
    • Running Motive on High DPI Displays
    • Firewall Settings
Powered by GitBook
On this page
  • Hardware: Cabling and Wiring
  • Ethernet System
  • External Device Sync
  • Software: Data Streaming
  • NI-DAQ

Was this helpful?

Export as PDF
  1. GENERAL TROUBLESHOOTING

Troubleshooting Q&A

Hardware: Cabling and Wiring

Q: Can USB and Ethernet Cameras be used in a same system?

A:No.

Ethernet System

Q: Cameras are not detected in Motive

A: There are a number of reasons why this could be happening.

  • Firewall blocking the camera system.

  • Camera system not connected to its designated network card.

External Device Sync

Q: Peripheral Device - Motive crashes at its launch

A: Motive may freeze at launch if an incompatible version of the NI-DAQmx driver is installed. If Motive is crashing at launch and you have the NI-DAQmx driver already installed, try uninstalling the driver, restart the computer, and reinstall the driver by reinitiating the Motive installation process. When you select the peripheral device to be installed, it will lead to the compatible version of NI-DAQmx driver setup.

Software: Data Streaming

Q: Data is not streamed
  • Check the data streaming settings in Motive

    • Is Streaming Enabled in the Settings?

    • Is the Network Interface address set properly?

    • Are the desired data types enabled for streaming?

  • Check the data streaming settings in the client software.

    • Is the client application connected to the server at a network interface designated by the server?

  • Check if the desired data type is enabled for streaming.

NI-DAQ

Q: Connected NI-DAQ device is not detected in Motive

A**:**

1) Confirm the NI-DAQ device is detected by the MS Windows system (Devices Manager) and by the NI Device Monitor (task tray) that installs with your NI-DAQ software.

2) If the device is still not detected in Motive even after confirming the connection from the above step, completely uninstall the National Instruments Software drivers and re-install Motive. Make sure to choose 'Yes' to install packaged OptiTrack Peripheral Module and the NI-DAQmx runtime. After installing the drivers, it is essential to restart your computer.

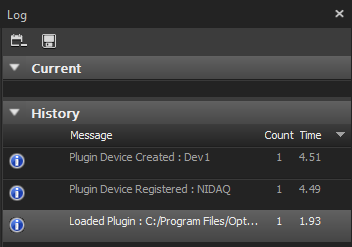
3) After launching Motive, check the Status Log panel (View tab → Status Log) and confirm the following:

a. The Peripheral Device module, or the OptiTrack Peripherals Module (OPM), is loaded by checking the Motive Status Log panel during startup.b. The NI-DAQ device is detected and created.

  • The Loaded Plugin message indicates the plugin was successfully loaded.

  • The Plugin Device Registered message indicates the devices is registered in Motive.

  • The Plugin Device Created message indicates the device is detected and initialized.

4) If the Status Log shows that it failed to load the plugin, make sure the BiomechDevicePlugin.dll is located within the devices folder in Motive's install directory.
Q: I have the NI-DAQmx driver installed for my DAQ device, but they are not the recommended version.

A: This is fine as long as the NI-DAQmx driver version is 15.1.1 or later. If you are experiencing connection difficulties, try uninstalling your current driver and re-installing the driver that ships with Motive.

Q: When installing the device NI-DAQmx driver, I get to a screen that indicates no changes will be made and I can't proceed.

A: This indicates the driver for your device is already installed. Hit cancel to exit the installer, and ensure the driver version is at least 15.1.1 or later. If not, update your driver. You can also re-install the driver that ships with Motive, but make sure the previous install is completely removed before the re-installation.

Q: I can't change the multiplier for my DAQ from the Devices pane in Motive.

A: If the device is configured to use external clock signals, the option to change the acquisition rate for NI-DAQ devices within Motive will be disabled. Set UseExternalClock to False to use the Free Run mode.

Q: Motive warns that the sampling rate is too high for my device.

A: This warning indicates that the sampling may be out of the allowable range for the DAQ device. Some devices share the allowable sample rate across all channels, and each channel takes up a portion of the total allowable sample rate of the device. Other devices have dedicated sample rates for each channel, and the allowable sample rate can be set for each channel in this case. For detailed specification on how your device samples incoming signals, refer to the respective NI-DAQ User's Guide.

Q: The analog input value does not appear to be correct.
Q: In the Device pane, I can't enable my device when checking the box next to it.

A: A device can't be enabled until one of it's channels is made active. Activate at least one channel under the device to enable the device itself. Only the channels that are active, and have the associated device enabled, will be recorded.

Q: No really, my analog input is incorrect.

A: Input channels can be verified using NI's Device Monitor and opening up a configuration session. Within the device monitor, the channel input can be observed. If the observed output is different from what appears in Motive, there may be an issue. This may also be due to aliasing of the sampled signal. Ensure that the signal is captured at the appropriate sampling frequency. A low sampling frequency may inaccurately capture high-frequency signals.

Q: Voltages from one channel seem to affect another channel.
PreviousNetwork TroubleshootingNextRunning Motive on High DPI Displays

Was this helpful?

A: Ensure that the appropriate channel type is selected. If your signal increases or decreases, with a steady baseline, your ground is not set correctly. See the section on for more information.

A: Crosstalk or ghosting is a normal occurrence in a digital acquisition device, and can be caused by a variety of sources. For detailed information on crosstalk, and steps you can take to minimize it, please refer to your NI-DAQ documentation. National Instrument also provides some steps on reducing unwanted voltages here:

http://digital.ni.com/public.nsf/allkb/B9BCDFD960C06B9186256A37007490CD?OpenDocument
channel types
Status log message when the NI-DAQ device is successfully loaded.