Calibration Pane
Calibration Pane is used for calibrating the mocap system through the calibration wanding process. This page provides descriptions on the fields and settings included on the calibration pane. Read through the Calibration workflow page to learn about the calibration process in detail.
In Motive, the Calibration pane can be accessed under the View tab or by clicking  icon on the main toolbar.
Calibration

Mask Visible
This masks all pixels that are above the set threshold. By default, the threshold is set to 200 but this can be changed by the user in the cameras pane. Pixels in a camera image will have a grayscale value between 0 and 255 inclusively. If the default threshold is used, a pixel that is above 200 will be blocked along with the surrounding pixels.
This feature is a quick way to block data that is not needed and can be used in tandem with manual masking.
Start Wanding
This will start recording wand samples. After masking the cameras, press the start wanding button to begin your wand wave.
Reset
This will stop wand acquisition and the calibration solver.
Calibration Options

Calibration Type
You can selected different calibration types before wanding: Full, Refine, Refine Extrinsic Only, Visualize Only.
Full: Calibrate cameras from scratch, discarding any prior known position of the camera group or lens distortion information. A Full calibration will also take the longest time to run.
Refine: Adjusts slight changes on the calibration of the cameras based on prior calibrations. This will solve faster than a Full calibration. Only use this if your previous calibration closely reflects the placement of cameras. In other words, Refine calibration only works if you do not move the cameras significantly from when you last calibrated them. Only slight modifications can be allowed in camera position and orientation, which often occurs naturally from the environment such as mount expansion.
Visual: Only render the calibration solution visual and will not calibrate your cameras. This can be used to validate the quality of existing calibration by comparing position and orientation of the cameras.
OptiWand
This options allows the user to select which calibration wand their using. The dimension must match the wand exactly in order for the system to be properly calibrated.
Calibration Wands:
Wands come in 250, 400 and 500 mm sizes. Custom wands can also be used. A 250 mm wand should be used for smaller volumes or for systems that have cameras with lenses that have larger focal lengths. The reason being that the cameras will not be able to see all 3 markers on a 500 mm wand if the wand is close to the camera or the camera has a very narrow view angle due to it's lens type.
If your camera's are not collecting wand samples while wanding, you may need to use a shorter wand. A 250 mm wand is good to use in most small to medium volumes. When making a calibration wand, understand that the system accuracy will be tied directly to the accuracy at which the wand is constructed. A poorly measure wand will result in poor calibration results. To make a wand all that is needed is 3 markers at set distances in a line.
Wand Length (mm)
This can be set when creating a custom wand and is the measure of the distance between the two outer marker centers. The accuracy of this measurement will directly impact camera calibration results, so be careful when creating and setting a custom wand.
Center Distance (mm)
Defines the distance in millimeters between the outer post and the center post (use the shorter of the two center offset distances). For use with custom calibration wands.
Calibration Engine

Calculate
Initiates the calibration solver. Press this button after collecting enough wand samples.
Apply Result
Applies the calibration results to the cameras. Once pressed, this button will bring up a calibration result box. If the calibration result is satisfactory, press Apply. After you save the wanding the camera calibration pane will switch over to the Ground Plane tab so you can set the global origin.
Wanding Table
While wanding the bottom part of the Camera Calibration Pane will show a table of the number of samples collected for each camera in the system. The samples will increase as the wand is waved in the capture volume.
Calibration Results Table
The calibration results will show in the Calibration Engine portion of the Calibration pane. The elapsed time of the calibration solver is shown at the bottom of the list. If no calibration is being processed this area will remain blank. However, when a wanding or a calibration solver is underway, this field will be populated with a table showing the live results of the solution. The components of that table are described below.
Cam
This column shows the camera number associated with the row of data, the wanding result or the average result of the camera group. The wanding has error and is reported as the deviation in the wand markers across all samples.
Samp
The number of samples utilized at the current stage of the solution. This number can climb as the solution converges.
Quality
The quality given to the current pixel error. You will see the quality increase as the pixel error drops. Quality ranges in the progress bar. Red is poor, yellow is good, and green is excellent.
Focal
This is the calculated or given focal length of the camera. Doesn't apply to the average or the wanding.
PixErr
The average pixel error of the camera. Represent the 2 dimensional error of the camera's ability to locate a marker.
As the calibration proceeds through the various phases of the solution you may notice the results slowing when a phases is finishing. Let the calibration finish all phases of the calibration. Once the solver converges on an appropriate solution, press the Apply Result button to apply the solution to the cameras. If you are unsatisfied with the results, hit reset near the top of the pane to cancel the results.
Ground Plane
Ground plane tab under the calibration pane

Set Ground Plane
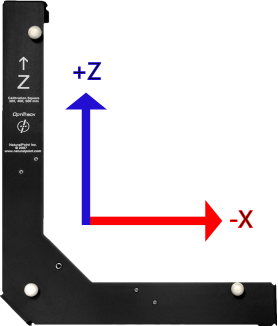
Set the location of the global origin. Use an 'L' Frame or 3 markers in the shape of an 'L'. If only 3 markers are seen by the cameras, you can simply press 'Set Ground Plane'. If more markers are in view then you can select the 3 markers you want to use in the 3D viewport and then press 'Set Ground Plane'.
Motive 1.6 and earlier : L-Frame long (marked Z) "leg" interpreted as -Z, L-Frame short (unlabeled) leg interpreted as +X Motive 1.7 : L-Frame long (marked Z) "leg" interpreted as +Z, L-Frame short (unlabeled) leg interpreted as -X


Vertical Offset
In this section you can assign the Vertical Offset value. The Vertical Offset (mm) is the difference in height (y-direction) between the L frame vertex marker and the actual ground plane. Use positive values to set the global origin below the 3 marker vertex and negative values to set the global origin above the 3 marker vertex. Motive will recognize calibration squares, unless custom designed, and will ask to correct the offset value before the calibration process. However, the global origin is arbitrary and can be placed anywhere the user desires.
Ground Plane Refinement
The Ground Plane Refinement feature can be used to refine the ground plane. You can select multiple reconstructions and use the corresponding 3D points to level the ground plane. This refinement feature assumes that the selected markers are all placed on the ground with a given vertical offset (mm) between the marker centroids to the ground surface, and then they use the selected samples to refine the ground plane.
Especially in large-scale volumes where the floor is not uniform, defining a ground plane using the calibration square may not be sufficient because it would be referencing just a local part of the volume. For such cases, this feature allows users to further refine the ground plane.
For example, you can evenly spread out 4 or more spherical markers throughout the floor. Specify the marker centroid to ground vertical offset distance, which would be the radius of the marker in this case. Then press the Ground Refinement button. This will change the vertical location of the floor, ensuring all of the markers are above the floor.
Capture Volume Translation
The Volume Translation modifies the global origin after it has been set.
Simply enter the amounts you want to translate the origin in the X, Y and/or Z direction and press the Apply Translation button. There is no limit to the number of translations that can be applied and there is no memory once a translation is applied. To revert a translation, simply translate the origin be an equivalent amount in the opposite direction. If there is existing 3D data in the Take, you will need to reconstruct a new set of 3D data from recorded 2D data after the translation has been applied.
Capture Volume Rotation
The Volume Rotation is use to apply a rotational offset to the current global origin. If there is existing 3D data in the Take, you will need to reconstruct a new set of 3D data from recorded 2D data after the rotation has been applied.
Last updated
Was this helpful?