LogoLogo
WebsiteSupportDownloadsForumsQuick LinksContact Us
v3.2
v3.2
  • OptiTrack Documentation
  • WHAT'S NEW
    • What's New in Motive 3.2
  • QUICK START GUIDES
    • Quick Start Guide: Getting Started
    • Quick Start Guide: Prime Color Camera Setup
    • Quick Start Guide: Precision Capture
    • Quick Start Guide: Tutorial Videos
    • Quick Start Guide: Active Marker Tracking
    • Quick Start Guide: Outdoor Tracking Setup
  • HARDWARE
    • Cameras
      • Ethernet Cameras
        • PrimeX 120
        • PrimeX 41
        • PrimeX 22
        • PrimeX 13
        • PrimeX 13W
        • SlimX 13
        • Prime Color
        • VersaX 22
        • VersaX 41
        • VersaX 120
      • USB Cameras
        • Slim 3U
        • Flex 13
        • Flex 3
        • V120:Duo
        • V120:Trio
        • Adjusting Global Origin for Tracking Bars
    • Prepare Setup Area
    • Camera Mount Structures
    • Camera Placement
    • Ethernet Camera Network Setup
      • General Overview and Specs
      • Windows 10 Network Settings
      • Cabling and Load Balancing
      • Switch Configuration for PrimeX 120
      • NETGEAR ProSafe GSM7228S: Disabling the Broadcast Storm Control
      • White/Blacklisting Cameras
    • USB Camera System Setup
      • USB Camera Network Overview and Specs
      • V120:Duo and Trio Setup
      • Tracking Bar Coordinate System
        • Transforming Coordinate System: Global to Local
    • Aiming and Focusing
    • Camera Status Indicators
  • MOTIVE
    • Installation and License Activation
    • Motive Basics
    • Calibration
      • .mcal XML Calibration Files
      • Continuous Calibration
      • Continuous Calibration (Info Pane)
      • Calibration Squares
    • Markers
    • Assets
      • Gizmo Tool: Translate, Rotate, and Scale
    • Rigid Body Tracking
      • Aligning Rigid Body Pivot Point with a Replicated 3D Model
    • Skeleton Tracking
    • Trained Markersets
    • IMU Sensor Fusion
    • Data Recording
      • Data Types
    • Labeling
    • Data Editing
    • Data Export
      • Data Export: BVH
      • Data Export: C3D
      • Data Export: CSV
      • Data Export: FBX
      • Data Export: TRC
    • Data Streaming
    • Camera Video Types
    • Audio Recording
    • Motive HotKeys
    • Measurement Probe Kit Guide
    • Motive Batch Processor
    • Reconstruction and 2D Mode
  • MOTIVE UI PANES
    • Settings
      • Settings: General
      • Settings: Assets
      • Settings: Live Pipeline
      • Settings: Streaming
      • Settings: Views
      • Settings: Mouse and Keyboard
      • Settings: Audio
    • Assets Pane
    • Builder Pane
    • Constraints Pane
      • Constraints XML Files
    • Calibration Pane
    • Data Pane
    • Devices Pane
    • Edit Tools Pane
    • Graph View Pane
    • Info Pane
    • Labels Pane
    • Log Pane
    • Probe Pane
    • Properties Pane
      • Properties Pane: Camera
      • Properties Pane: Force Plates
      • Properties Pane: NI-DAQ
      • Properties Pane: OptiHub2
      • Properties Pane: Rigid Body
      • Properties Pane: Skeleton
      • Properties Pane: Take
      • Properties Pane: Trained Markerset
      • Properties Pane: eSync2
    • Status Panel
    • Toolbar/Command Bar
    • Control Deck
    • Viewport
  • PLUGINS
    • OptiTrack Blender Plugin
      • OptiTrack Blender Plugin
    • OptiTrack Unreal Engine Plugin
      • Unreal Engine: OptiTrack Live Link Plugin
        • Quick Start Guide: Real-Time Retargeting in Unreal Engine with Live Link Content
        • Unreal Editor for Fortnite (UEFN): OptiTrack Plugin for Live Link Hub
        • Unreal Engine: Live Link Camera Stream Setup
        • Live Link Content: Active Puck Static Meshes
      • Unreal Engine: MotionBuilder Workflow
      • Unreal Engine: HMD Setup
      • Unreal Engine VCS Inputs
    • OptiTrack Unity Plugin
      • Unity: HMD Setup
    • OptiTrack OpenVR Driver
    • OptiTrack MATLAB Plugin
    • Autodesk Maya
      • Autodesk Maya: OptiTrack Insight VCS Plugin
    • Autodesk MotionBuilder
      • Autodesk MotionBuilder Plugin
      • Autodesk MotionBuilder: OptiTrack Skeleton Plugin
      • Autodesk MotionBuilder: OptiTrack Optical Plugin
      • Autodesk MotionBuilder: OptiTrack Insight VCS Plugin
      • Autodesk MotionBuilder: Timecode Data
    • OptiTrack Peripheral API
    • External Plugins
      • Houdini 19 Integration
  • ACTIVE COMPONENTS
    • Active Components Hardware
      • Active Puck
      • Wired AnchorPuck
      • CinePuck
      • Wired CinePuck
      • BaseStation
      • Information for Assembling the Active Tags
      • Manus Glove Setup
    • Configuration
      • Active Batch Programmer
      • Active Hardware Configuration: PuTTY
      • Active Component Firmware Compatibility
    • Active Marker Tracking
      • Active Finger Marker Set
  • SYNCHRONIZATION
    • Synchronization Hardware
      • External Device Sync Guide: eSync 2
      • External Device Sync Guide: OptiHub2
    • Synchronization Setup
    • OptiTrack Timecode
  • VIRTUAL PRODUCTION
    • Unreal Engine: OptiTrack InCamera VFX
    • Entertainment Marker Sets
    • PrimeX 41
  • MOVEMENT SCIENCES
    • Movement Sciences Hardware
      • General Motive Force Plate Setup
      • AMTI Force Plate Setup
      • Bertec Force Plate Setup
      • Kistler Force Plate Setup
      • Delsys EMG Setup
      • NI-DAQ Setup
      • Multiple Device Setup
    • Movement Sciences Marker Sets
      • Biomechanics Marker Sets
      • Biomech (57)
      • Rizzoli Marker Sets
    • For Visual3D Users
    • Prime Color Camera Setup
      • Prime Color Setup: Required Components
      • Prime Color Setup: Hardware Setup
      • Prime Color Camera Setup: Camera Settings
      • Prime Color Camera Setup: Prime Color FS Calibration
      • Prime Color Setup: Data Recording / Export
      • Prime Color Camera Setup: FAQ / Troubleshooting
      • Prime Color Camera Setup: Windows Network Settings
  • VIRTUAL REALITY
    • VR Plugins
      • VR Unreal Engine
        • OptiTrack Unreal Engine Plugin
        • Unreal Engine: OptiTrack Live Link Plugin
          • UE5.1 Live Link Retarget External Workaround
        • Unreal Engine VCS Inputs
      • VR Unity
        • OptiTrack Unity Plugin
      • VR OpenVR
        • OptiTrack OpenVR Driver
    • VR HMD Setup
      • Unreal Engine: HMD Setup
      • Unity: HMD Setup
      • Manually Calibrating the HMD Pivot Point
      • Sync Configuration with an HTC Vive System
    • SlimX 13
    • Active Marker Tracking
      • Active Finger Marker Set
    • Synchronization Hardware
      • External Device Sync Guide: eSync 2
      • External Device Sync Guide: OptiHub2
  • ANIMATION
    • Autodesk Maya
      • Autodesk Maya: OptiTrack Insight VCS Plugin
    • Autodesk MotionBuilder
      • Autodesk MotionBuilder Plugin
      • Autodesk MotionBuilder: OptiTrack Skeleton Plugin
      • Autodesk MotionBuilder: OptiTrack Optical Plugin
      • Autodesk MotionBuilder: OptiTrack Insight VCS Plugin
      • Autodesk MotionBuilder: Timecode Data
  • ROBOTICS
    • MoCap4ROS2 Setup
    • OptiTrack Robot Applications
    • Outdoor Tracking Setup
  • DEVELOPER TOOLS
    • Developer Tools Overview
    • Camera SDK
      • Class: cCameraModule
      • Class: cUID
    • Motive API
      • Motive API: Quick Start Guide
      • Motive API Overview
      • Motive API: Function Reference
      • Motive API Camera Calibration
    • NatNet SDK
      • NatNet 4.1
      • NatNet: Class/Function Reference
      • NatNet: Creating a Managed (C sharp) Client Application
      • NatNet: Creating a Native (C++) Client Application
      • NatNet: Data Types
      • NatNet: Matlab Wrapper
      • NatNet: Migration to NatNet 3.0 libraries
      • NatNet: Remote Requests/Commands
      • NatNet: Sample Projects
      • NatNet: Unicast Data Subscription Commands
      • Latency Measurements
    • VRPN Sample
    • Peripheral API: Glove Devices
  • SKELETON MARKER SETS
    • Full Body
      • Baseline (41)
      • Core (50)
      • Biomech (57)
      • Conventional (39)
    • Full Body + Fingers
      • Baseline + Passive Fingers (49)
      • Baseline + Active Fingers (57)
      • Core + Passive Fingers (54)
      • Core + Active Fingers (62)
    • Upper
      • Baseline Upper (25)
      • Conventional Upper (27)
    • Lower
      • Baseline Lower (20)
      • Helen Hayes Lower (19)
      • Conventional Lower (16)
    • Hand and Fingers
      • Left/Right Hand (4) Active
      • Left/Right Hand (10) Active + Passive
      • Active Finger Marker Set
    • Glove Device Setup
      • Manus Glove Setup
      • StretchSense Glove Setup
    • Rizzoli Marker Sets
    • Entertainment Marker Sets
    • Rigid Body Skeleton Marker Set
  • GENERAL TROUBLESHOOTING
    • Licensing Troubleshooting
    • Windows 11 Optimization for Realtime Applications
    • Network Troubleshooting
    • Troubleshooting Q&A
    • Running Motive on High DPI Displays
    • Firewall Settings
Powered by GitBook
On this page
  • Planning Camera Placement
  • General Guide
  • Camera Placement Checkpoints
  • Placement Examples

Was this helpful?

Export as PDF
  1. HARDWARE

Camera Placement

PreviousCamera Mount StructuresNextEthernet Camera Network Setup

Was this helpful?

In optical motion capture systems, proper camera placement is very important in order to efficiently utilize the captured images from each camera. Before setting up the cameras, it is good idea to plan ahead and create a blueprint of the camera placement layout. This page highlights the key aspects and tips for efficient camera placements.

A well-arranged camera placement can significantly improve the tracking quality. When tracking markers, 3D coordinates are reconstructed from the 2D views seen by each camera in the system. More specifically, correlated 2D marker positions are triangulated to compute the 3D position of each marker. Thus, having multiple distinct vantages on the target volume is beneficial because it allows wider angles for the triangulation algorithm, which in turn improves the tracking quality. Accordingly, an efficient camera arrangement should have cameras distributed appropriately around the capture volume. By doing so, not only the tracking accuracy will be improved, but uncorrelated rays and marker occlusions will also be prevented. Depending on the type of tracking application, capture volume environment, and the size of a mocap system, proper camera placement layouts may vary.

Planning Camera Placement

An ideal camera placement varies depending on the capture application. In order to figure out the best placements for a specific application, a clear understanding of the fundamentals of optical motion capture is necessary.

To calculate 3D marker locations, tracked markers must be simultaneously captured by at least two synchronized cameras in the system. When not enough cameras are capturing the 2D positions, the 3D marker will not be present in the captured data. As a result, the collected marker trajectory will have gaps, and the accuracy of the capture will be reduced. Furthermore, extra effort and time will be required for the data. Thus, marker visibility throughout the capture is very important for tracking quality, and cameras need to be capturing at diverse vantages so that marker occlusions are minimized.

Depending on captured motion types and volume settings, the instructions for ideal camera arrangement vary. For applications that require tracking markers at low heights, it would be beneficial to have some cameras placed and aimed at low elevations. For applications tracking markers placed strictly on the front of the subject, cameras on the rear won't see those and as a result, become unnecessary. For large volume setups, installing cameras circumnavigating the volume at the highest elevation will maximize camera coverage and the capture volume size. For captures valuing extreme accuracy, it is better to place cameras close to the object so that cameras capture more pixels per marker and more accurately track small changes in their position.

Again, the optimal camera arrangement depends on the purpose and features of the capture application. Plan the camera placement specific to the capture application so that the capability of the provided system is fully utilized. Please if you need consulting with figuring out the optimal camera arrangement.

General Guide

For common applications of tracking 3D position and orientation of Skeletons and Rigid Bodies, place the cameras on the periphery of the capture volume. This setup typically maximizes the camera overlap and minimizes wasted camera coverage. General tips include the following:

  • Mount cameras at the desired maximum height of the capture volume.

  • Distribute the cameras equidistantly around the setup area.

  • Adjust angles of cameras and aim them towards the target volume.

  • For cameras with rectangular FOVs, mount the cameras in landscape orientation. In very small setup areas, cameras can be aimed in portrait orientation to increase vertical coverage, but this typically reduces camera overlap, which can reduce marker continuity and data quality.

TIP: For capture setups involving large camera counts, it is useful to separate the capture volume into two or more sections. This reduces amount of computation load for the software.

Camera Placement Checkpoints

Around the volume

For common applications tracking a Skeleton or a Rigid Body to obtain the 6 Degrees of Freedom (x,y,z-position and orientation) data, it is beneficial to arrange the cameras around the periphery of the capture volume for tracking markers both in front and back of the subject.

Camera Elevations

However, it can be beneficial to place cameras at varying elevations. Doing so will provide more diverse viewing angles from both high and low elevations and can significantly increase the coverage of the volume. The frequency of marker occlusions will be reduced, and the accuracy of detecting the marker elevations will be improved.
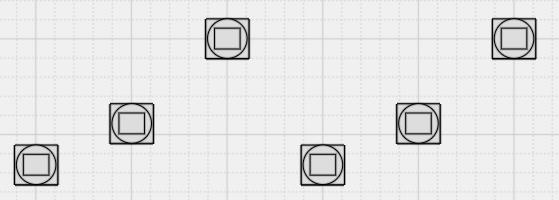
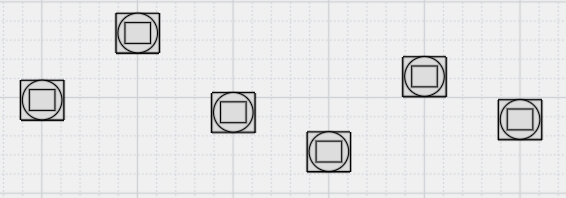
Camera to Camera Distance

Separating every camera by a consistent distance is recommended. When cameras are placed in close vicinity, they capture similar images on the tracked subject, and the extra image will not contribute to preventing occlusions or the reconstruction calculations. This overlap detracts from the benefit of a higher camera count and also doubles the computational load for the calibration process. Moreover, this also increases the chance of marker occlusions because markers will be blocked from multiple views simultaneously whenever obstacles are introduced.

Camera to Object Distance

An ideal distance between a camera and the captured subject also depends on the purpose of the capture. A long distance between the camera and the object gives more camera coverage for larger volume setups. On the other hand, capturing at a short distance will have less camera coverage but the tracking measurements will be more accurate. The cameras lens focus ring may need to be adjusted for close-up tracking applications.

Placement Examples
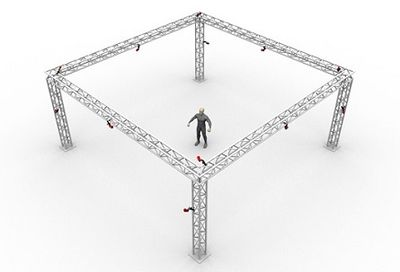
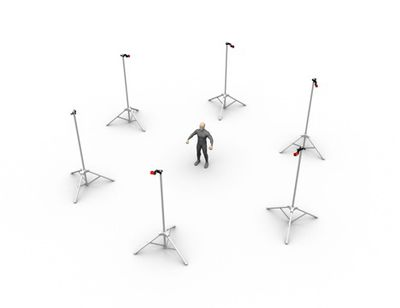
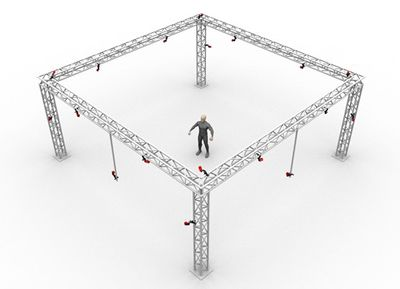
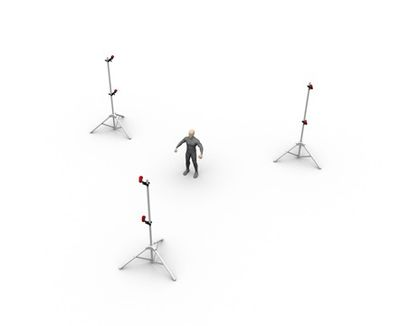
For typical motion capture setup, placing cameras at high elevations is recommended. Doing so maximizes the capture coverage in the volume, and also minimizes the chance of subjects bumping into the truss structure which can degrade calibration. Furthermore, when cameras are placed at low elevations and aimed across from one another, the synchronized IR illuminations from each camera will be detected, and will need to be from the 2D view.

post-processing
contact us
masked
Cameras placed at periodical elevations.
Cameras placed at random elevations.
Cameras placed at alternating elevations.
Click images to enlarge.