LogoLogo
WebsiteSupportDownloadsForumsQuick LinksContact Us
v3.2
v3.2
  • OptiTrack Documentation
  • WHAT'S NEW
    • What's New in Motive 3.2
  • QUICK START GUIDES
    • Quick Start Guide: Getting Started
    • Quick Start Guide: Prime Color Camera Setup
    • Quick Start Guide: Precision Capture
    • Quick Start Guide: Tutorial Videos
    • Quick Start Guide: Active Marker Tracking
    • Quick Start Guide: Outdoor Tracking Setup
  • HARDWARE
    • Cameras
      • Ethernet Cameras
        • PrimeX 120
        • PrimeX 41
        • PrimeX 22
        • PrimeX 13
        • PrimeX 13W
        • SlimX 13
        • Prime Color
        • VersaX 22
        • VersaX 41
        • VersaX 120
      • USB Cameras
        • Slim 3U
        • Flex 13
        • Flex 3
        • V120:Duo
        • V120:Trio
        • Adjusting Global Origin for Tracking Bars
    • Prepare Setup Area
    • Camera Mount Structures
    • Camera Placement
    • Ethernet Camera Network Setup
      • General Overview and Specs
      • Windows 10 Network Settings
      • Cabling and Load Balancing
      • Switch Configuration for PrimeX 120
      • NETGEAR ProSafe GSM7228S: Disabling the Broadcast Storm Control
      • White/Blacklisting Cameras
    • USB Camera System Setup
      • USB Camera Network Overview and Specs
      • V120:Duo and Trio Setup
      • Tracking Bar Coordinate System
        • Transforming Coordinate System: Global to Local
    • Aiming and Focusing
    • Camera Status Indicators
  • MOTIVE
    • Installation and License Activation
    • Motive Basics
    • Calibration
      • .mcal XML Calibration Files
      • Continuous Calibration
      • Continuous Calibration (Info Pane)
      • Calibration Squares
    • Markers
    • Assets
      • Gizmo Tool: Translate, Rotate, and Scale
    • Rigid Body Tracking
      • Aligning Rigid Body Pivot Point with a Replicated 3D Model
    • Skeleton Tracking
    • Trained Markersets
    • IMU Sensor Fusion
    • Data Recording
      • Data Types
    • Labeling
    • Data Editing
    • Data Export
      • Data Export: BVH
      • Data Export: C3D
      • Data Export: CSV
      • Data Export: FBX
      • Data Export: TRC
    • Data Streaming
    • Camera Video Types
    • Audio Recording
    • Motive HotKeys
    • Measurement Probe Kit Guide
    • Motive Batch Processor
    • Reconstruction and 2D Mode
  • MOTIVE UI PANES
    • Settings
      • Settings: General
      • Settings: Assets
      • Settings: Live Pipeline
      • Settings: Streaming
      • Settings: Views
      • Settings: Mouse and Keyboard
      • Settings: Audio
    • Assets Pane
    • Builder Pane
    • Constraints Pane
      • Constraints XML Files
    • Calibration Pane
    • Data Pane
    • Devices Pane
    • Edit Tools Pane
    • Graph View Pane
    • Info Pane
    • Labels Pane
    • Log Pane
    • Probe Pane
    • Properties Pane
      • Properties Pane: Camera
      • Properties Pane: Force Plates
      • Properties Pane: NI-DAQ
      • Properties Pane: OptiHub2
      • Properties Pane: Rigid Body
      • Properties Pane: Skeleton
      • Properties Pane: Take
      • Properties Pane: Trained Markerset
      • Properties Pane: eSync2
    • Status Panel
    • Toolbar/Command Bar
    • Control Deck
    • Viewport
  • PLUGINS
    • OptiTrack Blender Plugin
      • OptiTrack Blender Plugin
    • OptiTrack Unreal Engine Plugin
      • Unreal Engine: OptiTrack Live Link Plugin
        • Quick Start Guide: Real-Time Retargeting in Unreal Engine with Live Link Content
        • Unreal Editor for Fortnite (UEFN): OptiTrack Plugin for Live Link Hub
        • Unreal Engine: Live Link Camera Stream Setup
        • Live Link Content: Active Puck Static Meshes
      • Unreal Engine: MotionBuilder Workflow
      • Unreal Engine: HMD Setup
      • Unreal Engine VCS Inputs
    • OptiTrack Unity Plugin
      • Unity: HMD Setup
    • OptiTrack OpenVR Driver
    • OptiTrack MATLAB Plugin
    • Autodesk Maya
      • Autodesk Maya: OptiTrack Insight VCS Plugin
    • Autodesk MotionBuilder
      • Autodesk MotionBuilder Plugin
      • Autodesk MotionBuilder: OptiTrack Skeleton Plugin
      • Autodesk MotionBuilder: OptiTrack Optical Plugin
      • Autodesk MotionBuilder: OptiTrack Insight VCS Plugin
      • Autodesk MotionBuilder: Timecode Data
    • OptiTrack Peripheral API
    • External Plugins
      • Houdini 19 Integration
  • ACTIVE COMPONENTS
    • Active Components Hardware
      • Active Puck
      • Wired AnchorPuck
      • CinePuck
      • Wired CinePuck
      • BaseStation
      • Information for Assembling the Active Tags
      • Manus Glove Setup
    • Configuration
      • Active Batch Programmer
      • Active Hardware Configuration: PuTTY
      • Active Component Firmware Compatibility
    • Active Marker Tracking
      • Active Finger Marker Set
  • SYNCHRONIZATION
    • Synchronization Hardware
      • External Device Sync Guide: eSync 2
      • External Device Sync Guide: OptiHub2
    • Synchronization Setup
    • OptiTrack Timecode
  • VIRTUAL PRODUCTION
    • Unreal Engine: OptiTrack InCamera VFX
    • Entertainment Marker Sets
    • PrimeX 41
  • MOVEMENT SCIENCES
    • Movement Sciences Hardware
      • General Motive Force Plate Setup
      • AMTI Force Plate Setup
      • Bertec Force Plate Setup
      • Kistler Force Plate Setup
      • Delsys EMG Setup
      • NI-DAQ Setup
      • Multiple Device Setup
    • Movement Sciences Marker Sets
      • Biomechanics Marker Sets
      • Biomech (57)
      • Rizzoli Marker Sets
    • For Visual3D Users
    • Prime Color Camera Setup
      • Prime Color Setup: Required Components
      • Prime Color Setup: Hardware Setup
      • Prime Color Camera Setup: Camera Settings
      • Prime Color Camera Setup: Prime Color FS Calibration
      • Prime Color Setup: Data Recording / Export
      • Prime Color Camera Setup: FAQ / Troubleshooting
      • Prime Color Camera Setup: Windows Network Settings
  • VIRTUAL REALITY
    • VR Plugins
      • VR Unreal Engine
        • OptiTrack Unreal Engine Plugin
        • Unreal Engine: OptiTrack Live Link Plugin
          • UE5.1 Live Link Retarget External Workaround
        • Unreal Engine VCS Inputs
      • VR Unity
        • OptiTrack Unity Plugin
      • VR OpenVR
        • OptiTrack OpenVR Driver
    • VR HMD Setup
      • Unreal Engine: HMD Setup
      • Unity: HMD Setup
      • Manually Calibrating the HMD Pivot Point
      • Sync Configuration with an HTC Vive System
    • SlimX 13
    • Active Marker Tracking
      • Active Finger Marker Set
    • Synchronization Hardware
      • External Device Sync Guide: eSync 2
      • External Device Sync Guide: OptiHub2
  • ANIMATION
    • Autodesk Maya
      • Autodesk Maya: OptiTrack Insight VCS Plugin
    • Autodesk MotionBuilder
      • Autodesk MotionBuilder Plugin
      • Autodesk MotionBuilder: OptiTrack Skeleton Plugin
      • Autodesk MotionBuilder: OptiTrack Optical Plugin
      • Autodesk MotionBuilder: OptiTrack Insight VCS Plugin
      • Autodesk MotionBuilder: Timecode Data
  • ROBOTICS
    • MoCap4ROS2 Setup
    • OptiTrack Robot Applications
    • Outdoor Tracking Setup
  • DEVELOPER TOOLS
    • Developer Tools Overview
    • Camera SDK
      • Class: cCameraModule
      • Class: cUID
    • Motive API
      • Motive API: Quick Start Guide
      • Motive API Overview
      • Motive API: Function Reference
      • Motive API Camera Calibration
    • NatNet SDK
      • NatNet 4.1
      • NatNet: Class/Function Reference
      • NatNet: Creating a Managed (C sharp) Client Application
      • NatNet: Creating a Native (C++) Client Application
      • NatNet: Data Types
      • NatNet: Matlab Wrapper
      • NatNet: Migration to NatNet 3.0 libraries
      • NatNet: Remote Requests/Commands
      • NatNet: Sample Projects
      • NatNet: Unicast Data Subscription Commands
      • Latency Measurements
    • VRPN Sample
    • Peripheral API: Glove Devices
  • SKELETON MARKER SETS
    • Full Body
      • Baseline (41)
      • Core (50)
      • Biomech (57)
      • Conventional (39)
    • Full Body + Fingers
      • Baseline + Passive Fingers (49)
      • Baseline + Active Fingers (57)
      • Core + Passive Fingers (54)
      • Core + Active Fingers (62)
    • Upper
      • Baseline Upper (25)
      • Conventional Upper (27)
    • Lower
      • Baseline Lower (20)
      • Helen Hayes Lower (19)
      • Conventional Lower (16)
    • Hand and Fingers
      • Left/Right Hand (4) Active
      • Left/Right Hand (10) Active + Passive
      • Active Finger Marker Set
    • Glove Device Setup
      • Manus Glove Setup
      • StretchSense Glove Setup
    • Rizzoli Marker Sets
    • Entertainment Marker Sets
    • Rigid Body Skeleton Marker Set
  • GENERAL TROUBLESHOOTING
    • Licensing Troubleshooting
    • Windows 11 Optimization for Realtime Applications
    • Network Troubleshooting
    • Troubleshooting Q&A
    • Running Motive on High DPI Displays
    • Firewall Settings
Powered by GitBook
On this page
  • Head Markers
  • Torso Markers
  • Waist Markers
  • Upper Extremity Markers
  • Hand Markers
  • Lower Extremity Markers
  • Foot Markers
  • References

Was this helpful?

Export as PDF
  1. SKELETON MARKER SETS
  2. Full Body

Conventional (39)

PreviousBiomech (57)NextFull Body + Fingers

Was this helpful?

Head Markers

Labels
Related Segment
Anatomical Location
Placement Description

LAH RAH

Head

Left Anterior Head Right Anterior Head

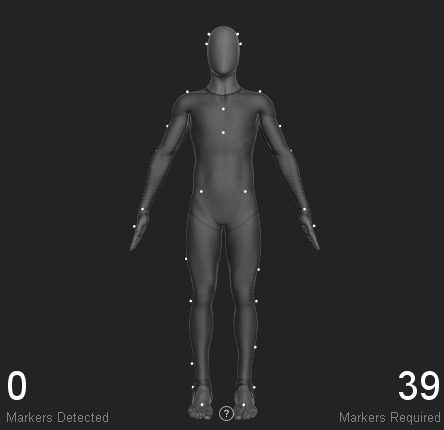
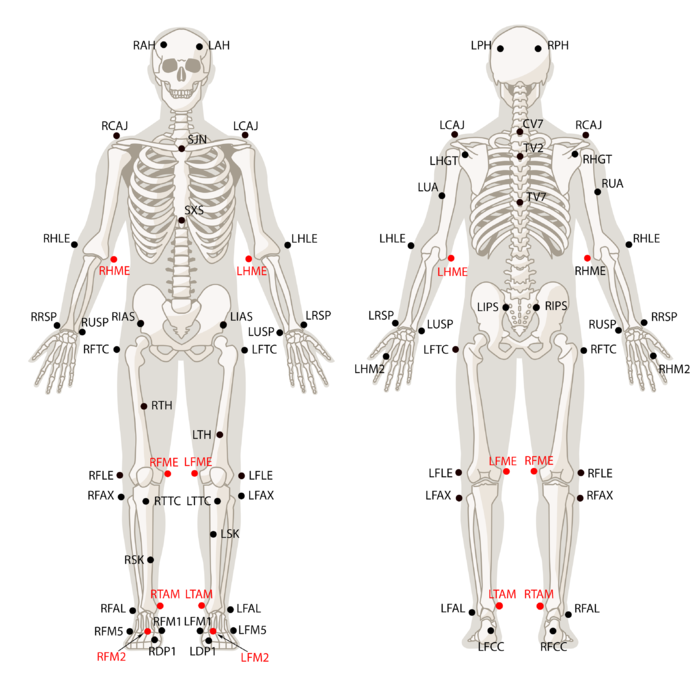
Place the markers on the left and right side of the fore head. The respective location is shown in the Skeleton figure.

LPH RPH

Head

Left Posterior head Right Posterior head

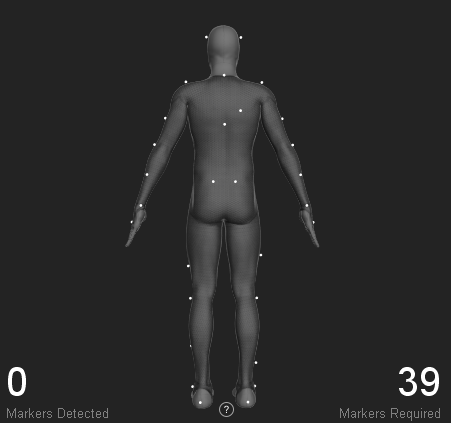
Place the markers on the left and right side of the head about 2 cm behind the ear. The respective location is shown in the Skeleton figure.

Torso Markers

Labels
Related Segment
Anatomical Location
Additional Description

Thorax

Sternum Jugular Notch

Top most section of the sternum. Place the marker on the center of the two clavicle bones.

Thorax

Sternum Xiphoid Process

Lowest section of the sternum. Place the marker 1-2 cm above where bottom of the two rib cages conjoin.

Thorax

Cervical Spine Vertebra 7

The 7th cervical spine vertebra is the largest vertebra located at the most inferior region of the neck. This section usually protrudes to the posterior side and can be palpated.

Thorax

Thoracic Spine Vertebra 2

The second thoracic spine vertebra is located three spine levels below the C7 vertebra. Which is located approximately at same height with shoulder joint markers.

Thorax

Thoracic Spine Vertebra 7

Usually located at the center of the thoracic spinal column.

Waist Markers

Labels
Related Segment
Anatomical Location
Additional Description

Pelvis

Left Iliac Anterior Spine Right Iliac Anterior Spine

Place the marker on the protruding bones located on the left and right side of the pelvis front.

Pelvis

Left Iliac Posterior Spine Right Iliac Posterior Spine

Place each marker on the two dimples which can be palpated near the spine right above the hips.

Note that the waist markers are the key markers in modeling the pelvis bone, which is the major segment governing the other subsequent Skeleton segments.

Upper Extremity Markers

Labels
Related Segment
Anatomical Location
Placement Description

Thorax

Left Clavicle-Acromion Joint Right Clavicle-Acromion Joint

Ask the subject to stretch both arms towards the side (T-pose), then palpate top of each shoulder for the protruding bone. The prominence is usually located at the end of the corresponding clavicle bone just before where the upper arm starts.

LHLE RHLE

Upper Arm

Left Humerus Lateral Epicondyle Right Humerus Lateral Epicondyle

Placed the markers on the lateral side of the elbow axis. Flex and extend the arm few times to find where elbow axis is located.

LUA RUA

Upper Arm

Left Upper Arm Right Upper Arm

Ask the subject to stand in T-pose while placing the marker. Palpate to find the groove between the triceps muscles where skin movements are relatively minimal.

Hand Markers

Labels
Related Segment
Anatomical Location
Placement Description

LHM2 RHM2

Hand

Left Hand Second metacarpal Right Hand Second metacarpal

Place the marker slight below the knuckle of the index finger.

LUSP RUSP

Hand

Left Ulna Styloid Process Right Ulna Styloid Process

Place the marker on the lateral side of the wrist axis.

LRSP RRSP

Hand

Left Radius Styloid Process Right Radius Styloid Process

Place the marker on the medial side of the wrist axis.

For best results, place the three hand markers so the created shape is asymmetrical (avoid isosceles shape) and unique from the marker arrangements on the other hand. Since the wrist markers have defined placement — along the wrist axis — introduce small amount of positional offset to the LHM2 and RHM2 markers.

Lower Extremity Markers

Labels
Related Segment
Anatomical Location
Placement Description

Upper Leg

Left Femur Lateral Epicondyle Right Femur Lateral Epicondyle

Place the marker on the lateral prominence of the knee joint axis. More specifically, the marker should be placed on the femur epicondyle. You may need to ask the subject to flex and extend the knee few times to locate the axis.

LTH RTH

Upper Leg

Left Thigh Right Thigh

Place the markers at the front center of the thigh near the midline. This marker is placed for distinguishing left and right side of the Skeleton. For best results, slightly offset the height of right and left marker to introduce an asymmetry.

LSK RSK

Upper Leg

Left Superior Knee Right Superior Knee

Place the markers on the shin bone near the midline of the lower leg. This marker is placed for distinguishing left and right side of the Skeleton. For best results, slightly offset the height of right and left marker to introduce an asymmetry.

Lower Leg

Left Tibial Tubercle Right Tibial Tubercle

Place the marker about 2-3 cm below the knee cap bone. This marker should be placed on the most anterior point of the tibial tuberosity.

The joint center of the knee and the ankle is modeled at the midpoint of the lateral and medial joint markers (FLE/FME and FAL/TAM). Assuming that center of the femoral head aligns with the center of the acetabulum, its virtual location is modeled using markers on the pelvis segment (posterior and anterior iliac spine markers). The lower extremity segments are modeled along these three virtual locations.

Foot Markers

Labels
Related Segment
Anatomical Location
Placement Description

Lower Leg/Foot

Left Fibula Ankle Lateral Right Fibula Ankle Lateral

Place the maker on the lateral side of the ankle axis; on the lateral prominence of the lateral malleolus bone.

Foot

Left Foot Second Metatarsal Right Foot Second Metatarsal

Place the marker on the dorsal aspect of the second metatarsal bone.

Foot

Left Foot Calcaneus Right Foot Calcaneus

Place the marker on center of the heel, where the Achilles tendon attaches to the calcneous bone.

References

  1. Leardini, A., Biagi, F., Merlo, A., Belvedere, C., Benedetti, M.G., 2011. Multi-segment trunk kinematics during locomotion and elementary exercises. Clin. Biomech. 26, 562-571.

  2. Leardini, A., Sawacha, Z., Paolini, G., Ingrosso, S., Nativo, R., Benedetti, M.G., 2007. A new anatomically based protocol for gait analysis in children. Gait Posture 26. 560-571.

SJN (IJ)

SXS (PX)

CV7 (C7)

TV2 (T2)

TV7 (T7)

LIAS (PSISl) RIAS (PSIS)

LIPS (ASIS) RIPS (ASIS)

LCAJ (LA) RCAJ (RA)

LFLE (LE) RFLE (LE)

LTTC (TT) RTTC (TT)

LFAL(LM) RFAL

LFM2* (SM) RFM2*

LFCC (CA) RFCC

[1]
[1]
[1]
[1]
[1]
[2]
[1]
[2]
[1]
[2]
[1]
[2]
[1]
[1]
[1]
[2]
[2]
[2]
[2]
[2]
[2]
[2]
Conventional Marker Set front
Conventional Marker Set back