Learn how to work with different types of trackable assets in Motive.
In Motive, an Asset is a set of markers that define a specific object to be tracked in the capture. Asset tracking data can be sent to other pipelines (e.g., animations and biomechanics) for extended applications.
When an asset is created, Motive automatically applies a set of predefined labels to the reconstructed trajectories (markers) using Motive's tracking and labeling algorithms. Motive calculates the position and orientation of the asset using the labeled markers.
There are three types of assets, covering a full range of tracking needs:
Rigid Bodies: used to track rigid, unmalleable, objects.
Skeletons: used to track human motions.
Trained Markersets: used to track any object that is not a Rigid Body or a pre-defined Skeleton.
This article provides an introduction to working with existing assets. For information specific to each asset type, click the links in the list above. Visit the Builder pane page for detailed instructions to create and modify each asset type.
Assets can be created in Live mode (before capture) or in post-production (Edit mode, using a loaded TAKE).
If new assets are created during post-production, the take must be reconstructed and auto-labeled to apply the changes to the 3D data.
The following video demonstrates the asset creation workflow.
When an asset is selected, either from the Assets pane or from the 3D Perspective view, its related properties are displayed in the Properties pane.
Follow these steps to copy an asset to other recorded TAKES or to the Live capture.
Right-click the desired Take to open the context menu.
Select Copy Assets to Takes.
This will bring up a dialog window to select the assets to move.
Select the assets to copy and click Done.
Use shift-click or ctrl-click to select Takes from the Data pane until all the desired Takes are selected.
Right-click any of the selected Takes. This should copy the assets you selected to all the selected Takes in the Data pane to open the context menu.
Select Copy Assets to Takes.
This will bring up a dialog window to select the assets to move.
Select the assets to copy and click Done.
To copy multiple assets, use shift-click or ctrl-click to select all of them in the Assets pane.
Right-click (one of) the asset(s).
Select Copy Assets to Live.
The asset(s) will now appear in the Assets pane in Live mode. Motive will recognize the asset when it enters the volume, based on its unique marker placement.
Assets can be exported into the Motive user profile file (.MOTIVE), where they can then be imported into different takes without creating a new asset.
The user profile is a text-readable file that contains various configuration settings, including the asset definitions. With regard to assets, profiles specifically store the spatial relationship of each marker in the asset, ensuring that only the identical marker arrangement will be recognized and defined with the imported asset.
From the File menu, select Export Assets...
This will copy all the asset definitions in either Live-mode or in the current Take file into the user profile.
The option to export the user profile allows Motive users to save custom profiles as part of their project folders.
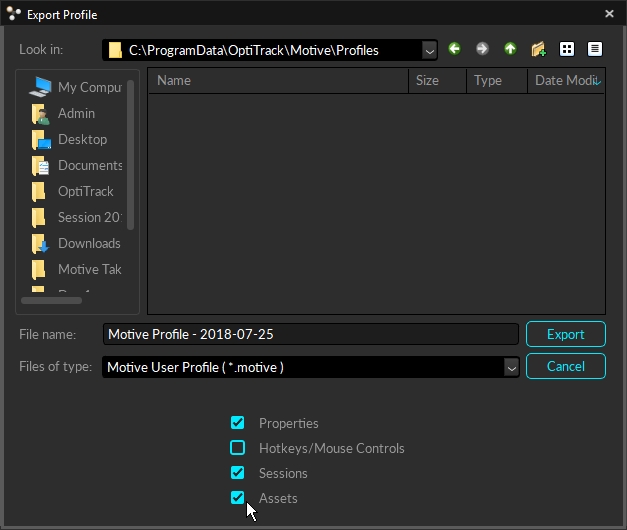
To export a user profile:
From the File menu, select Export Profile As...
The Export Profile window will open.
Navigate to the folder where you want the exported profile stored, or use the Motive default folder.
Select the profile elements to export. Options are: Properties, Hotkeys/Mouse Controls, Sessions, and Assets.
Name the file, using the File Type: Motive User Profile (*.motive).
Click Export.
This page provides instructions on how to utilize the Gizmo tool for modifying asset definitions (Rigid Bodies and Skeletons) on the of Motive
Edit Mode: As of Motive 3.0, asset editing can only be performed in
Solved Data: In order to edit asset definitions from a recorded Take, corresponding must be removed before making the edit, and then recalculated.
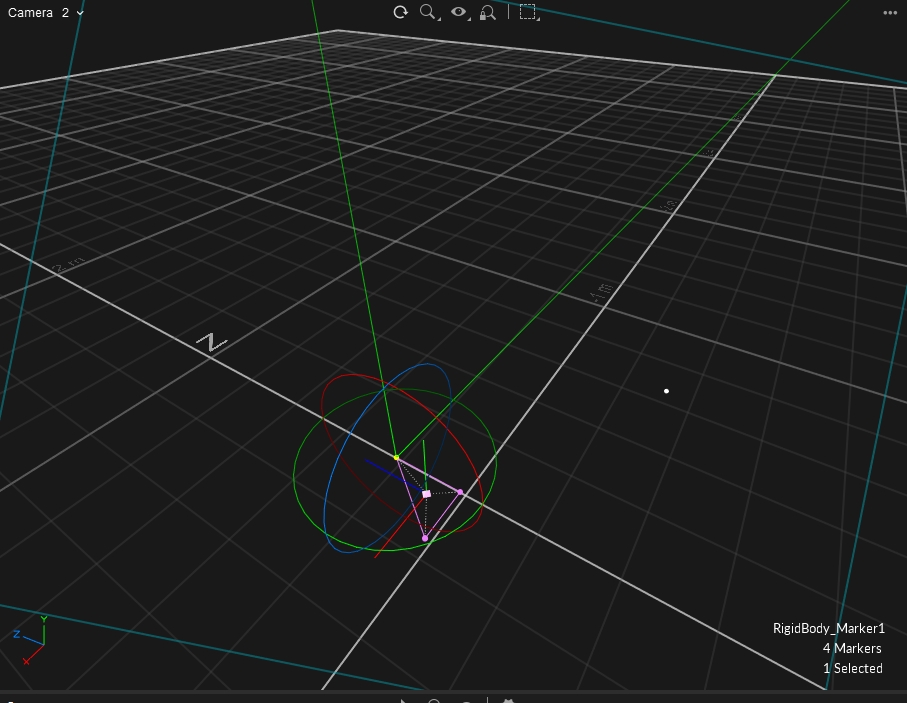
The gizmo tools allow users to make modifications on reconstructed 3D markers, Rigid Bodies, or Skeletons for both real-time and post-processing of tracking data. This page provides instructions on how to utilize the gizmo tools.
Using the gizmo tools from the perspective view options to easily modify the position and orientation of Rigid Body pivot points. You can translate and rotate Rigid Body pivot, assign pivot to a specific marker, and/or assign pivot to a mid-point among selected markers.
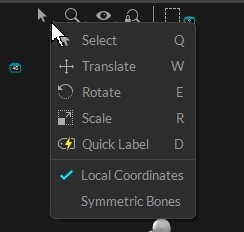
Select Tool (Hotkey: Q): Select tool for normal operations.
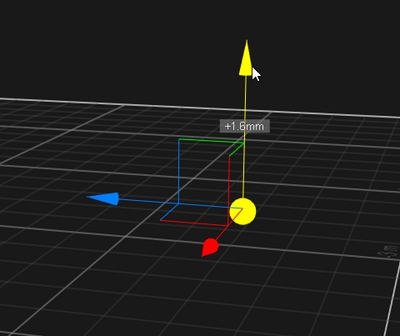
Translate Tool (Hotkey: W): Translate tool for moving the Rigid Body pivot point.
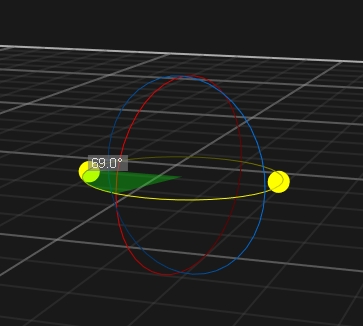
Rotate Tool (Hotkey: E): Rotate tool for reorienting the Rigid Body coordinate axis.
Scale Tool (Hotkey: R): Scale tool for resizing the Rigid Body pivot point.
Precise Position/Orientation: When translating or rotating the Rigid Body, you can CTRL + select a 3D reconstruction from the scene to precisely position the pivot point, or align a coordinate axis, directly on, or towards, the selected marker. Multiple reconstructions can also be selected, and their geometrical center (midpoint) will be used as the target reference.
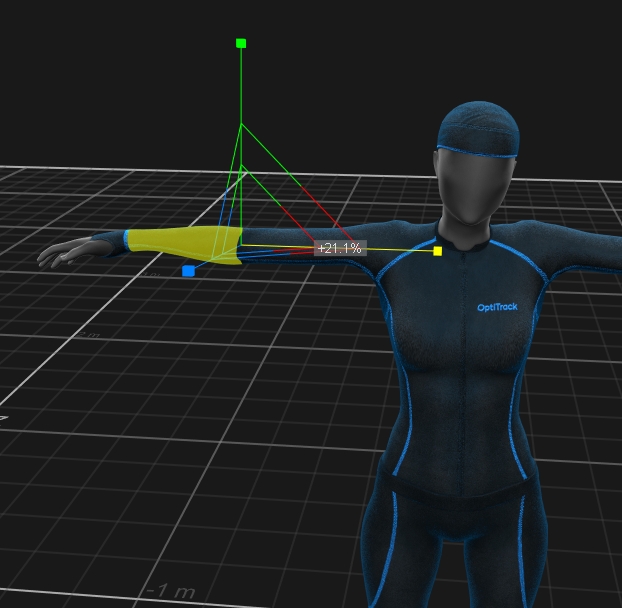
You can utilize the gizmo tools to modify skeleton bone lengths, joint orientations, or scale the spacing of the markers. Translating and rotating the skeleton assets will change how skeleton bone is positioned and oriented with respect to the tracked markers, and thus, any changes in the skeleton definition will affect the realistic representation of the human movement.
The scale tool modifies the size of selected skeleton segments.
The gizmo tools can also be used to edit positions of reconstructed markers.In order to do this, you must be working reconstructed 3D data in post-processing. In live-tracking or 2D mode doing live-reconstruction, marker positions are reconstructed frame-by-frame and it cannot be modified. The Edit Assets must be disabled to do this (Hotkey: T).
Translate
Using the translate tool, 3D positions of reconstructed markers can be modified. Simply click on the markers, turn on the translate tool (Hotkey: W), and move the markers.
Rotate
Using the rotate tool, 3D positions of a group of markers can be rotated at its center. Simply select a group of markers, turn on the rotate tool (Hotkey: E), and rotate them.\
Scale
Using the scale tool, 3D spacing of a group of makers can be scaled. Simply select a group of markers, turn on the scale tool (Hotkey: R) and scale their spacing.
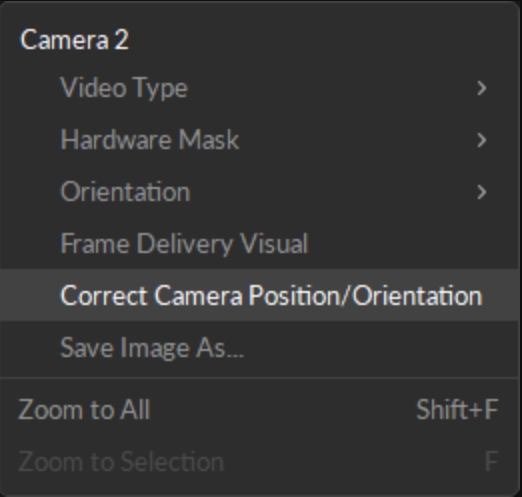
Cameras can be modified using the gizmo tool if the Settings Window > General > Calibration > "Editable in 3D View" property is enabled. Without this property turned on the gizmo tool will not activate when a camera is selected to avoid accidentally changing a calibration. The process for using the gizmo tool to fix a misaligned camera is as follows:
Select the camera you wish to fix, then view from that camera (Hotkey: 3).
Select either the Translate or Rotate gizmo tool (Hotkey: W or E).
Use the red diamond visual to align the unlabeled rays roughly onto their associated markers.
Right lock then choose "Correct Camera Position/Orientation". This will perform a calculation to place the camera more accurately.
Turn on Continuous Calibration if not already done. Continuous calibration should finish aligning the camera into the correct location.
Assets used in the current TAKE are displayed in and managed from the Assets pane. To open the Assets pane, click the icon.
Please note that the following tutorial videos were created in an older version of Motive. The workflow in 3.0 is slightly different and only requires you to select Translate, Rotate, or Scale from the to begin manipulating your Asset.