Loading...
Loading...
Loading...
Loading...
Loading...
Loading...
Loading...
Loading...
A list of components used in a Prime Color Camera setup.
For the latest PC specifications, please see the Quick Start Guide: Prime Color Camera Setup page.
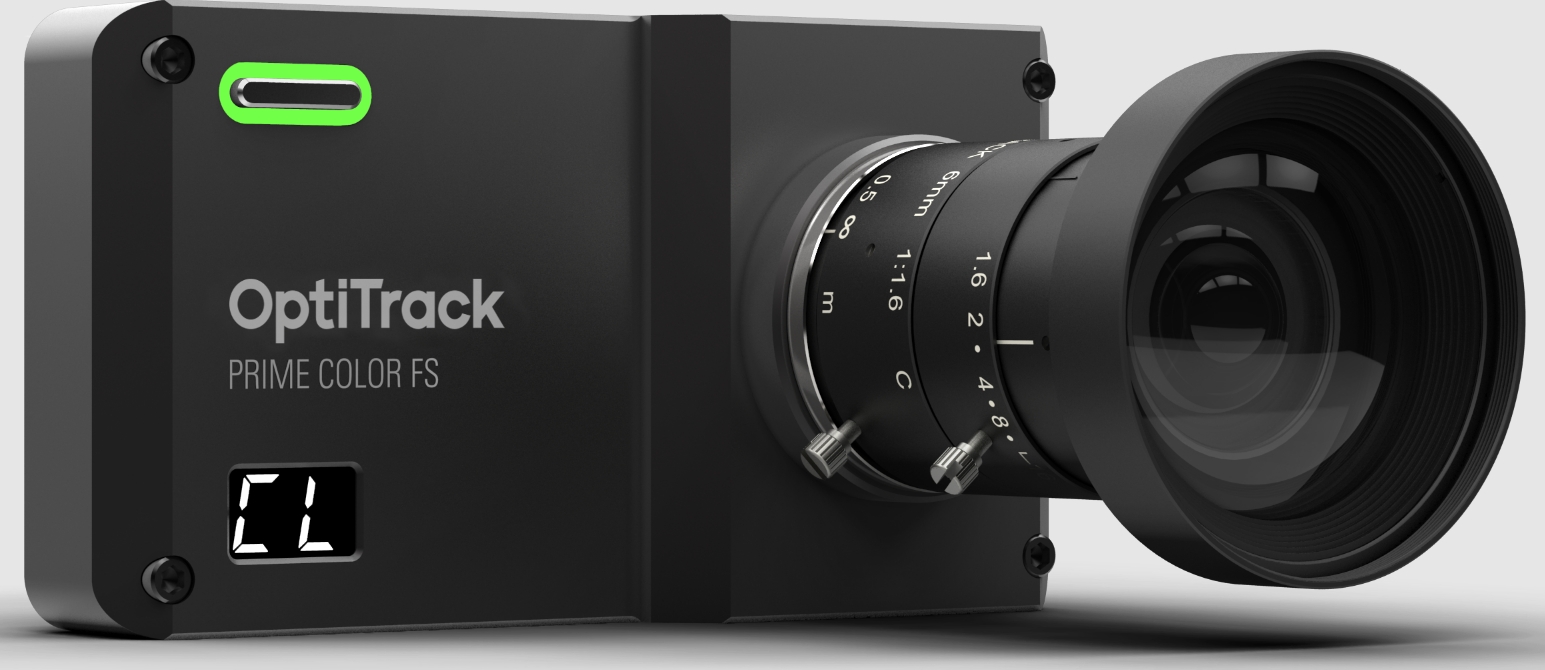
Prime Color
The Prime Color is a full-color video camera that is capable of recording synchronized high-speed videos. Powered by a standard PoE connection, the Prime Color can be used as a reference camera in any mocap system.
The camera enables recording of high frame rate videos (up to 500 FPS at 480p) with resolutions up to 1080p (at 250 FPS) by performing onboard compression (H.264) of captured frames.
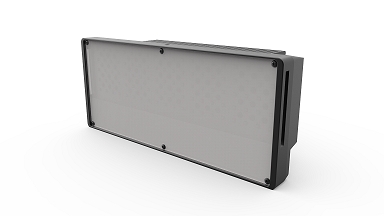
eStrobe
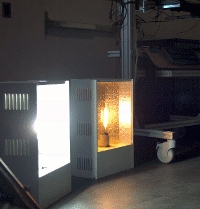
When capturing high-speed videos, the time-length of camera exposures are very short, and providing sufficient lighting becomes critical for obtaining clear images. The eStrobe is designed to optimally brighten the image taken by the Prime Color camera by synchronizing the illuminations of the eStrobe LEDs to the camera exposures. This allows the LEDs to illuminate with precisely the right timing, producing the most efficient and powerful lighting for high-speed video capture.
The eStrobe emits only white light, and will not interfere with tracking within the IR spectrum.
The eStrobe is for indoor use only. Sunlight should provide sufficient lighting for high-speed capture when filming outdoors.
For the latest PC Specifications please see our Quick Start Guide: Prime Color Camera Setup page.
Make sure there is sufficient capacity available on the disk drive where the Take files are saved.
Each color camera can upload a large amount of data over the network, causing the recorded Take (TAK) to get pretty large even with a short recording. For example, if a 10 second take was recorded with a total data throughput of 1 GBps, the resulting TAK file will be 10 GB, which can quickly fill up a storage device.
If you are exporting the recorded data as video files, re-encoding the videos will reduce the file sizes magnitudes smaller. See: Re-encoding.
Ensure the write speed to the storage is fast enough.
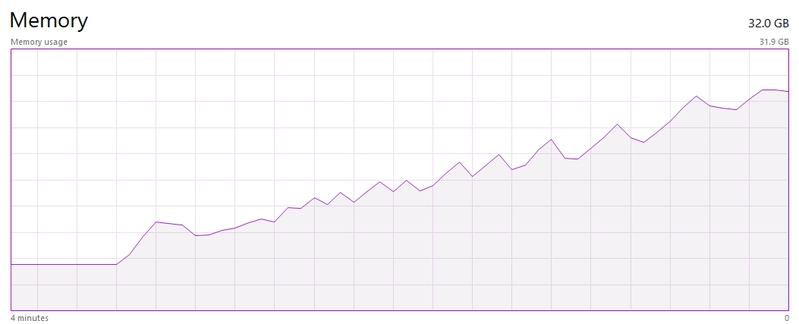
Prime Color cameras can output a large amount of data to the RAM memory quickly. If the write speed to the secondary storage device isn't fast enough, the occupied memory in RAM storage may gradually increase to its maximum, resulting in system instability.
For recording with just one or two Prime Color cameras, a standard SSD drive will suffice. When using multiple Prime Color cameras, we recommend using a fast storage drive (e.g. M.2 SSD).
Prime Color Camera systems with 1-2 cameras can be supported by a 1 Gbps NIC and 1 Gbps uplink port. When running two or more Prime Color cameras, the computer must have a 10 Gbps network adapter with a 10 Gbps uplink port in order to successfully receive all of the data output from the camera system. Please see the Load Balancing page for more information.
It is important to update the NIC to the latest drivers, to prevent underutilization.
For the Intel X550-T2 10Gb NIC recommended for Prime Color Camera systems, please install the latest Intel® Ethernet Adapter Complete Driver Pack.
To see which driver is currently installed:
Open the Network Connections folder in Windows.
Right-click the network connection to the Motive switch and select Properties.
Click the Configure... button.
The driver version and date are listed on the Driver tab.
An overview of properties unique to the Prime Color Camera series.
Listed in their own category in the Devices pane, Prime Color Cameras are configured in the same manner as other OptiTrack tracking cameras.
Select a camera in the Devices pane to view its Properties in the Properties pane.
For an overview of settings applicable to all OptiTrack cameras, please see the page Properties Pane: Camera.
Default: 1920 x 1080
This property sets the resolution of the images captured by the selected camera.
You may need to reduce the maximum frame rate to accommodate the additional data produced by recording at higher resolutions. The table below shows the maximum allowed frame rates for each respective resolution setting.
960 x 540 (540p)
500 FPS
1280 x 720 (720p)
360 FPS
1920 x 1080 (1080p)
250 FPS
Default: Constant Bit Rate.
This property determines how much the captured images will be compressed.
In the Constant Bit-Rate mode, Prime Color cameras vary the degree of image compression to match the data transmission rate given under the Bit Rate settings. At a higher bit-rate setting, the captured image will be compressed less. At a lower bit-rate setting, the captured image will be compressed more to meet the given data transfer rate. Compression artifacts may be introduced if it is set too low.
The Constant Bit-Rate mode is used by default and is recommended because it is easier to control the data transfer rate and efficiently utilizes the available network bandwidth.
The Variable Bit-Rate setting keeps the amount of the compression constant and allows the data transfer rate to vary. This mode is beneficial when capturing images with objects that have detailed textures because it keeps the amount of compression consistent on all frames. However, this mode may also cause dropped frames if the camera needs to compress highly detailed images, spiking the data transfer rate, which may overflow the network bandwidth as a result. For this reason, we recommend using the Constant Bit-Rate setting in most applications.
The compression property sets the percentage (100%) of the maximum data transmission speed to allocate for the camera.
Default: 30 MB/s
Available only while using Constant Bit rate Mode
The bit-rate setting determines the selected color camera's output transmission rate.
The maximum data transmission speed that a Prime color camera can output is 100 megabytes per second (MB/s). At this setting, the camera will capture the best quality image, however, it could overload the network if there isn't enough bandwidth to handle the transmitted data.
There's also a diminishing return to what the human eye can detect with the image quality. The image might look identical at 30 and 100 bit rates.
Since the bit rate controls the rate of data each color camera outputs, this is one of the most important settings to adjust when configuring the system.
When a system is experiencing 2D frame drops, one of the following system requirements is not being met:
Network bandwidth
CPU processing speed
RAM/disk memory
Decreasing the bit-rate in such cases may slow the data transmission speed of the color camera enough to resolve the problem.
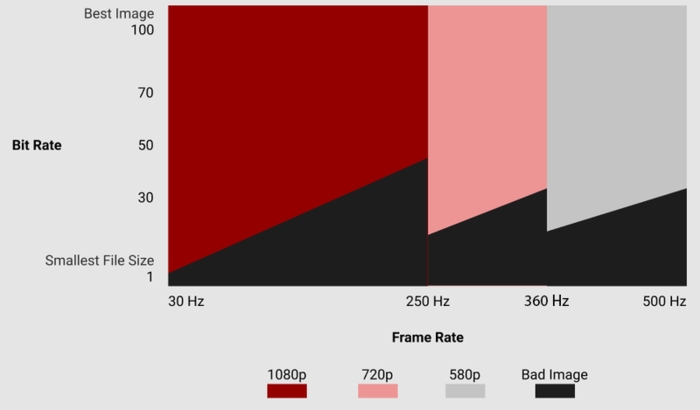
While the image quality increases at a higher bit-rate setting, this also results in larger file sizes and possible frame drops due to data bandwidth bottlenecks. The desired result may differ depending on the capture application and its intended use. The graph below illustrates how the image quality varies depending on the camera frame rate and bit-rate settings.
It's useful to convert Bit Rate (MB/s) to Bit Rate per frame (MB/frame) to compare different FPS and Bit Rate combinations.
Bit Rate (MB/s) / Frame Rate (s/frame) = Data per Frame (MB/frame)
Example:
Bit Rate of 10 and a FPS of 30
10/30 = 0.3 MB/frame
In this example, the 1080p image can accommodate up to 0.3 MB for all data in any given frame.
OptiTrack testing determined that, for a 1920x1080 resolution, 0.15 MB/frame is the minimum rate before the image noticeably deteriorates.
At different resolutions the minimum data per frame to yield a decent image is as follows:
0.15 MB/frame at 1080p
0.08 MB/frame at 720p
0.05 MB/frame at 540p
0.05 MB/frame at 272p
At different resolutions, the minimum data per frame to yield a high-quality image is as follows:
0.26 MB/frame at 1080p
0.11 MB/frame at 720p
0.08 MB/frame at 540p
0.08 MB/frame at 272p
These heuristics are used by the Color Camera Presets to auto-set the bit rate values.
How is the image quality at a frame rate of 120Hz or even 250Hz?
To determine this, we solve for the required bit rate that will produce the desired data rate per frame (.3 in this example):
At 120 Hz, the bit rate must be 36
X / 120 = 0.3
X = 36
At 240 Hz, the bit rate must be 72
X/240 = .3
X = 72
To determine the ideal bit rate for your camera system, it's important to also consider the network configuration. Once you've calculated the ideal bit rate for the cameras, you can use that value to determine how many Prime Color cameras you can attach to each 1 Gb child switch and the total number of cameras the 10 Gb aggregator will handle.
For example:
If the goal is to achieve 0.3 MB/frame at 240 Hz, then a bit rate of 72 MB/s is required for each camera. This translates to:
One camera per 1Gb child switch or PoE injector (1 Gbps = 125 MBps)
Approximately 17 prime color cameras per 10 Gbps aggregator switch (10 Gbps = 1250 MBps)
1250/72 = 17
Consider the two scenarios with exactly 4 cameras each and notice that the maximum bit rate is different for the two systems. Technically, the single camera on the 1 Gb switch could run at a bit rate of 100.
Tip: Monitoring data output from each camera
Default : 28
Gamma correction is a non-linear amplification of the output image. The gamma setting will adjust the brightness of dark pixels, midtone pixels, and bright pixels differently, affecting both brightness and contrast of the image. Depending on the capture environment, especially with a dark background, you may need to adjust the gamma setting to get best quality images.
Default: Off
When using the eStrobes to light the capture volume, the LED setting must be enabled on the Prime Color cameras to which the eStrobes are connected. Once enabled, the Prime Color camera will output the signals from its RCA sync output port, allowing the eStrobes to receive this signal and illuminate the LEDs.
Presets for Color Cameras use standard settings to optimize for different outcomes based on file size and image quality. Calibration mode sets the appropriate video mode for the camera type in addition to other setting changes.
The optimal Bit Rate for each preset is calculated based on the master camera frame rate when the preset is selected. Lower bit rates result in smaller file sizes. Higher bit rates produce higher quality captures and result in larger file sizes.
Small Size - Lower Rate
Video Mode: Color Video
Rate Multiplier: 1/4 (or closest possible)
Exposure: 20000 (or max)
Bit Rate: [calculated]
Small Size - Full Rate
Video Mode: Color Video
Rate Multiplier: x1
Exposure: 20000 (or max)
Bit Rate: [calculated]
Great Image
Video Mode: Color Video
Rate Multiplier: x1
Exposure: 20000 (or max)
Bit Rate: [calculated]
Calibration Mode
Video Mode: Object Mode
Rate Multiplier: x1
Exposure: 250
Bit Rate: N/A
Different types of lenses can be equipped on a Prime Color camera as long as the lens mount is compatible, however, for Prime Color cameras, we suggest using C-mount lenses to fully utilize the imager. Prime Color cameras with C-mount can be equipped with either the 12mm F#1.8 lenses or the 6.8mm F#1.6 lenses. The 12mm lens is zoomed in more and is more suitable for capturing at long ranges. On the other hand, the 6.8mm lens has a larger field of view and is more suitable for capturing a wide area. Both lenses have adjustable f-stop and focus settings, which can be optimized for different capture environments and applications.
F-Stop: Set the f-stop to a low value to make the aperture size bigger. This will allow in more light onto the imager, improving the image quality. However, this may also decrease the camera's depth of field, requiring the lens to be focused specifically on the target capture area.
Focus: For best image quality, make sure the lenses are focused on the target tracking area.
6.5mm F#1.6 lens: When capturing 1080p images with 6.5mm F#1.6 lens, you may see vignetting in each corner of the captured frames due to imager size limitations. For larger FOV, please use the 6.8mm F#1.6 lens to avoid this vignetting issue.
Before going into details of setting up a system with Prime Color cameras, it is important to go over the data bandwidth availability within the camera network. At its maximum setting for capturing the best quality image, one Prime Color camera can transmit data at a rate of up to ~100 Megabytes-per-second (MBps), or ~800 Megabits-per-second (Mbps). For a comparison, a tracking camera in outputs data at a rate less than 1MBps, which is several magnitudes smaller than the output from a Prime Color camera. A standard network switch (1 Gb switch) and network card only support network traffic of up to 1000 Mbps (or 1 Gbps). When Prime Color camera(s) are used, they can take up a large portion, or all, of the available bandwidth, and for this reason, extra attention to bandwidth use will be needed when first setting up the system.
When there is not enough available bandwidth, captured 2D frames may drop out due to the data bottleneck. Thus, it is important to take the bandwidth consumption into account and make sure an appropriate set of network switches (PoE and Uplink), Ethernet cables, and a network card is used. If a 1-Gb network/uplink switch is used, then only 1-2 Prime Color camera can be used at its maximum bit-rate setting. If three or more Prime Color cameras need to be used, then either a 10-Gb network setup will be required OR the setting will need to be turned down. A lower bit-rate will further compress the image with a tradeoff on the image quality, which may or may not be acceptable depending on the capture application.
Upgraded PC specifications and settings can aid with stability in increased bit rates, please see our page for more information.
Detecting Dropped 2D Frames
Every 2D frame drops are logged under the, and it can also be identified in the Devices pane. It will be indicated with a warning sign next to the corresponding camera. You may see a few frame drops when booting up the system or when switching between Live and Edit modes; however, this should only occur just momentarily.
If the system continues to drop 2D frames, that indicates there is a problem with receiving the camera data. If this is happening with Prime Color cameras, try lowering down the bit-rate, and if the system stops dropping frames, that means there wasn’t enough bandwidth availability. To use the cameras in a higher bit-rate setting, you will need to properly balance out the load within the available network bandwidth or .
Note: Due to the current architecture of our bug reporting in Motive, a single color camera will not display dropped frame messages. If you need these messages you will need to either connect another camera or an eSync 2 into the system.
Each Prime Color camera must be uplinked and powered through a standard PoE connection that can provide at least 15.4 watts to each port simultaneously.
Please note that if your aggregation switch is PoE, you can plug your Prime Color Cameras directly into the aggregation switch. PoE injectors are optional and will only be required if your aggregation switch is not PoE.
Prime Color cameras connect to the camera system just like other Prime series camera models. Simply plug the camera onto a PoE switch that has enough available bandwidth and it will be powered and synchronized along with other tracking cameras. When you have two color cameras, they will need to be distributed evenly onto different PoE switches so that the data load is balanced out.
For 1-2 Prime Color Cameras it is recommended to use 1Gbps network switch with 1Gbps uplink port and a 1Gpbs NIC or higher. For 3+ Prime Color Cameras it is required to use network switches with a 10Gbps uplink port in conjunction with a 10Gbps designated NIC and their appropriate drivers.
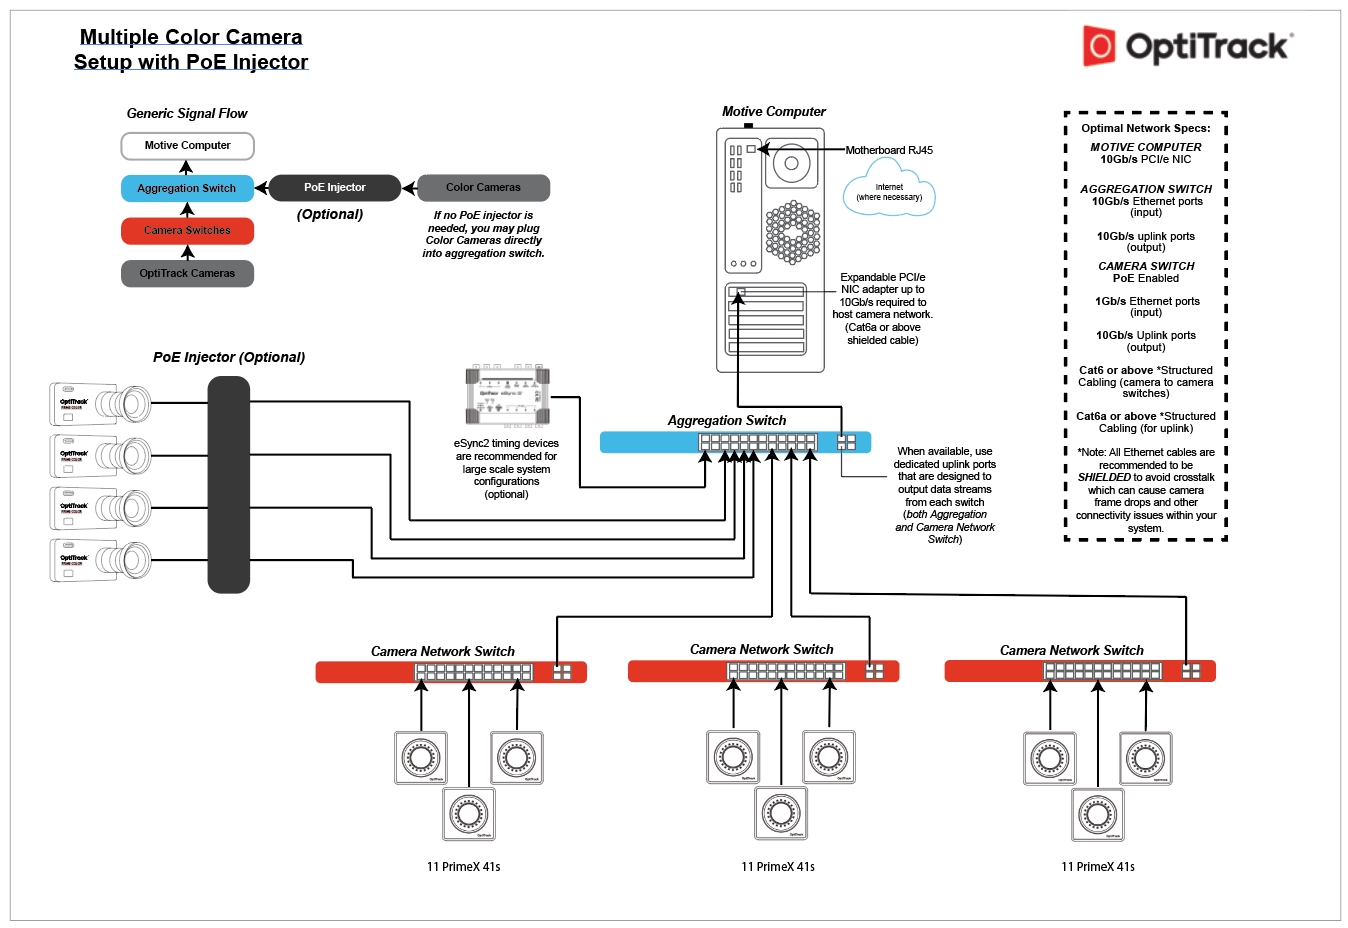
When using multiple Prime Color cameras, we recommend connecting the color cameras directly into the 10-gigabit aggregation (uplink) switch, because such setup is best for preventing bandwidth bottleneck. A PoE injector will be required if the uplink switch does not provide PoE. This allows the data to travel directly onto the uplink switch and to the host computer through the 10-gigabit network interface. This will also separate the color cameras from the tracking cameras.
Cable Type
There are multiple categories for Ethernet cables, and each has different specifications for maximum data transmission rate and cable length. For an Ethernet based system, Cat6 or above Gigabit Ethernet cables should be used. 10 Gigabit Ethernet cables – Cat6a or above — are recommended in conjunction with a 10 Gigabit uplink switch for the connection between the uplink switch and the host PC in order to accommodate for high data traffic.
Note
Electromagnetic Shielding
We recommend using only cables that have electromagnetic interference shielding. If unshielded cables are used, cables in close proximity to each other have the potential to create data transfer interference and cause cameras to stall in Motive.
Unshielded cables do not protect the cameras from Electrostatic Discharge (ESD), which can damage the camera. Do not use unshielded cables in environments where ESD exposure is a risk.
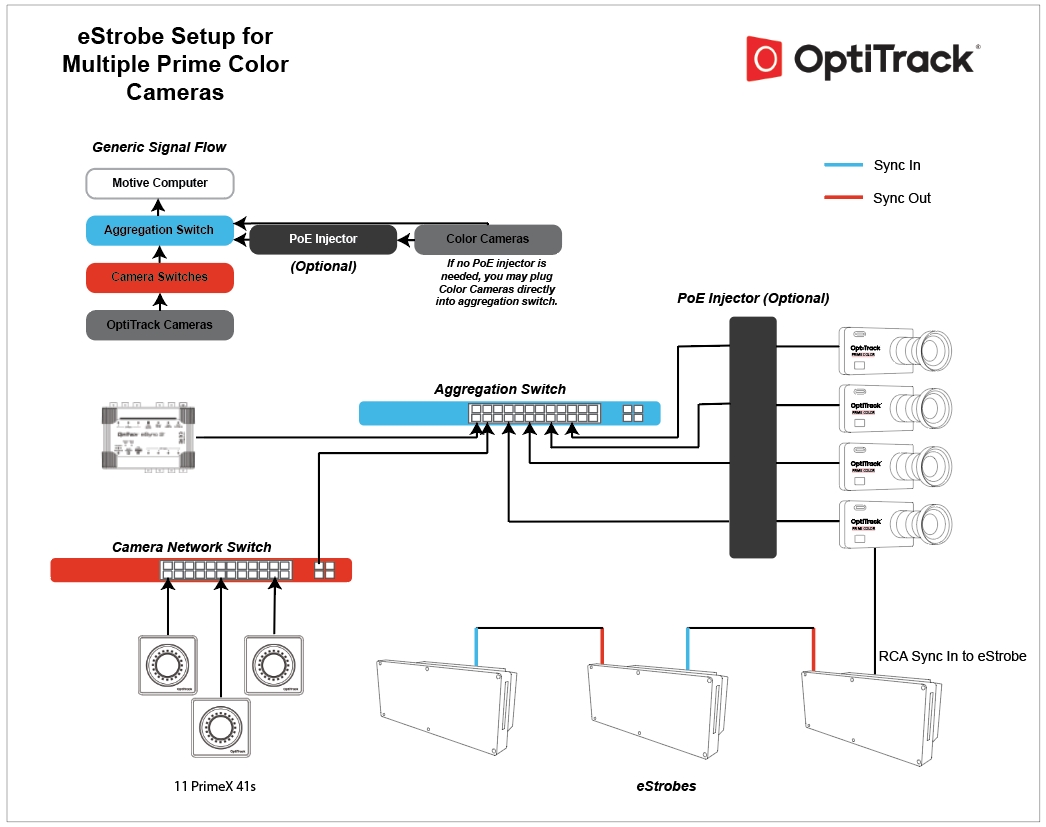
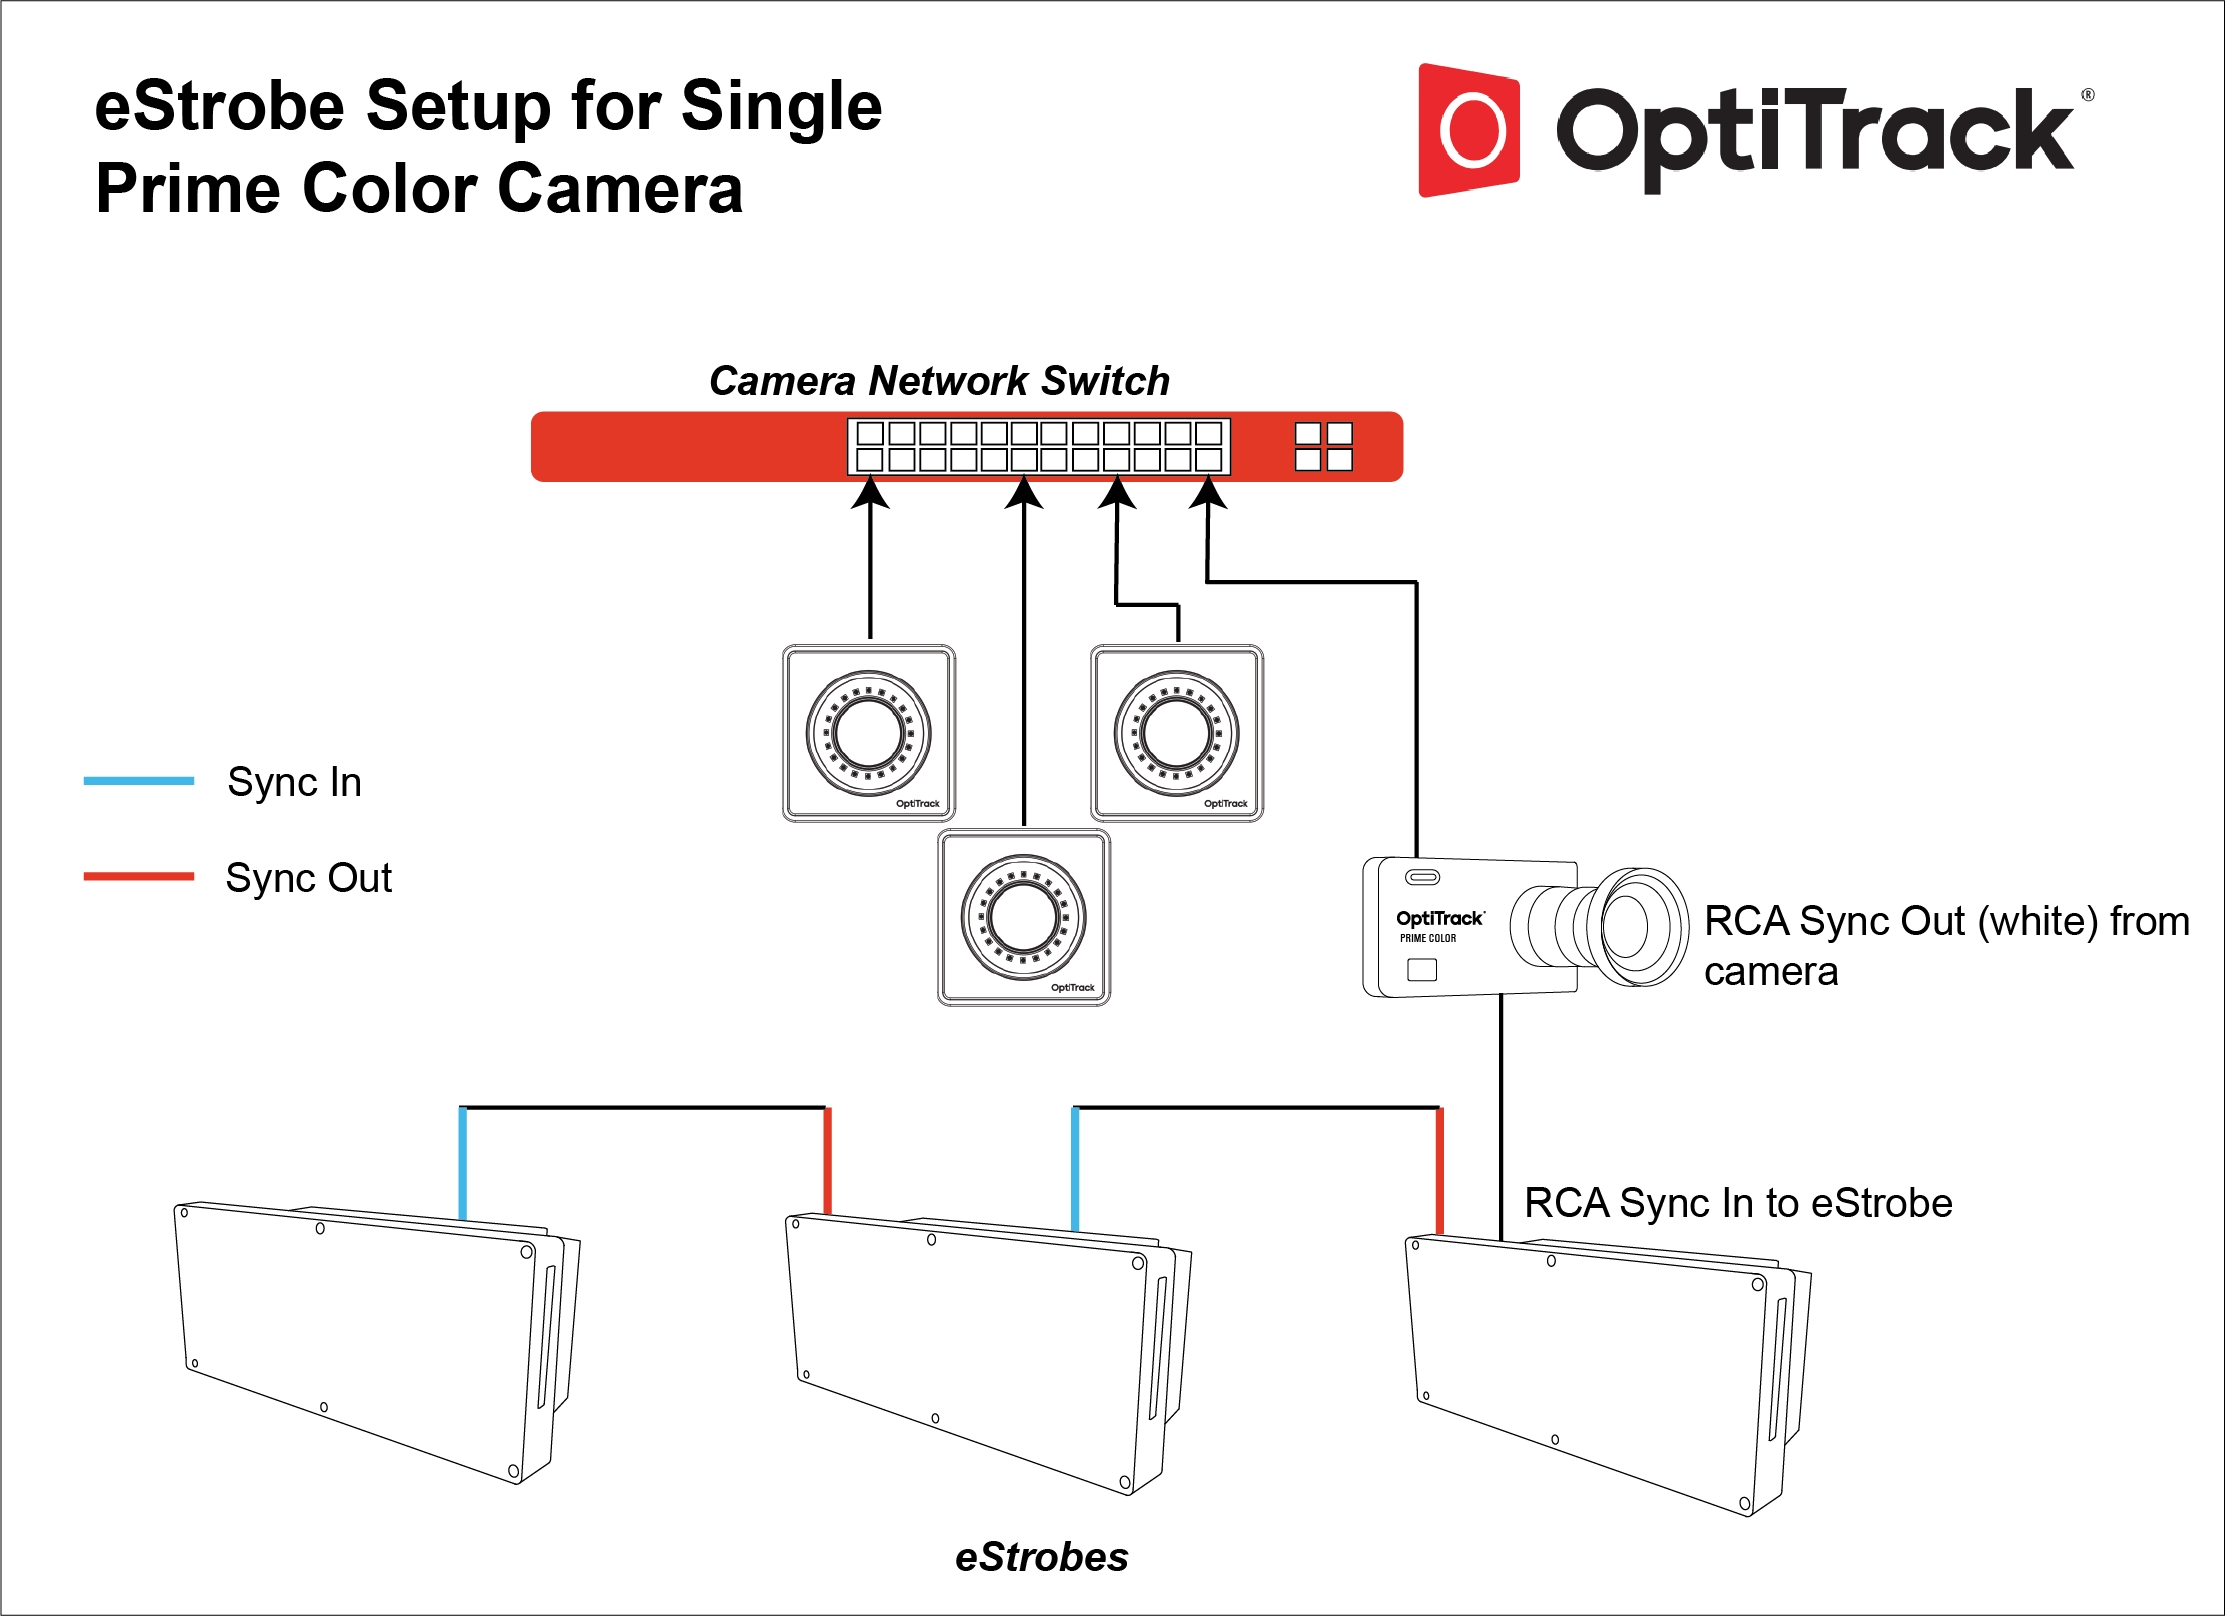
The eStrobe synchronizes with Prime Color cameras through RCA cable connection. It receives exposure signals from the cameras and synchronizes its illuminations correspondingly. Depending on the frame rate of the camera system, the eStrobe will vary its illumination frequency, and it will also vary the percent duty cycle depending on the exposure length. Multiple eStrobes can be daisy-chained in series by relaying the sync signal from the output port to the input port of another as shown in the diagram.
Illumination:
The eStrobe emits only white light and does not interfere with tracking within the IR spectrum. In other words, its powerful illumination will not introduce noise to the IR tracking data.
Power Requirement:
Warning:
Please be aware of the hot surface. The eStrobe will get very hot as it runs.
Avoid looking directly at the eStrobe, it could damage your eyes.
Make sure the power strips or extension cords are able to handle the power. Using light-duty components could damage the cords or even the device if they cannot sufficiently handle the amount of the power drawn by the eStrobes.
The eStrobe is not typically needed for outdoor use. Sunlight should provide enough lighting for the capture.
When capturing without eStrobes, the camera entirely relies on the ambient lighting to capture the image, and the brightness of the captured frames may vary depending on which type of light source is used. In general, when capturing without an eStrobe, we recommend setting the camera at a lower framerate (30~120 FPS) and increasing the camera exposure to allow for longer exposure time so that the imager can take in more light.
Indoor
When capturing indoors without the eStrobe, you will be relying on the room lighting for brightening up the volume. Here, it is important to note that every type of artificial light source illuminates, or flickers, at a certain frequency (e.g. fluorescent light bulbs typically flicker at 120Hz). This is usually fast enough so that the flickering is not noticeable to human eyes, however, with high-speed cameras, the flickering may become apparent.
When Prime Color captures at a frame rate higher than the ambient illumination frequency, you will start noticing brightness changes between consecutive frames. This happens because, with mismatching frequencies, the cameras are exposing at different points of the illumination phase. For example, if you capture at 240FPS with 120Hz light bulbs lighting up the volume, brightness of captured images may be different in even and odd numbered frames throughout the capture. Please take this into consideration and provide appropriate lighting as needed.
Info: Frequencies of typical light bulbs
Fluorescent: Fluorescent light bulbs typically illuminate at 120 Hz with 60 Hz AC input.
Incandescent: Incandescent light bulbs typically illuminate at 120 Hz with 60 Hz AC input.
LED light bulbs: Variable depending on the manufacturer.
eStrobe: LEDs on the eStrobe will be synchronized to the exposure signal from the cameras and illuminate at the same frequency.
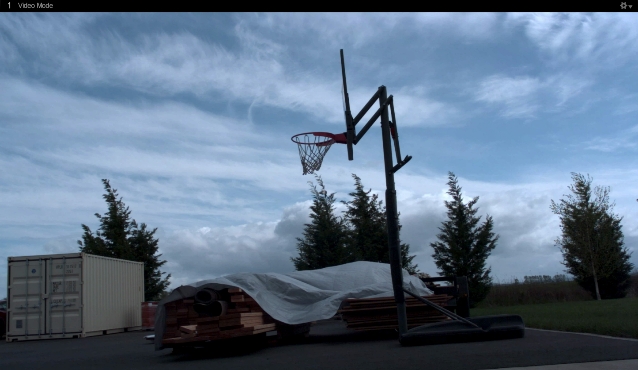
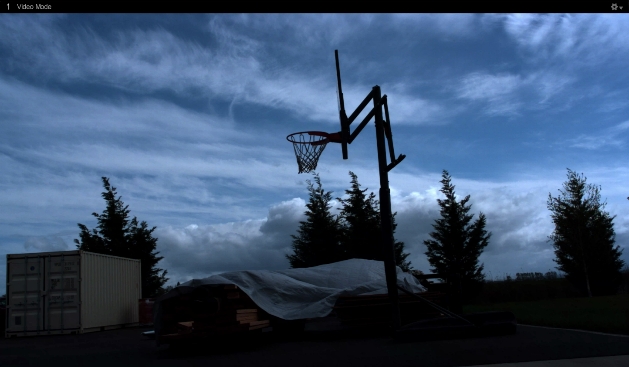
Outdoor
When capturing outdoors using Prime Color cameras, sunlight will typically provide enough ambient lighting. Unlike light bulbs, sunlight is emitted continuously, so there is no need to worry about the illumination frequency. Furthermore, the sun is bright enough and you should be able to capture high-quality images by adjusting only the f-stop (aperture size) and the exposure values.
RAM Usage: Open the windows task manager and check the memory usage. If the RAM usage slowly creeps up to the maximum memory while recording a take, it means the disk driver is not fast enough to write out the color video from RAM. You will have to reduce the bit-rate setting or use a faster disk drive (e.g. M.2 SSD).
Hard Drive Space: Make sure there is enough memory capacity available on the computer. Take files (TAK) with color camera data can be quite large, and it could quickly fill up the memory, especially, when recording lightly-compress video from multiple color cameras.
In order to calibrate the color camera into the 3D capture volume, the Prime Color camera must be equipped with an IR filter switcher. Prime Color cameras without IR filter switcher cannot be calibrated, and can only be used as a reference camera to monitor the reference views in the or in the .
When loaded into Motive, Prime Color cameras without IR filter switcher will be hidden in the . Only Prime Color FS cameras with the filter switcher will be shown in the 3D space.
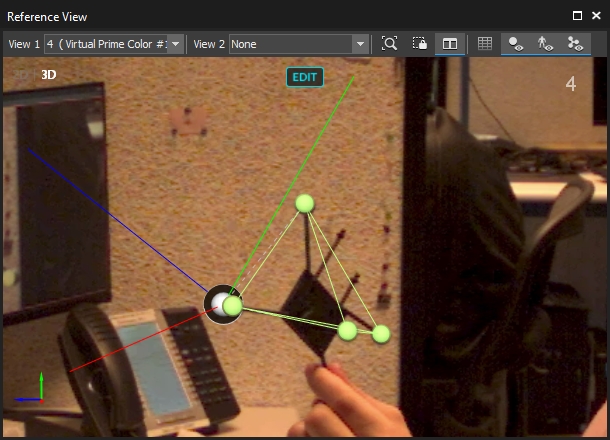
The Prime Color FS is equipped with a filter switcher that allows the cameras to detect in IR spectrum. The Prime Color FS can be calibrated into the 3D capture volume using an active calibration wand with the IR LEDs. Once calibrated, the color camera will be placed within the 3D viewport along with other tracking cameras, and 3D assets (markers, Rigid Bodies, Skeletons, cameras) can be overlaid as shown in the image.
To calibrate the camera, switch the Prime Color FS to the in the pane. This will switch the Color camera to detect in the IR spectrum, and then use the active wand to follow the standard process. Once the calibration is finished, you can switch the camera back to the Color Video Mode.
Active Wand:
Once you have set up the system and configured the cameras correctly, Motive is now ready to capture Takes. Recorded TAK files will contain color video along with the tracking data, and you can play them back in Motive. Also, the color reference video can be exported out from the TAK.
Once the camera is set up, you can start recording from Motive. Captured frames will be stored within the TAK file and you can access them again in Edit mode. Please note that capture files with Prime Color video images will be much larger in file size.
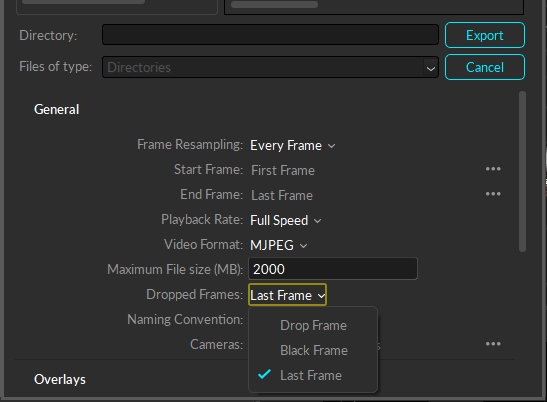
When this is set to Drop Frame, Motive will remove any dropped frames in the color video upon export. This will only occur on cameras that have dropped frames, thus resulting in varying video lengths for each camera.
With this option, any dropped frames will be completely removed. The exact frames in the exported file may not match the frames in the corresponding Motive recording.
If required, you can set this export option to Black Frame to insert black, or blank, frames in place of the dropped frames in the exported video. This will allow for each recording to be the same length.
This export setting allows for a dropped frame to use a previous frame to fill in the dropped frame. This will allow for each recording to be the same length. Last Frame is recommended over Black Frame especially for markerless applications.
The following pages offer in-depth information regarding Prime Color Camera setup. If you are looking for a quick setup, please see out page.
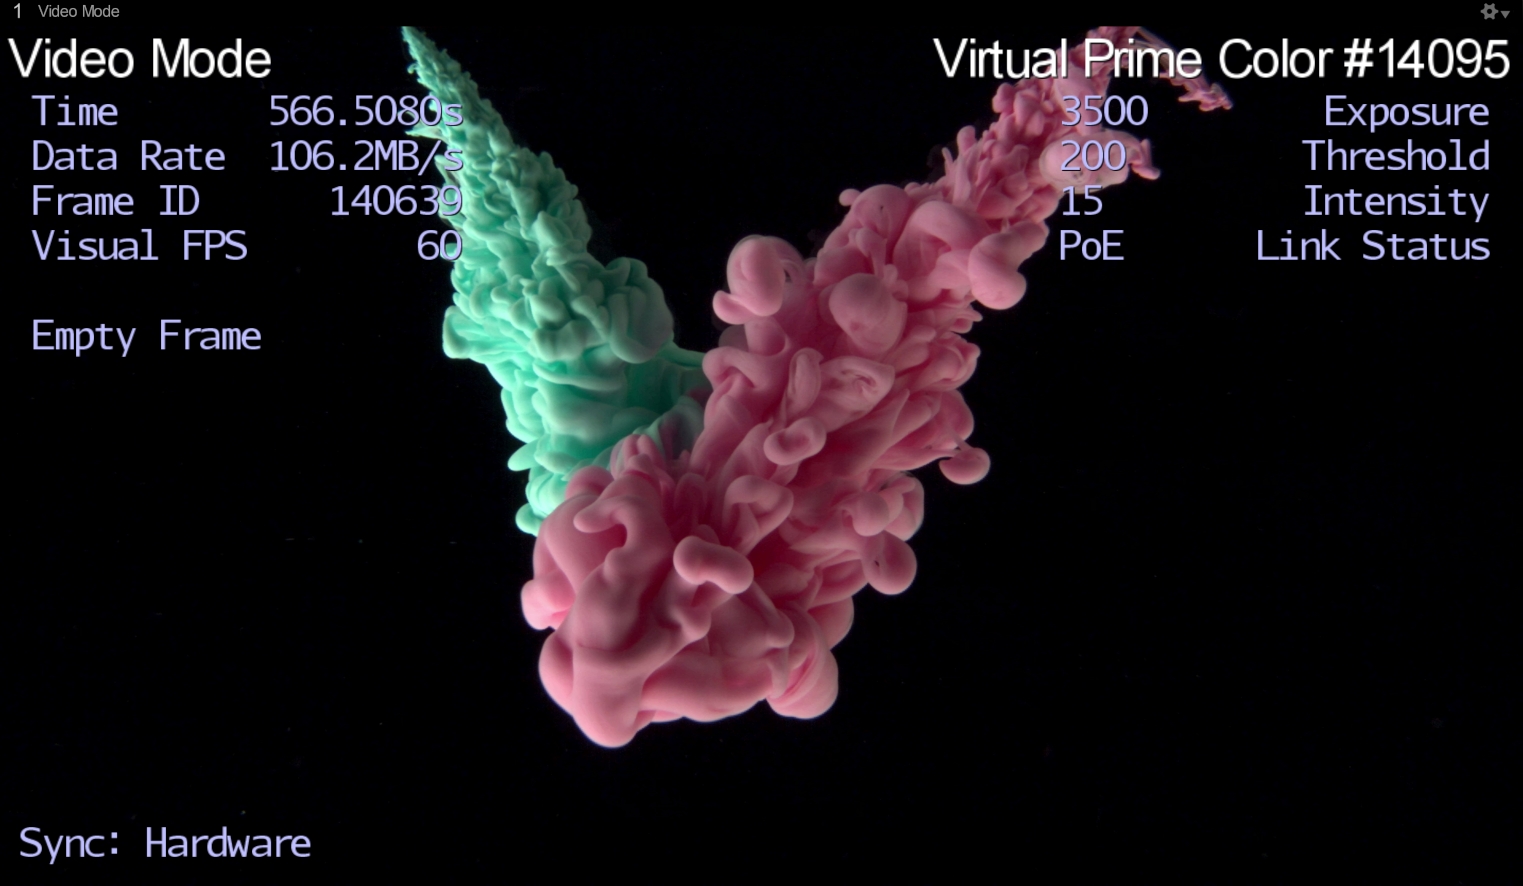
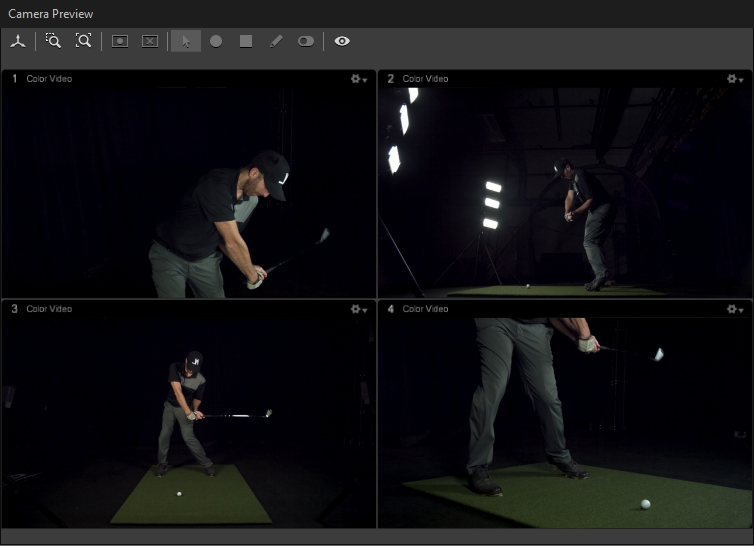
Data output from the entire camera system can be monitored through the Status Panel. Output from individual cameras can be monitored from the 2D Camera Preview pane when the Camera Info display is enabled under the visual aids ( ) option.
NIC drivers may need to be installed via disc or downloaded from the manufacture's support website. If you're unsure of where to find these drivers or how to install them, please reach out to our team.
10Gb uplink switches, NICs, and cables are recommended for large camera counts or high data cameras like the Prime Color cameras. Typically 1Gb switches, NICs, and cables should be enough to accommodate smaller and moderately sized systems. If you're unsure of whether or not you need more than 1Gb, please contact one of our Sales Engineers or see our page for more information.
The amount of power drawn by each eStrobe will vary depending on the system frame rate as well as the length of camera , because the eStrobe is designed to vary its illumination rate and percent duty cycle depending on those settings.At maximum, one eStrobe can draw up to 240 Watts of power. A typical 110V wall outlet outputs 110V @ 15A; which totals up to 1650W of power. Also, there may be other factors such as restrictions from the surge protector or extension cords that are used. Therefore, in general, we recommend connecting no more than five eStrobes onto a single power source.
Now that you have set up a camera system with Prime Color, all of the connected cameras should be listed under the . At this point, you would want to launch Motive and check the following items to make sure your system is operating properly.
2D Frame Delivery: There should be no dropped 2D frames. You can monitor this under the or from the . If frame drops are reported continuously, you can lower down the setting or revisit the network configuration and make sure the data loads are balanced out. For more information, section of this page.
CPU Usage: Open the windows task manager and check the CPU processing load. If only one of the CPU core is fully occupied, the CPU is not fast enough to process data from the color camera. In this case, you will want to use a faster CPU or lower down the setting.
Currently, we only take custom orders for the active wands, but in the future, this will be available for sale. For additional questions about active wands, please .
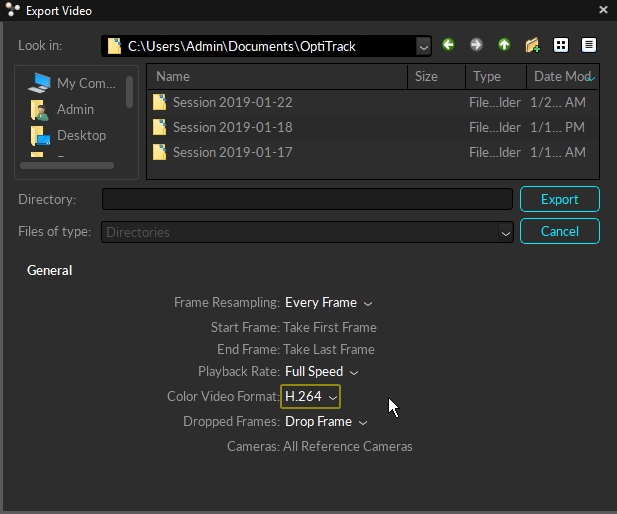
Once the color videos have been saved onto TAK files, the captured reference videos can be exported into AVI files using either H.264 or MJPEG compression format. The H.264 format will allow faster export of the recorded videos and is recommended. Video for the current TAK can be exported by clicking File tab -> Export Video option in Motive, or you can also export directly from the by right-clicking on the Take(s) and clicking Export Video from the context menu. The following export dialogue window will open and you will be able to configure the export settings before outputting the files:
If there are multiple TAK files containing reference video recordings, you can export the videos all at once in the or through the . When exporting directly from the Data pane, simply CTRL-select multiple TAK files together, right-click to bring up the context menu, and click Export Video. When using the batch processor (NMotive), the VideoExporter class can be used to export videos from loaded TAK files.
The size of the exported video file can be re-encoded and compressed down further by additional subsampling. This can be achieved using a third-party video processing software, and doing so can hugely reduce the size of the exported file; almost in orders of two magnitudes. This is supported by most of the high-end video editing software, but Handbrake () is a freely available open-source software that is also capable of doing this. Since the exported video file can be large in size, we suggest using one of the third-party software to re-encode the exported video file.
Low PC Specifications or improper settings: If you're seeing a significant amount of frame drops your PC specifications or settings may need to be upgraded and fine tuned. For the latest PC specifications and settings, please see our page.
Network Bandwidth: Insufficient network bandwidth will cause frame drops. You will have to make sure the network setup, including the network switches, Ethernet cables, and the network adapter on the host PC, is capable of transmitting and receiving data fast enough. See:
Audio playing in background (MMCSS): When playing audio using applications (e.g. Chrome, VLC) that registers to Multimedia Class Scheduler Service (MMCSS), it will interfere with how the CPU resource is used in Motive. This service will prioritize time-sensitive multimedia applications to utilize the CPU resources as much as possible, which may cause increased latency which may lead to dropped frames. We recommend exiting out from such applications if there are any latency and frame drop issues. It is best to to limit the competition of resources for Motive.
Recommended network settings for Prime Color Camera systems.
These settings can be used with any OptiTrack camera system, but are generally not required. For systems that include Prime Color cameras, these changes can resolve dropped frames and other similar network issues.
Firewalls can cause connection issues and frame drops. We recommend disabling the Windows firewall on the camera network.
If the Motive PC is connected to multiple networks, leave the firewalls enabled for all the other networks, especially the network used to connect to the internet.
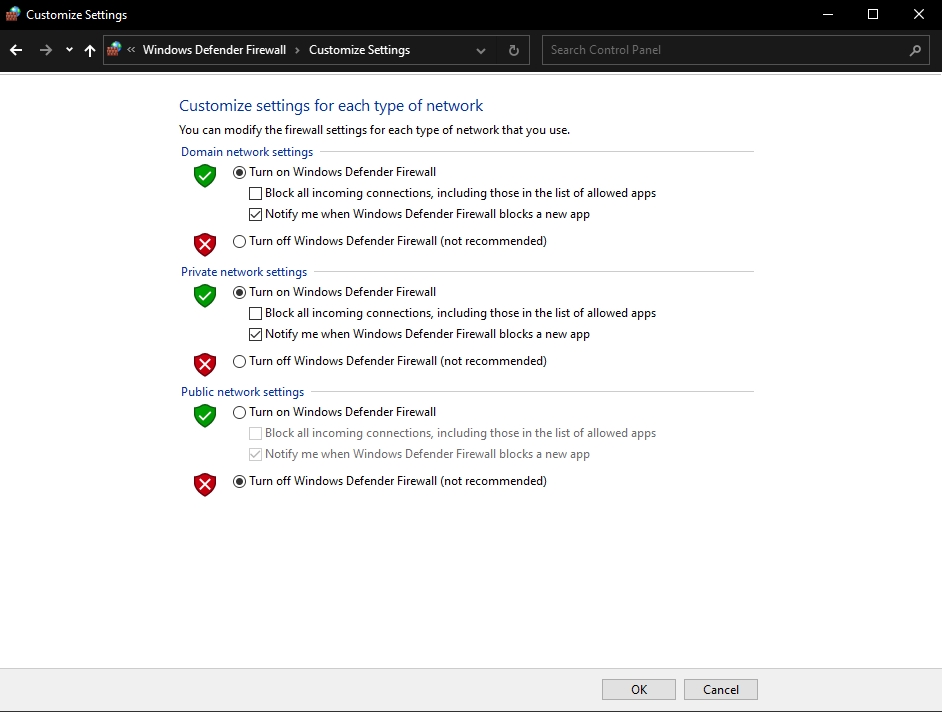
Navigate to Control Panel -> System and Security -> Windows Defender Firewall
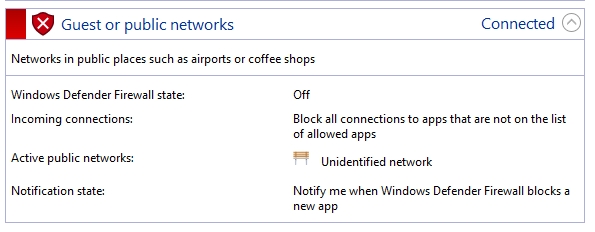
The camera network is typically labeled "Unidentified Network" under the Guest or public networks group.
Select Turn Windows Defender Firewall on or off in the sidebar.
From this window, select Turn off Windows Defender Firewall for the network group that the camera network is on.
Click OK to return to the main firewall page.
The network group will be tagged with a red 'x' shield:
Many of the recommended optimizations are completed using Window’s Local Group Policy Editor. To open this program:
From the Windows search bar, type CMD.
Run Command Prompt as administrator.
At the command line, type gpedit.msc and press enter.
This will open the Local Group Policy Editor window.
Once these policies are implemented, the firewall cannot be re-enabled by any other means.
Open Window’s Local Group Policy Editor.
Navigate to Computer Configuration -> Windows Settings -> Security Settings -> Windows Defender Firewall with Advanced Security.
The Overview panel shows the current status of the firewall. Click Windows Defender Firewall Properties to change the state of the Private and Public profiles to Off then click OK.
Only change Advanced Firewall settings under the guidance of a Support Engineer or your organization's IT department. Changes can cause breaches in security if done incorrectly.
Please contact our Support team if you are having connectivity issues.
Please see our Quick Start Guide: Prime Color Camera Setup page for more information regarding Ethernet Settings within Windows.