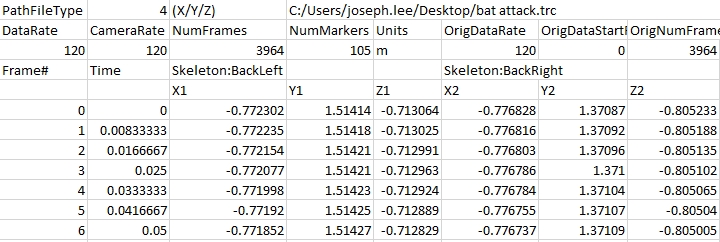
Captured tracking data can be exported into a Track Row Column (TRC) file, which is a format used in various mocap applications. Exported TRC files can also be accessed from spreadsheet software (e.g. Excel). These files contain raw output data from capture, which include positional data of each labeled and unlabeled marker from a selected Take. Expected marker locations and segment orientation data are not included in the exported files. The header contains basic information such as file name, frame rate, time, number of frames, and corresponding marker labels. Corresponding XYZ data is displayed in the remaining rows of the file.
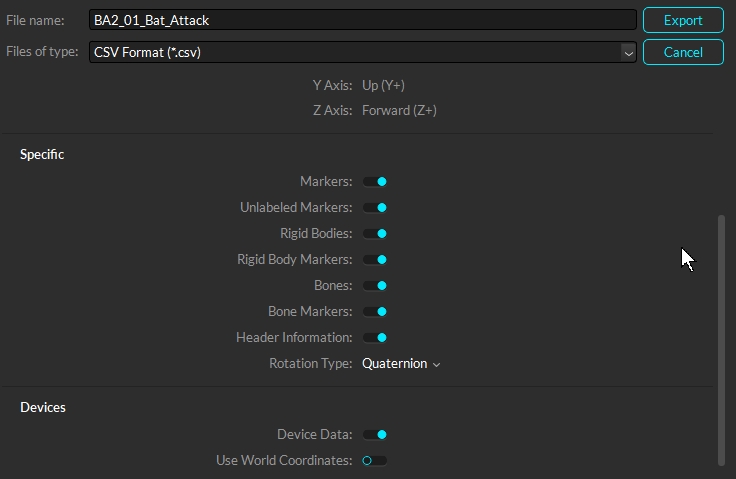
Captured tracking data can be exported in Comma Separated Values (CSV) format. This file format uses comma delimiters to separate multiple values in each row, which can be imported by spreadsheet software or a programming script. Depending on which data export options are enabled, exported CSV files can contain marker data, and data for Rigid Bodies, Trained Markersets, and/or Skeletons. Data for force plate, NI-DAQs, and other devices will export to separate files if these devices are included in the Take.
CSV export options are listed in the following charts:
General Export Options
Frame Rate
Number of samples included per second of exported data.
Start Frame
Start frame of the exported data. Set to one of the following:
The recorded first frame of the exported Take (the default option).
Custom to enter a specific frame number.
End Frame
End frame of the exported data. Set to one of the following:
The recorded end frame of the exported Take (the default option).
Custom to enter a specific frame number.
Scale
Apply scaling to the exported tracking data.
Units
Set the measurement units to use for exported data.
Axis Convention
Sets the axis convention on exported data. This can be set to a custom convention or select preset conventions for Entertainment or Measurement.
X Axis Y Axis Z Axis
Allows customization of the axis convention in the exported file by determining which positional data to be included in the corresponding data set.
CSV Export Options
Header information
Markers
X/Y/Z reconstructed 3D positions for each marker in exported CSV files.
Unlabeled Markers
Includes tracking data of all of the unlabeled makers to the exported CSV file along with other labeled markers. To view only the labeled marker data, turn off this export setting.
Rigid Body Bones
The exported CSV file will contain 6 Degrees of Freedom (6 DoF) data for each rigid body from the Take. This includes orientations (pitch, roll, and yaw) in the chosen rotation type as well as 3D positions (x,y,z) of the rigid body center.
Rigid Body Constraints
3D position data for the location of each Marker Constraint of rigid body assets. This is distinct from the actual marker location. Compared to the positions of the raw marker positions included within the Markers columns, the Rigid Body Constraints show the solved positions of the markers as affected by the rigid body tracking but not affected by occlusions.
Skeleton and Markerset Bones
The exported CSV files will include 6 DoF data for each bone segment of skeletons and trained markersets in exported Takes. 6 DoF data contain orientations (pitch, roll, and yaw) in the chosen rotation type, and also 3D positions (x,y,z) for the center of the bone. All skeleton and markerset assets must be solved to export this data.
Bone Constraints
3D position data for the location of each Marker Constraint of bone segments in skeleton and trained markerset assets. Compared to the real marker positions included within the Markers columns, the Bone Markers show the solved positions of the markers as affected by the skeleton tracking but not affected by occlusions.
Exclude Fingers
Exported skeletons will not include the fingers, if they are tracked in the Take file.
Asset Hip Name
When selected, the hip bone data is labeled as Asset_Name:Asset_Name (e.g., Skeleton:Skeleton). When unselected, the exported data will use the classic Motive naming convention of Asset_Name:Hip (e.g., Skeleton:Hip).
Rotation Type
Rotation type determines whether Quaternion or Euler Angles are used for orientation convention in exported CSV files. For Euler rotation, right-handed coordinate system is used and all different orders (XYZ, XZY, YXZ, YZX, ZXY, ZYX) of elemental rotation are available. More specifically, the XYZ order indicates pitch is degree about the X axis, yaw is degree about the Y axis, and roll is degree about the Z axis.
This option determines whether exported data will be based on world (global) or local coordinate systems.
Device Data
Exports separate CSV files for recorded device data. This includes force plate data and analog data from NI-DAQ devices. A CSV file is exported for each device included in the Take.
Coordinates for exported data are either global to the volume or local to the asset.
Defines the position and orientation in respect to the global coordinate system of the calibrated capture volume. The global coordinate system is the origin of the ground plane, set with a calibration square during the Calibration process.
Defines the bone position and orientation in respect to the coordinate system of the parent bone.
Local coordinate axes can be set to visible from Application Settings or in the skeleton properties. The Bone rotation values in the Local coordinate space can be used to roughly represent the joint angles, however, for precise analysis, joint angles should be computed through a biomechanical analysis software using the exported capture data (C3D).
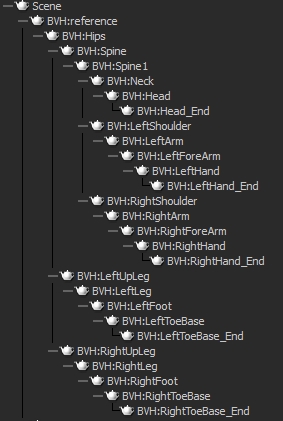
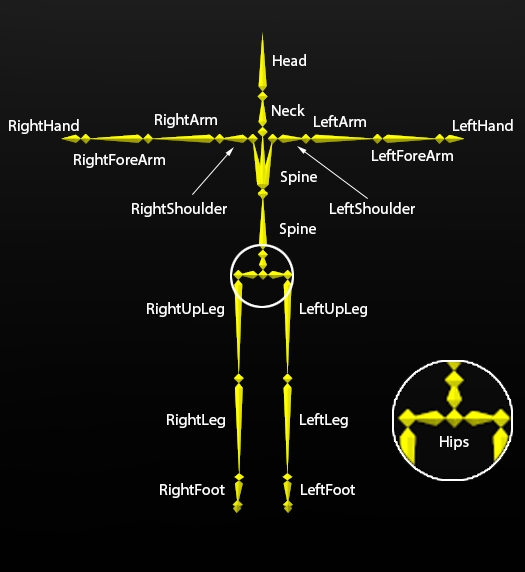
In a skeleton, the hip is always the top-most parent of the segment hierarchy.
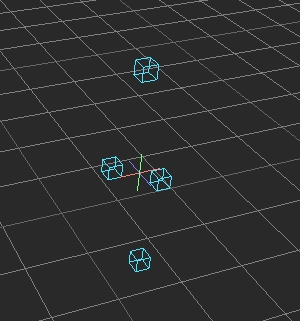
Rigid Body markers, trained markerset markers and Skeleton bone markers are referred to as Marker Constraints. They appear as transparent spheres within a Rigid Body, or a Skeleton, and each sphere reflect the position that a Rigid Body, or a Skeleton, expects to find a 3D marker. When the asset definitions are created, it is assumed that the markers are in fixed positions relative to one another and that these relative positions do not shift over the course of capture.
In the CSV file, Rigid Body markers have a physical marker column and a Marker Constraints column.
When a marker is occluded in Motive, the Marker Constraints will display the solved position for where the marker should be in the CSV file. The actual physical marker will display a blank cell or null value since Motive cannot account for its actual location due to its occlusion.
When the header is disabled, this information is excluded from the CSV files. Instead, the file will have frame IDs in the first column, time data on the second column, and the corresponding mocap data in the remaining columns.
CSV Headers
1st row
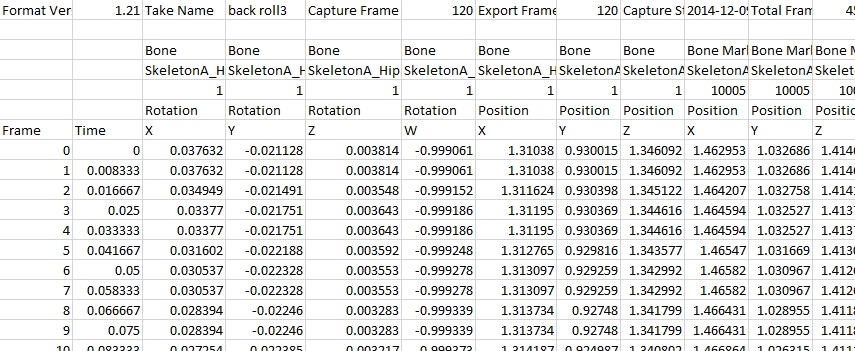
General information about the Take and export settings: Format version of the CSV export, name of the TAK file, the captured frame rate, the export frame rate, capture start time, capture start frame, number of total frames, total exported frames, rotation type, length units, and coordinate space type.
2nd row
Empty
3rd row
4th row
Includes marker or asset labels for each corresponding data set.
5th row
Displays marker or asset ID.
6th and 7th rows
Shows which data is included in the column: rotation or position and orientation on X/Y/Z.
TIP: Occlusion in the marker data
When there is an occlusion of a marker, the CSV file will contain blank cells, which can interfere when running a script to process the CSV data.
We recommend optimizing the system setup to reduce occlusions. To omit unnecessary frame ranges with frequent marker occlusions, select the frame range with the most complete tracking results.
Another solution is to use Fill Gaps to interpolate missing trajectories in post-processing.
For Takes containing force plates (AMTI or Bertec) or data acquisition (NI-DAQ) devices, additional CSV files are exported for each connected device. For example, if you have two force plates and a NI-DAQ device in the setup, a total 4 CSV files will be created when you export the tracking data from Motive. Each of the exported CSV files will contain basic properties and settings at its header, including device information and sample counts. Also, mocap frame rate to device sampling rate ratio is included since force plate and analog data are sampled at higher sampling rates.
Since device data is usually sampled at a higher rate than the camera system, the camera samples are collected at the center of the corresponding device data samples that were collected. For example, if the device data has 9 sub-frames for each camera frame sample, the camera tracking data will be recorded at every 5th frame of device data.
Force Plate Data: Each of the force plate CSV files will contain basic properties such as platform dimensions and mechanical-to-electrical center offset values. The mocap frame number, force plate sample number, forces (Fx/Fy/Fz), moments (Mx, My, Mz), and location of the center of pressure (Cx, Cy, Cz) will be listed below the header.
Analog Data: Each of the analog data CSV files contains analog voltages from each configured channel.
Motive can export tracking data in BioVision Hierarchy (BVH) file format. Exported BVH files do not include individual marker data. Instead, a selected skeleton is exported using hierarchical segment relationships. In a BVH file, the 3D location of a primary skeleton segment (Hips) is exported, and data on subsequent segments are recorded by using joint angles and segment parameters. Only one skeleton is exported for each BVH file, and it contains the fundamental skeleton definition that is required for characterizing the skeleton in other pipelines.
Notes on relative joint angles generated in Motive: Joint angles generated and exported from Motive are intended for basic visualization purposes only and should not be used for any type of biomechanical or clinical analysis.
General Export Options
Frame Rate
Number of samples included per every second of exported data.
Start Frame
End Frame
Scale
Apply scaling to the exported tracking data.
Units
Sets the length units to use for exported data.
Axis Convention
Sets the axis convention on exported data. This can be set to a custom convention or select preset conventions for Entertainment or Measurement.
X Axis Y Axis Z Axis
Allows customization of the axis convention in the exported file by determining which positional data to be included in the corresponding data set.
BVH Specific Export Options
Single Bone Torso
When this is set to true, there will be only one skeleton segment for the torso. When set to false, there will be extra joints on the torso, above the hip segment.
Exclude Fingers
When set to true, exported skeletons will not include the fingers, if they are tracked in the Take file.
Hands Downward
Sets the exported skeleton base pose to use hands facing downward.
Bone Naming Convention
Sets the name of each skeletal segment according to the bone naming convention used in the selected application: Motive, FBX or 3dsMax.
Bone Name Syntax
Sets the convention for bone names in the exported data.
Skeleton Names
Select which skeletons will be exported: All skeletons, selected skeletons, or custom. The custom option will populate the selection field with the names of all the skeletons in the Take. Remove the names of the skeletons you do not wish to include in your export. Names must match the names of actual skeletons in the Take to export.
Tracking data can be exported into the C3D file format. C3D (Coordinate 3D) is a binary file format that is widely used especially in biomechanics and motion study applications. Recorded data from external devices, such as force plates and NI-DAQ devices, will be recorded within exported C3D files. Note that common biomechanics applications use a Z-up right-hand coordinate system, whereas Motive uses a Y-up right-hand coordinate system. More details on coordinate systems are described in the later section. Find more about C3D files from .
Force plate data is displayed in Newtons (N).
Force plate moments are measured in Newton Meters (N m)
General Export Options
C3D Specific Export Options
Common Conventions
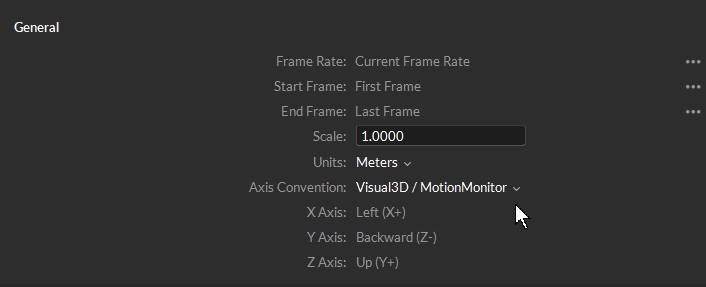
Since Motive uses a different coordinate system than the system used in common biomechanics applications, it is necessary to modify the coordinate axis to a compatible convention in the C3D exporter settings. For biomechanics applications using z-up right-handed convention (e.g., Visual3D), the following changes must be made under the custom axis.
X axis in Motive should be configured to positive X
Y axis in Motive should be configured to negative Z
Z axis in Motive should be configured to positive Y.
This will convert the coordinate axis of the exported data so that the x-axis represents the anteroposterior axis (left/right), the y-axis represents the mediolateral axis (front/back), and the z-axis represents the longitudinal axis (up/down).
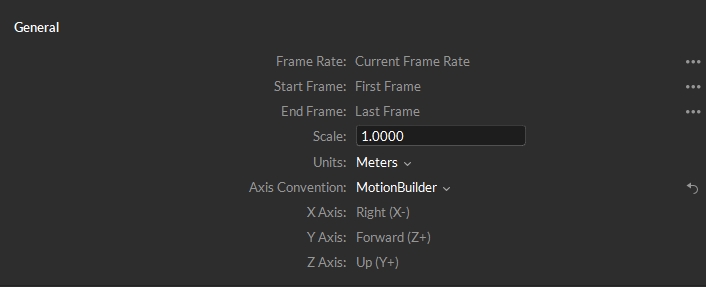
MotionBuilder Compatible Axis Convention
This is a preset convention for exporting C3D files for use in Autodesk MotionBuilder. Even though Motive and MotionBuilder both use the same coordinate system, MotionBuilder assumes biomechanics standards when importing C3D files (negative X axis to positive X axis; positive Z to positive Y; positive Z to positive Y). Accordingly, when exporting C3D files for MotionBuilder use, set the Axis setting to MotionBuilder Compatible, and the axes will be exported using the following convention:
Motive: X axis → Set to negative X → Mobu: X axis
Motive: Y axis → Set to positive Z → Mobu: Y axis
Motive: Z axis → Set to positive Y → Mobu: Z axis
There is an known behavior where importing C3D data with timecode doesn't accurately show up in MotionBuilder. This happens because MotionBuilder sets the subframe counts in the timecode using the playback rate inside MotionBuilder instead of using the rate of the timecode. When this happens you can set the playback rate in MotionBuilder to be the same as the rate of the timecode generator (e.g. 30 Hz) to get correct timecode. This happens only with C3D import in MotionBuilder, FBX import will work fine without the change to the playback rate.
Various types of files, including the tracking data, can be exported out from Motive. This page provides information on what file formats can be exported from Motive and instructions on how to export them.
Once captures have been recorded into Take files and the corresponding 3D data have been reconstructed, tracking data can be exported from Motive in various file formats.
Exporting Tracking Data
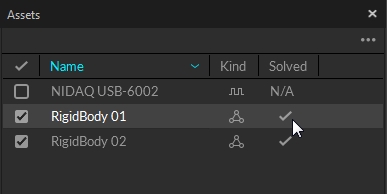
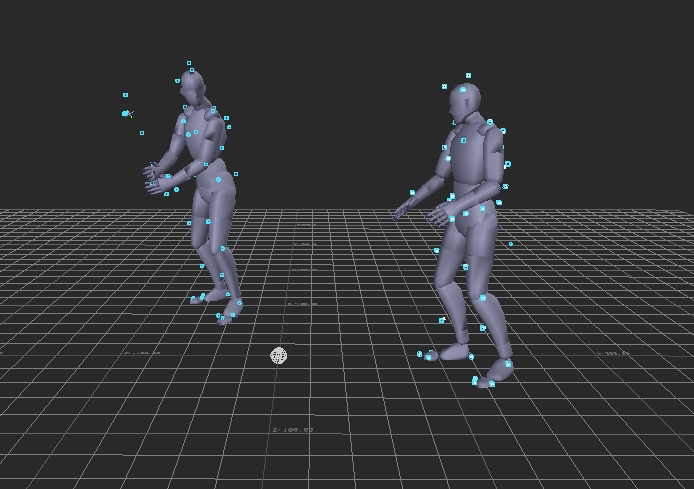
If the recorded Take includes Rigid Body or Skeleton trackable assets, make sure all of the Rigid Bodies and Skeletons are Solved prior to exporting. The solved data will contain positions and orientations of each Rigid Body and Skeleton. If changes have been made to either the Rigid Body or Skeleton, you will need to solve the assets again prior to exporting.
Please note that if you have Assets that are unsolved and just wish to export reconstructed Marker data, you can toggle off Rigid Body and Skeleton Bones from the Export window (see image below).
In the export dialog window, the frame rate, the measurement scale and type (meters, centimeters or millimeters), the Axis convention, and the frame range of exported data can be configured. Additional export settings are available for each export file formats. Read through below pages for details on export options for each file format:
Exporting a Single Take
Step 3. On the export dialogue window, select a file format and configure the corresponding export settings.
To export the entire frame range, set Start Frame and End Frame to Take First Frame and Take Last Frame.
To export a specific frame range, set Start Frame and End Frame to Start of Working Range and End of Working Range.
Step 4. Click Save.
Working Range:
The working range (also called the playback range) is both the view range and the playback range of a corresponding Take in Edit mode. Only within the working frame range will recorded tracking data be played back and shown on the graphs. This range can also be used to output specific frame ranges when exporting tracking data from Motive.
The working range can be set from the following places:
In the navigation bar of the Graph View pane, you can drag the handles on the scrubber to set the working range.
Exporting Multiple Takes
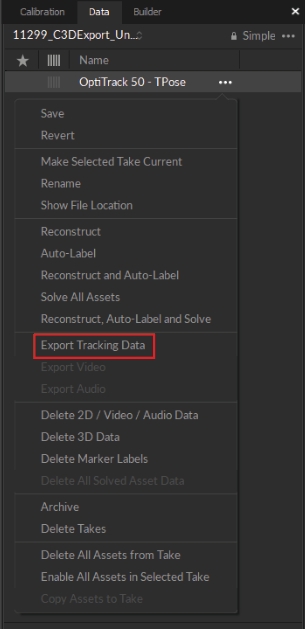
Step 2. Right-click on the selected Takes and click Export Tracking Data from the context menu.
Step 3. An export dialogue window will display to batch export tracking data.
Step 4. Select the desired output format and configure the corresponding export settings.
Step 5. Select frame ranges to export under the Start Frame and the End Frame settings. You can either export entire frame ranges or specified frame ranges on all of the Takes. When exporting specific ranges, desired working ranges must be set for each respective Takes.
To export entire frame ranges, set Start Frame and End Frame to Take First Frame and Take Last Frame.
To export specific frame ranges, set Start Frame and End Frame to Start of Working Range and End of Working Range.
Step 6. Click Save.
Motive Batch Processor:
Motive exports reconstructed 3D tracking data in various file formats and exported files can be imported into other pipelines to further utilize capture data. Available export formats include CSV, C3D, FBX, BVH, and TRC. Depending on which options are enabled, exported data may include reconstructed marker data, 6 Degrees of Freedom (6 DoF) Rigid Body data, or Skeleton data. The following chart shows what data types are available in different export formats:
CSV and C3D exports are supported in both Motive Tracker and Motive Body licenses. FBX, BVH, and TRC exports are only supported in Motive Body.
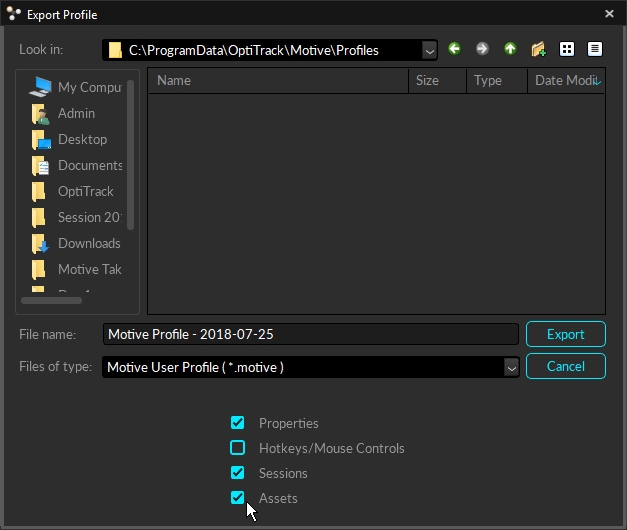
When an asset definition is exported to a MOTIVE user profile, it stores marker arrangements calibrated in each asset, and they can be imported into different takes without creating a new one in Motive. Note that these files specifically store the spatial relationship of each marker, and therefore, only the identical marker arrangements will be recognized and defined with the imported asset.
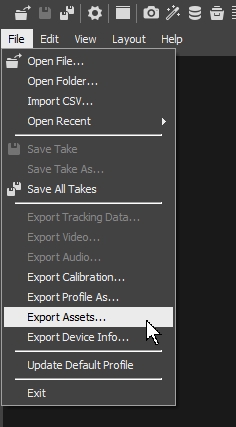
To export the assets, go to the File menu and select Export Assets to export all of the assets in the Live-mode or in the current TAK file(s). You can also use File → Export Profile to export other software settings including the assets.
Recorded NI-DAQ analog channel data can be exported into C3D and CSV files along with the mocap tracking data. Follow the tracking data export steps outlined above and any analog data that exists in the TAK will also be exported.
CSV Export: When exporting tracking data into CSV, additional CSV files will be exported for each of the NI-DAQ devices in a Take. Each of the exported CSV files will contain basic properties and settings at its header, including device information and sample counts. The voltage amplitude of each analog channel will be listed. Also, mocap frame rate to device sampling ratio is included since analog data is usually sampled at higher sampling rates.
Motive uses a different coordinate system than the system used in common biomechanics applications. To update the coordinate system to match your 3D analysis software during export, select the appropriate Axis Convention from the Export window.
For CSV, BVH, TRC formats, select Entertainment, Measurement, or Custom
For C3D format, select Visual 3D/Motion Monitor, MotionBuilder, or Custom
FBX formats do not include the option to change the Axis Convention.
Select the Custom axis convention to open up the X/Y/Z axis for editing. This creates a drop-down menu next to each axis that allows you to change it.
Click the curved arrow to the right of the field to reset the axis to its previous value, or to make your selection the default option.
Reference Video Type: Only compressed MJPEG reference videos or color camera videos can be recorded and exported from Motive. Export for raw grayscale videos is not supported.
Media Player: The exported videos may not be playable on Windows Media Player, please use a more robust media player (e.g. VLC) to play the exported video files.
Overlay options add layers of information to the exported video.
Sample Skeleton Label XML File
Cameras and other devices can now be exported to a CSV file. From the File menu, select Export Device Info...
The CSV file includes the device serial number and name.
For Cameras, the name is pre-defined and includes the camera model and serial number.
For all other devices, Motive will export the product serial number along with the name assigned in the device's properties. If no name is entered, the field will be left blank.
A Motive Body license can export tracking data into FBX files for use in other 3D pipelines. There are two types of FBX files: Binary FBX and ASCII FBX.
Notes for MotionBuilder Users
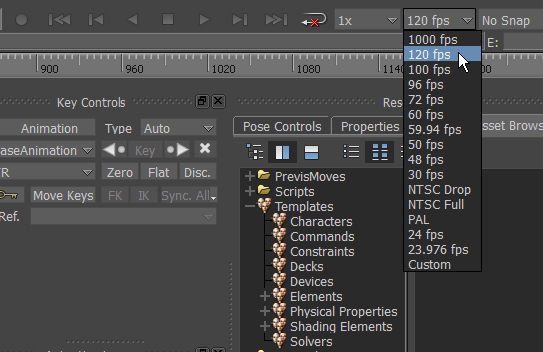
When exporting tracking data into MotionBuilder in the FBX file format, make sure the exported frame rate is supported in MotionBuilder (Mobu). In Mobu, there is a select set of playback frame rates that are supported, and the rate of the exported FBX file must agree in order to play back the data properly.
If there is a non-standard frame rate selected that is not supported, the closest supported frame rate is applied.
Exported FBX files in ASCII format can contain reconstructed marker coordinate data as well as 6 Degree of Freedom data for each involved asset depending on the export setting configurations. ASCII files can also be opened and edited using text editor applications.
FBX ASCII Export Options
Binary FBX files are more compact than ASCII FBX files. Reconstructed 3D marker data is not included within this file type, but selected Skeletons are exported by saving corresponding joint angles and segment lengths. For Rigid Bodies, positions and orientations at the defined Rigid Body origin are exported.
Make sure Individual Assets is selected when using the Remove Bone Name Prefixes option to export multiple skeletons, otherwise only one skeleton will be exported.
To include fingertips as nulls (Locators) in the export, the skeleton must contain hand bones. Select the following export options to export this data:
Marker Nulls
Unlabeled Markers
Interpolated Finger Tips
The start of the working range (or scope range) as configured under the in the .
The end of the working range (or scope range) as configured under the in the .
Detailed information about capture data is included as a header in exported CSV files. See for specifics.
Use
Displays which data type is listed in each corresponding column. Data types include raw marker, Rigid Body, Rigid Body marker, bone, bone marker, or unlabeled marker. Read more about .
Start frame of the exported data. You can set it to the recorded first frame of the exported Take (the default option), to the start of the working range (or scope range), as configured under the or in the , or select Custom to enter a specific frame number.
End frame of the exported data. You can set it to the recorded end frame of the exported Take (the default option), to the end of the working range (or scope range), as configured under the of in the , or select Custom to enter a specific frame number.
is required to export Marker data, is required when exporting Markers labeled from Assets, and is required prior to exporting Assets.
Step 1. Open and select a Take to export from the . The selected Take must contain reconstructed 3D data.
Step 2. Under the File tab on the command bar, click File → Export Tracking Data. This can also be done by right-clicking on a selected Take from the and clicking Export Tracking Data from the context menu.
You can also use the navigation controls on the Graph View pane to zoom in or zoom out on the frame ranges to set the working range. See: page.
Start and end frames of a working range can also be set from the when in the Edit mode.
Step 1. Under the , shift + select all the Takes that you wish to export.
Exporting multiple Take files with specific options can also be done through a script. For example, refer to the FBXExporterScript.cs script found in the MotiveBatchProcessor folder.
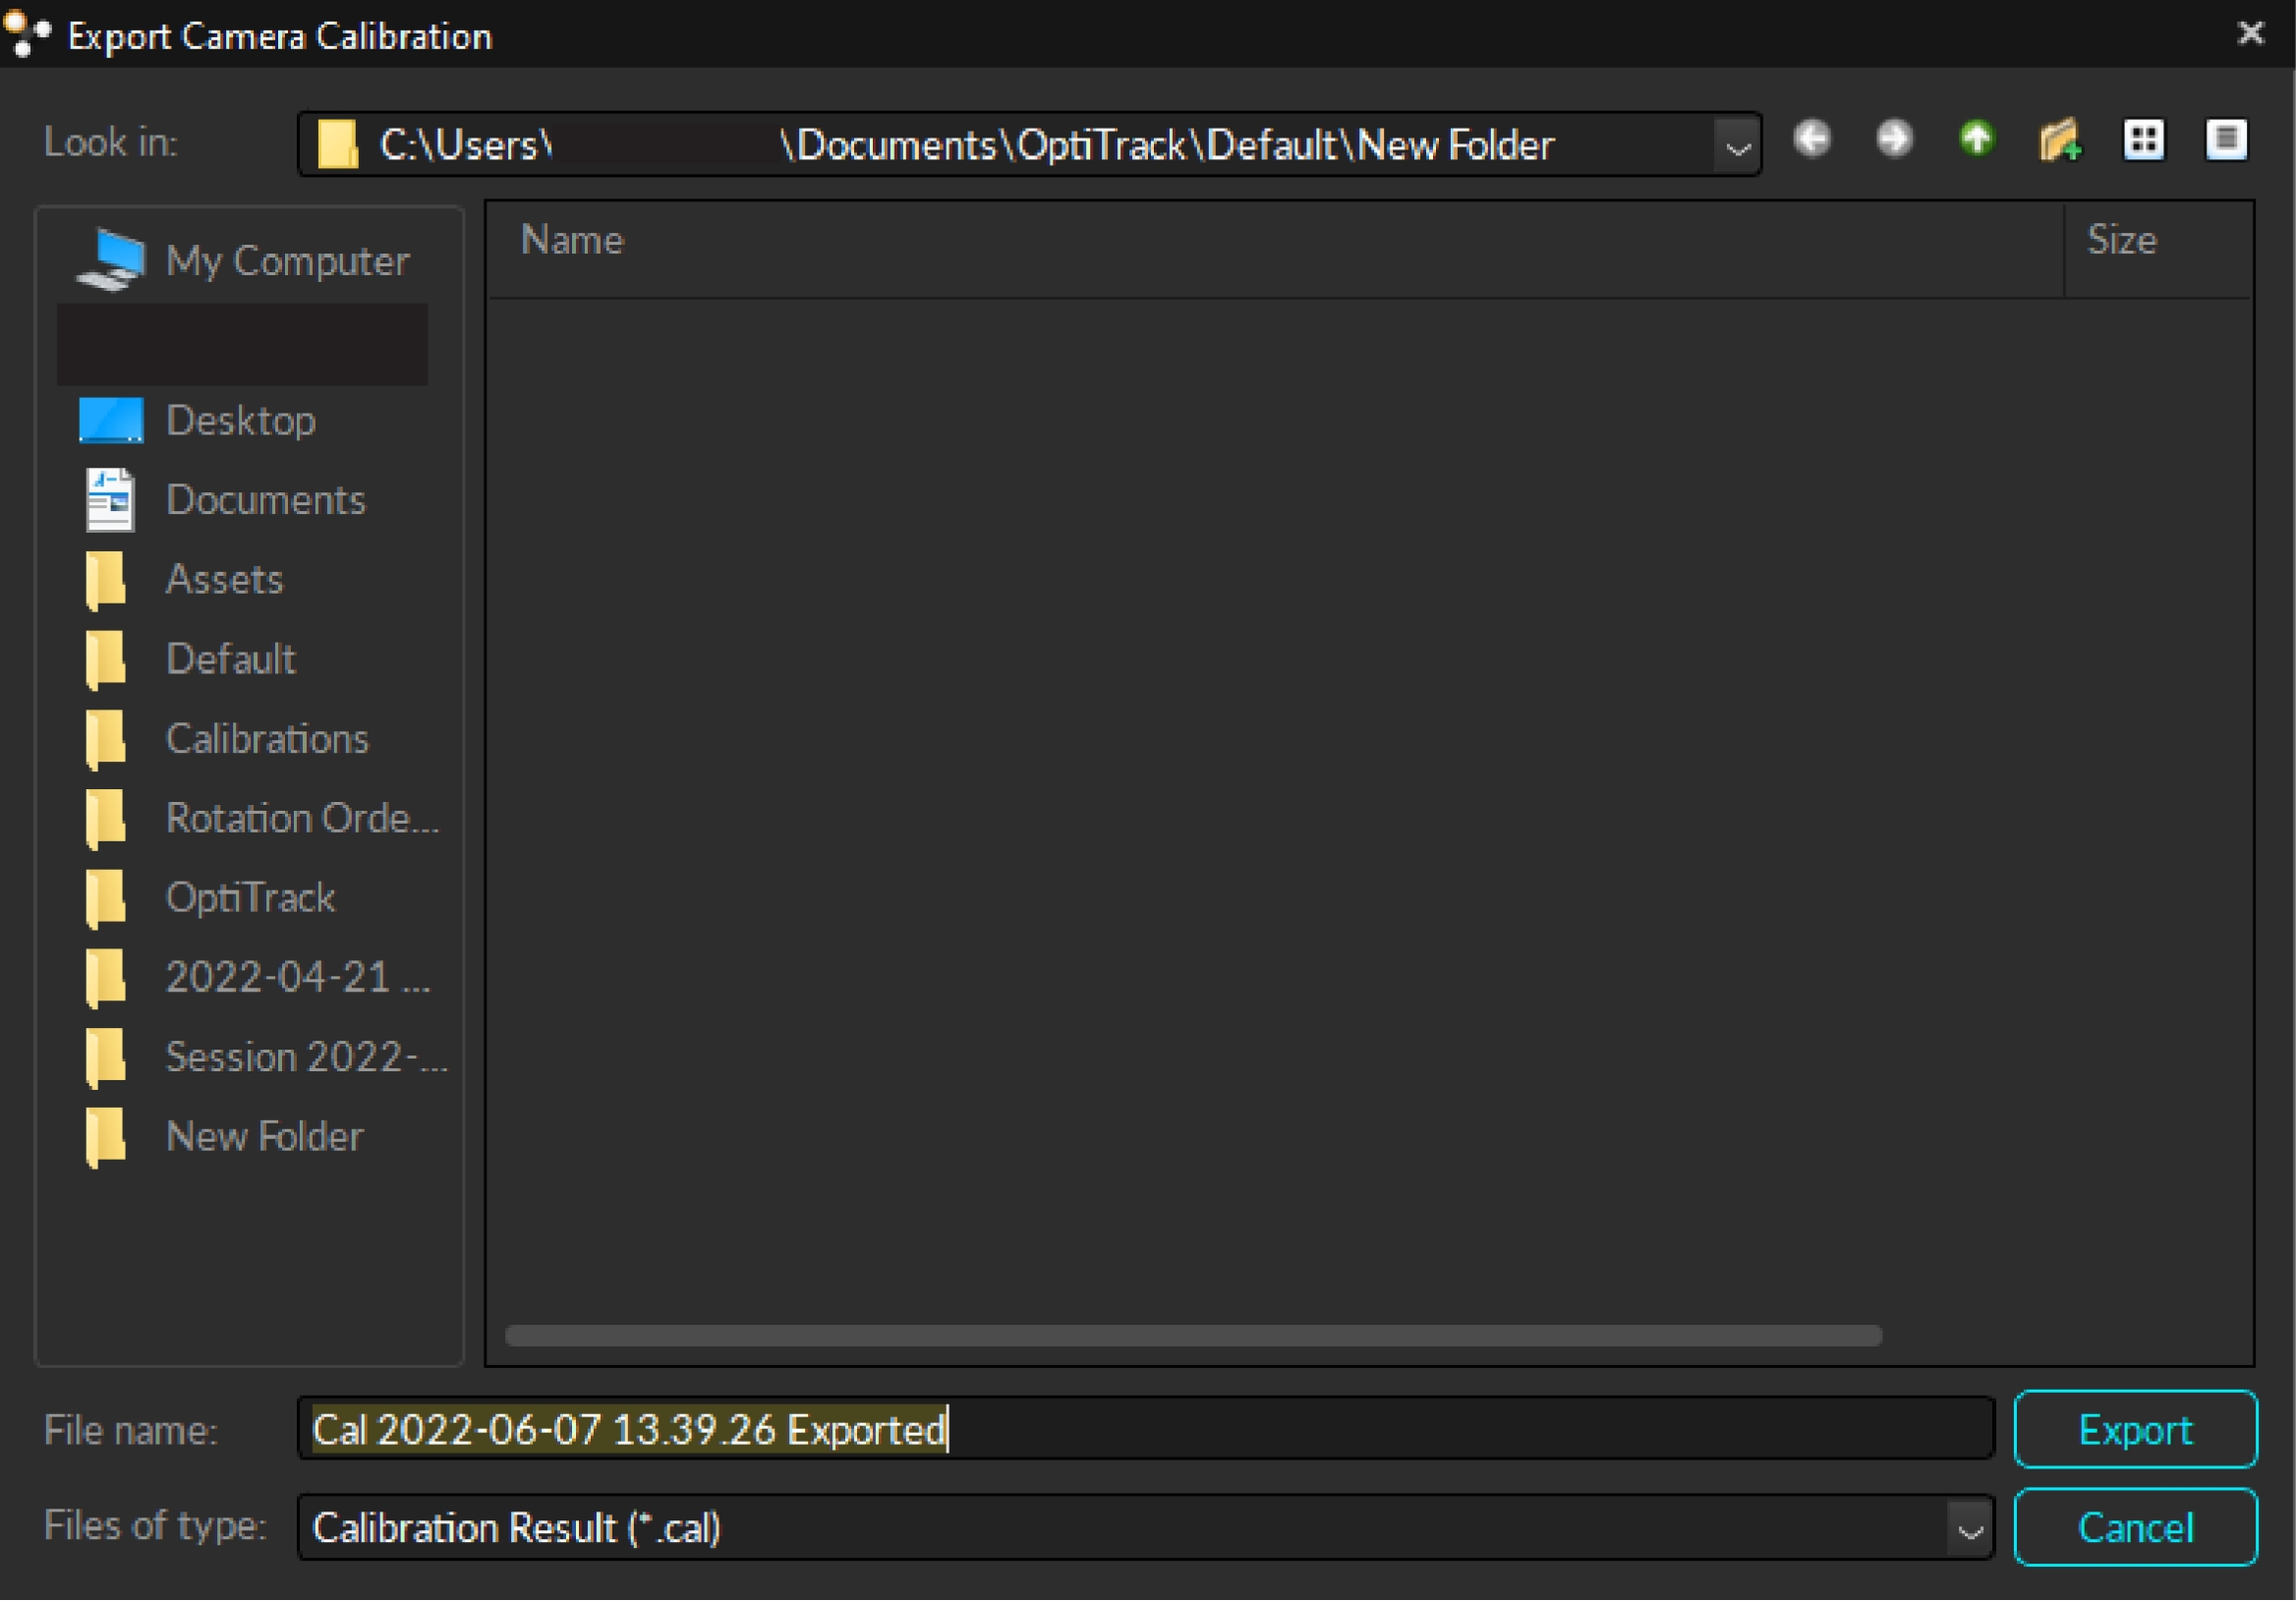
A calibration definition of a selected take can be exported from the Export Camera Calibration under the File tab. Exported calibration (CAL) files contain camera positions and orientations in 3D space, and they can be imported in different sessions to quickly load the calibration as long as the is maintained.
Read more about calibration files under the page.
Assets can be exported into the Motive user profile (.MOTIVE) file if it needs to be re-imported. The is a text-readable file that contains various configuration settings in Motive, including the asset definitions.
C3D Export: Both mocap data and the analog data will be exported onto a same C3D file. Please note that all of the analog data within the exported C3D files will be logged at the same sampling frequency. If any of the devices are captured at different rates, Motive will automatically resample all of the analog devices to match the sampling rate of the fastest device. More on C3D files:
When there is an MJPEG reference camera or a color camera in a Take, its recorded video can be exported into an AVI file or into a sequence of JPEG files. The Export Video option is located under the File menu, or you can also right-click on a TAK file from the and export from there. Read more about recording reference videos on the page.
When a recorded capture contains audio data, an audio file can be exported through the Export Audio option on the File menu or by right-clicking on a Take from the .
Skeletal marker labels for Skeleton assets can be exported as XML files (example shown below) from the . The XML files can be imported again to use the stored marker labels when creating new Skeletons.
For more information on Skeleton XML files, read through the page.
For more information, please visit site.
Autodesk has discontinued support for FBX ASCII import in MotionBuilder 2018 and above. For alternatives when working in MotionBuilder, please see the page.
Reconstructed 3D Marker Data
•
•
•
•
6 Degrees of Freedom Rigid Body Data
•
•
Skeleton Data
•
•
•
•
•
Time Data
Includes the frame reference number in the bottom left corner.
Cameras
Labels all cameras visible in the reference video with the Motive-assigned number.
Markers
Displays markers using the color scheme assigned in Motive.
Rigid Bodies
Shows the Rigid Body bone and constraints for all solved Rigid Bodies in the take.
Skeletons
Displays bones for all solved skeletons.
Markersets
Displays bones for all solved trained markersets.
Force Plates
Displays force plate(s) used in the take.
Marker Sticks
Displays the marker sticks for all solved assets used in the take.
Logo
Adds the OptiTrack logo to the top right corner of the video.
Frame Rate
Number of samples included per every second of exported data.
Start Frame
End Frame
Scale
Apply scaling to the exported tracking data.
Units
Sets the length units to use for exported data.
Axis Convention
Sets the axis convention on exported data. This can be set to a custom convention, or preset conventions for exporting to Visual3D/Motion Monitor (default) or MotionBuilder.
X Axis Y Axis Z Axis
Allows customization of the axis convention in the exported file by determining which positional data to be included in the corresponding data set.
Use Zero Based Frame Index
C3D specification defines first frame as index 1. Some applications import C3D files with first frame starting at index 0. Setting this option to true will add a start frame parameter with value zero in the data header.
Unlabeled Markers
Includes unlabeled marker data in the exported C3D file. When set to False, the file will contain data for only labeled markers.
Calculated Marker Positions
Exports the asset's constraints as the marker data.
Interpolated Fingertip Markers
Includes virtual reconstructions at the fingertips. Available only with Skeletons that support finger tracking (e.g., Baseline + 11 Additional Markers + Fingers (54))
Use Timecode
Includes timecode.
Disable Timecode Subframe
Export the timecode without using subframes.
Rename Unlabeled As _000X
Unlabeled markers will have incrementing labels with numbers _000#.
Marker Name Syntax
Choose whether the marker naming syntax uses ":" or "_" as the name separator. The name separator will be used to separate the asset name and the corresponding marker name in the exported data (e.g. AssetName:MarkerLabel or AssetName_MarkerLabel or MarkerLabel).
Frame Resampling
Adjusts the frame rate of the exported video from full (every frame) to half, quarter, 1/8 or 1/16 of the original.
Start Frame
End Frame
Playback Rate
Sets the playback speed for the exported video. Options are Full Speed (default), half speed, quarter speed, and 1/8 speed.
Video Format
Reference videos can be exported into AVI files using either H.264 or MJPEG compression formats, or as individual JPEG files (JPEG sequence). The H.264 format will allow faster export of the recorded videos and is recommended.
Maximum File size (MB)
Sets the maximum size for video export files, in megabytes. Large videos will be separated into multiple files, which will not exceed the size value set here.
Dropped Frames
Determines how dropped frames will be handled in the video output. Last Frame (the default) will display the last good frame through the end of the video. Black Frame will replace each dropped frame with a black frame. Both of these options will preserve the original video length, whereas Drop Frame will truncate the video at the first dropped frame.
Naming Convention
Sets the naming convention for the video export. The Standard naming convention is Take_Name (Camera Serial Number) e.g., Skeleton_Walking (M21614). The Prefix Camera ID convention will include the number assigned to the camera in Motive at the beginning, followed by the Take name e.g., Cam_1_Skeleton_Walking. This latter option will also create a separate folder for each camera's AVI file.
Camera
Select the camera(s) for the video export: All reference cameras, or custom.
Frame Rate
Number of samples included per every second of exported data.
Start Frame
End Frame
Scale
Apply scaling to the exported tracking data.
Units
Set the unit in exported files.
Use Timecode
Includes timecode.
Export FBX Actors
Includes FBX Actors in the exported file. Actor is a type of asset used in animation applications (e.g. MotionBuilder) to display imported motions and connect to a character. In order to animate exported actors, associated markers will need to be exported as well.
Skeleton Names
Select which skeletons will be exported: All skeletons, selected skeletons, or custom. The custom option will populate the selection field with the names of all the skeletons in the Take. Remove the names of the skeletons you do not wish to include in your export. Names must match the names of actual skeletons in the Take to export. Note: This field is only visible if Export FBX Actors is selected.
Optical Marker Name Space
Overrides the default name spaces for the optical markers.
Marker Name Separator
Choose ":" or "_" for marker name separator. The name separator will be used to separate the asset name and the corresponding marker name when exporting the data (e.g. AssetName:MarkerLabel or AssetName_MarkerLabel). When exporting to Autodesk MotionBuilder, use "_" as the separator.
Markers
Exports each marker's coordinates.
Unlabeled Markers
Includes unlabeled markers.
Calculated Marker Positions
Export asset's constraint marker positions as the optical marker data.
Interpolated Fingertips
Includes virtual reconstructions at the fingertips. Available only with Skeletons that support finger tracking.
Marker Nulls
Exports the location of each marker.
Export Skeleton Nulls
Rigid Body Nulls
Frame Rate
Number of samples included per every second of exported data.
Start Frame
End Frame
Scale
Apply scaling to the exported tracking data.
Units
Sets the unit for exported segment lengths.
Use Timecode
Includes timecode.
Export Skeletons
Skeleton Names
Select which skeletons will be exported: All skeletons, selected skeletons, or custom. The custom option will populate the selection field with the names of all the skeletons in the Take. Remove the names of the skeletons you do not wish to include in your export. Names must match the names of actual skeletons in the Take to export.
Name Separator
Choose ":" or "_" for marker name separator. The name separator will be used to separate the asset name and the corresponding marker name when exporting the data (e.g. AssetName:MarkerLabel or AssetName_MarkerLabel). When exporting to Autodesk Motion Builder, use "_" as the separator.
Bone Naming Convention
Select Motive, FBX, or UnrealEngine.
Rigid Body Nulls
Rigid Body Names
Names of the Rigid Bodies to export into the FBX binary file as 6 DoF nulls.
Markerset Nulls
Markerset Names
Select which markersets will be exported: All markersets, selected markersets, or custom. The custom option will populate the selection field with the names of all the markersets in the Take. Remove the names of the markersets you do not wish to include in your export. Names must match the names of actual markersets in the Take to export.
Marker Nulls
Exports the location of each marker. This setting must be enabled to export interpolated finger tip data.
Unlabeled Markers
Includes unlabeled markers. This setting must be enabled to export interpolated finger tip data.
Interpolated Fingertips
Includes virtual reconstructions at the fingertips. Available only with Skeletons that support finger tracking. Both Marker Nulls and Unlabeled Markers must be enabled also.
Exclude Fingers
When set to true, exported skeletons will not include the fingers, if they are tracked in the Take file.
Cameras
Select the cameras to include in your export. Options are All Color Cameras, All Cameras, or none (default).
Skeleton Stick Mesh
Select this option if exporting to a game engine that requires an FBX mesh asset to apply tracked skeletons to other characters for retargeting purposes.
Individual Assets
Exports the data for each asset into a separate file.
Remove Bone Name Prefixes
Removes the skeleton name prefix from the bones to create skeletons that are easily retargetable and interchangeable. Use when exporting into Unreal Engine.
Start frame of the exported data. You can set it to the recorded first frame of the exported Take (the default option), to the start of the working range (or scope range), as configured under the or in the , or select Custom to enter a specific frame number.
End frame of the exported data. You can set it to the recorded end frame of the exported Take (the default option), to the end of the working range (or scope range), as configured under the of in the , or select Custom to enter a specific frame number.
Can only be exported when is recorded for exported Skeleton assets. Exports 6 Degree of Freedom data for every bone segment in selected Skeletons.
Can only be exported when is recorded for exported Rigid Body assets. Exports 6 Degree of Freedom data for selected Rigid Bodies. Orientation axes are displayed on the geometrical center of each Rigid Body.
Start frame of the exported data. You can set it to the recorded first frame of the exported Take (the default option), to the start of the working range (or scope range), as configured under the or in the , or select Custom to enter a specific frame number.
End frame of the exported data. You can set it to the recorded end frame of the exported Take (the default option), to the end of the working range (or scope range), as configured under the of in the , or select Custom to enter a specific frame number.
Export Skeleton nulls. Please note that the must be recorded for Skeleton bone tracking data to be exported. It exports 6 Degree of Freedom data for every bone segment in exported Skeletons.
Can only be exported when is recorded for exported Rigid Body assets. Exports 6 Degree of Freedom data for selected Rigid Bodies. Orientation axes are displayed on the geometrical center of each Rigid Body.
Can only be exported when is recorded for exported trained markerset assets. Exports 6 Degree of Freedom data for selected assets. Orientation axes are displayed on the geometrical center of each markerset.