Before starting Motive, please make sure to launch your glove's software first.
Launch Motive. Connected gloves will be listed under the Devices pane.
Use the Builder pane to define a Skeleton asset in Motive. You can use any Skeleton model that is not designed to track fingers using motion capture data. The recommended Skeletons models to use are the Core 50 or Baseline 41.
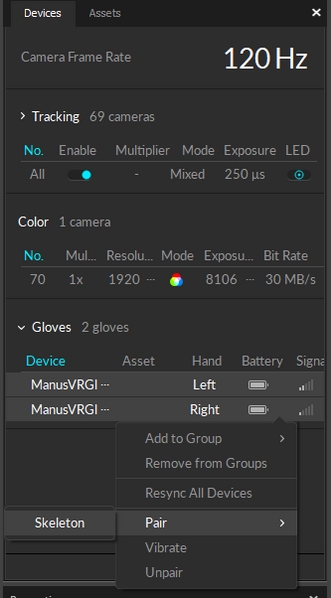
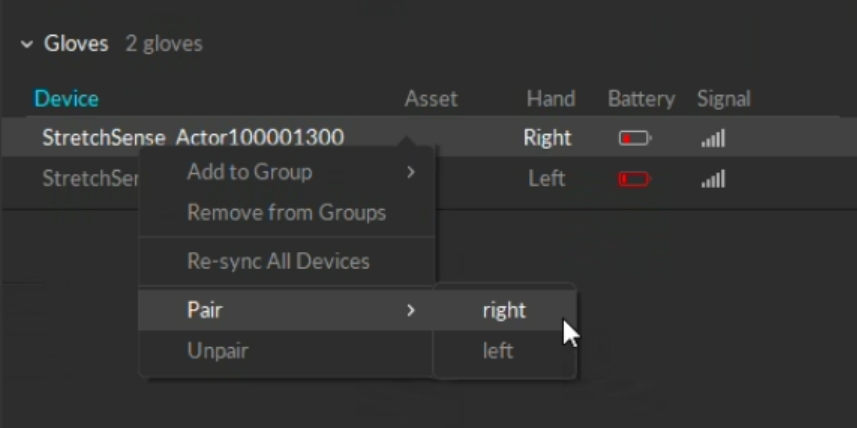
After a Skeleton has been defined, pair the Skeleton to the glove device. Open the Devices pane, right-click on the listed glove device, and pair it to the Skeleton as shown in the screenshot below.
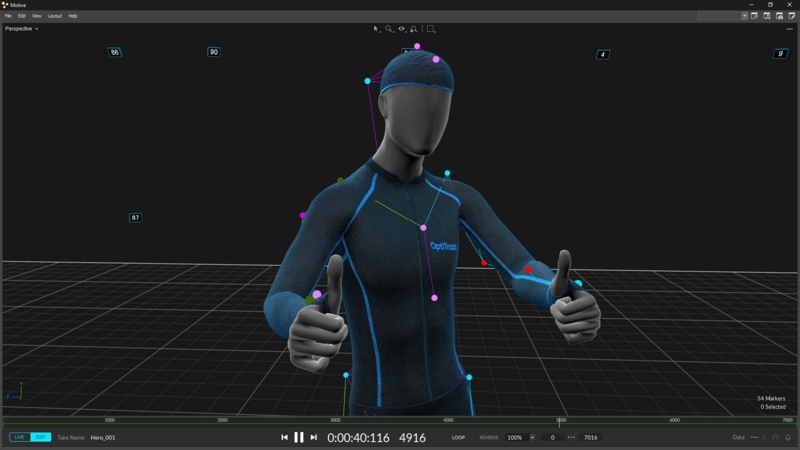
Once the glove has been configured and paired with the created Skeleton, the fingers will be tracking in Motive.
Once Motive starts tracking the glove, the finger tracking data can be outputted for various applications. Real-time finger data can be streamed into any NatNet client, and recorded finger data can be exported into other file formats. For instructions on outputting tracking data from Motive, refer to the following pages:
This page provides instructions on integrating StretchSense gloves with an OptiTrack motion capture system.
Starting from Motive 3.0 and above, StretchSense gloves can be integrated into Motive. This allows for easy integration of the external glove tracking system directly in Motive so that it can be used in tandem with the OptiTrack system to provide a more comprehensive tracking solution.
Required Components
StretchSense SuperSlay or Fidelity Gloves with corresponding dongles.
software
Motive 3.0 or above
(optional) MoCap suit and markers for full body capture.
(optional) 2 PCs, one to run Motive another to run Hand Engine
If you're having issues with latency, it is recommended that you run Hand Engine on a separate PC than Motive. For more instruction on how to do so, please see our section Below.
Before getting setup in Motive, you'll need to pair and calibrate your gloves within Hand Engine . Hand Engine is StretchSense's software that allows you to pair your gloves to their respective USB dongles and calibrate prior to integrating into Motive.
For a full guide on setting up your gloves with Hand Engine, please visit the .
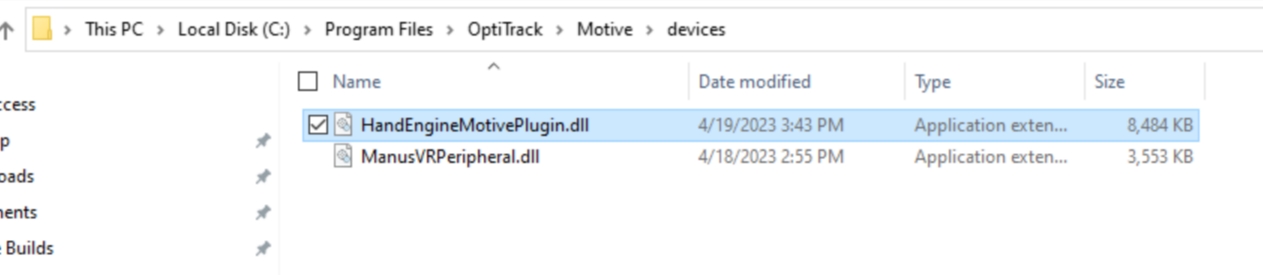
Once downloaded, you can place the DLL file into the directory below:
C:\Program Files\OptiTrack\Motive\devices
You will want to make sure Motive is not open during this process. Once the DLL has been stored in the devices folder, you can then open Motive.
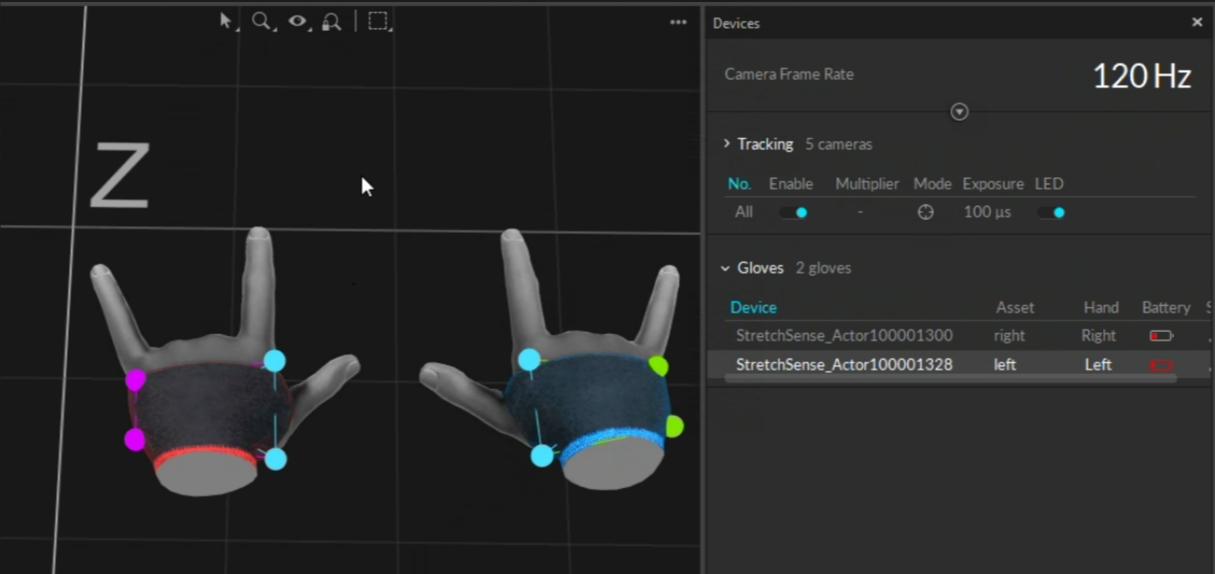
Open Motive and power on the StretchSense gloves. You'll see the gloves appear in the Devices pane.
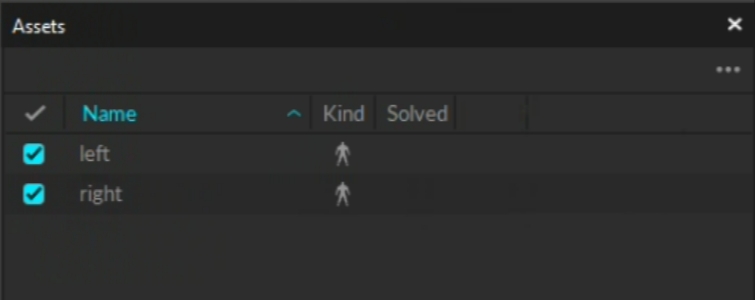
Create 2 hand Skeletons from the glove markers (left, and right hands).
From the Devices pane select the Right glove and pair it to the right Skeleton.
Repeat Step 5 with the left hand.
Your gloves should now be fully integrated into Motive and ready for tracking!
To improve any latency issues, you can follow the steps below for running Motive and Hand Engine on separate PCs.
On the host computer, make sure Hand Engine is running with 'Enable SDK' option turned on.
On the separate Motive PC, open Motive.
In Motive Settings -> General -> Glove Server Address, specify the IP address and port number of the remote Hand Engine instance. Glove Server Address is an advanced property, so 'Show Advanced' must be toggled. The IP address must follow with a colon ":" and then a port number that matches the number defined in Hand Engine. (e.g. 192.168.1.5:50051)
This is the name of the device. By default the naming convention is 'StretchSense_Actor #Serial number'. This is useful to identify each glove based on its serial number incase it was incorrectly paired in Hand Engine .
This column will populate with the Skeleton Asset that the glove was paired to within Motive.
This column denotes the left and right hands as they were setup in Hand Engine. If the gloves were incorrectly paired in Hand Engine, they will be incorrectly displayed here as well.
This column displays the current battery level of the gloves.
This column denotes the signal strength. It is important to make sure the signal strength is as full as possible for the best tracking experience.
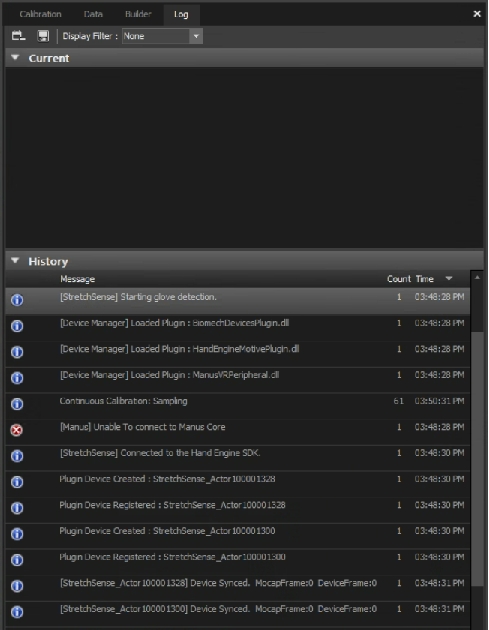
Important information regarding the status of the gloves as they integrate into Motive can be found in the Log pane.
This denotes that Motive is now connected to Hand Engine.
Prepares the glove to be created in Motive.
Creates the glove instance in Motive and populates the glove in the Devices pane.
This message should only appear initially and may occur if there are camera frame drops in other parts of your system. For the most part however, this isn't necessary general user information.
In order for StretchSense gloves to appear in the Devices pane in Motive, you'll first need to download the from our website.
Check the in Motive to confirm the connection. If the plugin stopped detecting, restart Motive.
Below is a description of the columns associated with the gloves in the .
Basic setup and troubleshooting guide for integrating Manus Glove devices with Motive.
The Manus Glove device integration brings finger tracking data from the external glove tracking system into Motive, providing a more comprehensive tracking solution.
Visit the Manus website to download and install the necessary software.
For detailed instructions on using Manus gloves, including the OptiTrack integration, please see the OptiTrack Motive plugin documentation on the Manus Knowledge Center.
Required Components
Manus Gloves and the USB Dongle.
Manus Core and Dashboard software.
Motive 3.0 or above.
(optional) MoCap suit and markers for full body capture.
Important Notes
Supported Glove Models: Manus Prime gloves and Quantum Metagloves.
Sampling Rate: Manus gloves run at a fixed sampling rate of 90Hz. If the camera system is set to run at a higher frame rate higher, Motive will pad the missing samples in the glove data with previous samples.
Sync: Manus gloves do not support hardware synchronization. Motive uses a software synchronization scheme to attempt to keep the Manus glove as close as possible to mocap data.
Manus Dongle: Plug the Manus dongle on a separate USB bus from the one used to connect the USB Security Key. If both dongles are connected to the same bus, it may cause conflicts with Motive activation.
The steps required to setup the glove may change depending on Manus Software versions. For the latest information, please refer to the Manus user documentation.
Before using Manus gloves in Motive, please ensure all gloves have been paired, calibrated and are able to report data from the Manus Dashboard software. This is a crucial first step for the successful use of Manus Gloves with Motive software.
Start the Manus Dashboard software.
Insert the Manus Glove Dongle(s) onto the computer. Do not connect the dongle into the same USB bus used by the USB Security Key as it can cause conflicts with device detection.
Power on the Manus Gloves.
(optional) You may need to pair the glove with the dongle. The gloves should come already paired.
Calibrate each glove according to the Manus user documentation. This step is critical to provide the most robust finger solve data.
Start Motive and the gloves should appear in the Devices pane.
Note: We recommend closing the Manus Dashboard while running Motive to prevent performance issues.
Please refer to our Glove Device Setup page.
The easiest method to properly align the constraints with the device is to place a camera in MJPEG mode (reference mode) and use the Gizmo tool to make adjustments.
Adjust the gain and exposure on the reference camera until the actor's hand in the Manus glove is clearly visible.
Once Motive is tracking the glove, the finger tracking data can be output for various applications. Real-time finger data can be streamed into any NatNet client, and recorded finger data can be exported into other file formats. For instructions, please refer to the following pages:
Manus Core requires the appropriate license for streaming to Motive. If that license is not found, Motive will report an error when the program is launched.
Until the proper license is installed, the gloves will appear in Motive, but when paired with a hand skeleton there is no hand animation as expected.
Contact Manus support to resolve Manus licensing issues.
The Log pane will record several informational entries when Manus gloves are connected:
The following Log pane entries indicate that additional steps are required to connect the gloves:
Failed to Load Plugin | Unable to Load dll ... The specified module could not be found | ManusCore not found on %s", szServerAddress | ManusCore not found on localhost | Failed to initialize the ManusSDK | Error: %s", p_SystemMessage->infoString | Incompatible SDK version. Use 2.0 or above | Skeleton-Related Error Messages
The OptiTrack Manus plugin did not load when Motive was initialized.
Troubleshooting Steps:
make the correct version of Plugin.dll is in the devices folder.
make sure ManusSDK.dll is in the same folder as Motive.exe.
The plugin DLL was found but not loaded due to missing dependencies. This indicates the plugin setup is incomplete.
Troubleshooting Steps:
Reinstall the plugin.
Contact Manus support.
The ManusCore application was not found at the designated server address.
Troubleshooting Steps:
Ensure the correct server address is indicated for the ManusCore PC.
Check that the ManusCore PC is running and that the software is installed.
The ManusCore application was not found on the Motive PC.
Troubleshooting Steps:
Ensure that the Motive PC has the ManusCore application installed.
The ManusSDK did not initialize.
Troubleshooting Steps:
Restart the ManusCore and Motive PCs.
See Manus support for additional troubleshooting.
Error callback from Manus SDK.
Troubleshooting Steps:
Contact Manus support for the specific message received.
Error reported from ManusSDK
Troubleshooting Steps:
Contact Manus support.
The following error messages indicate issues with the skeleton in Manus.
[Manus] Failed to load the skeleton
Failed initialization of Manus skeleton
[Manus] Failed to give skeleton an ID
Failed initialization of Manus skeleton
[Manus] Failed to create skeleton setup
Skeleton chaining error
[Manus] Failed to create skeleton chains.
Skeleton chaining error
[Manus] Error with setting up right hand skeleton node.
Failed initialization of Hand skeleton
[Manus] Error with setting up left hand skeleton node.
Failed initialization of Hand skeleton
[Manus] Failed to Add Chain To Skeleton Setup. Error Code: %d", result
Skeleton chaining error. Error code from ManusSDK
Troubleshooting Steps:
Check the configuration in Manus Dashboard and make sure the hand skeleton is correctly defined and working there.
Contact Manus support.