Loading...
Loading...
Loading...
Loading...
Loading...
Loading...
Loading...
Common licensing problems and how to address them.
Issues with licensing can prevent the operation of Motive. This list identifies possible causes for various licensing errors that can occur, and how to resolve them.
The Motive license folder is located at C:\ProgramData\OptiTrack\License. You can also open the License folder using the link on the Motive splash screen.
There are several potential causes when the License not found message appears.
Check the license folder. The license file name contains the 6-digit serial number of the USB key associated with it. Confirm the number matches the serial number on the USB key. If the key and the license are mismatched, contact support.
Maintenance Licenses extend the term of the license purchased with the OptiTrack system, which is referred to as the Initial License. For a maintenance license to work, both it and the initial license must be in the Motive license folder.
Check the license folder. The name of the license file will indicate whether the license is an initial or maintenance license.
If the Initial License is missing, use the License Activation Tool to download it again. You will need the licensing information provided on the License card when the system was purchased to do so. This will download the initial license and all associated maintenance licenses.
Expand the Details & Requirements section for any release to see the license effective date.
Motive release dates are also shown at-a-glance on the list of Changelogs:
USB Security Keys work with Motive 3.x, USB Hardware Keys work with Motive 2.x.
Check the license folder and move or delete either the oldest license or the one that is not needed.
If Motive does not detect the USB security key, check Windows Device Manager to see if the key is recognized by Windows.
Type Device Manager in the Windows Search bar to find and open the Device Manager.
Expand the list of Human Interface Devices.
The OptiTrack security key is listed as an HID-compliant vendor-defined device. There will likely be several of these on a user's system. If the security key is recognized by Windows, it is often the first in the list.
To identify a key that is plugged in and recognized as a security key, open the Device Properties and select the Details tab.
Select the Hardware Ids property. If the device is a security key, The first two values will begin with HID\VID_131D&PID_2702.
If the USB security key is not listed, try reconnected the device or using a different USB port. Use a port on the back of the PC if one of the ports on the front doesn't work.
Check the license folder to verify the license has been downloaded.
Verify that the version of Motive installed is the correct version for the license. Install the correct version if necessary. Previous versions of Motive can be found under "Previous Releases" on the Download page.
Disable any firewall or antivirus software and launch Motive with administrative privileges.
Contact support if the issue persists after completing these troubleshooting steps.
Check your data entry. In addition to typos, look for additional characters such as a space at the beginning or end of the sequence.
Use the license tool from the Motive splash screen instead of the online license tool:
Only one license (initial or maintenance) can be activated at a time. Subsequent Maintenance licenses are activated when the prior maintenance period ends.
Two USB keys are plugged in. Only one USB key can be connected at a time.
Support may authorize the use of a demo license at various times. Demo licenses are linked to a specific computer and require the computer's Machine ID to activate.
Once permission is granted, send your First Name, Last Name, Email, and Machine ID to Support:
Download and install the version of Motive that corresponds to the demo license.
Launch Motive. Click About Motive window from the splash page.
The Machine ID is displayed at the bottom:
Support will send the license file via email. Check your spam filter and junk folder if it does not arrive on a timely basis.
Download and save the demo license (.dat file) attached to the email to the license folder: (C:\ProgramData\OptiTrack\License).
Typically, system issues can be boiled down to issues with the network. Below are some general steps to take when troubleshooting your network and isolating the cause of the issue.
When working with network hardware, it's always a good rule to start with an easy fix and work your way up.
First and foremost, you'll want to verify that your network can communicate with Motive.
We always firmly suggest that you disable the firewall on your camera network and disable or allow Motive on your Antivirus software.
You'll want to make sure that there isn't any other hardware hooked up to your camera network outside of provided sync devices or other OptiTrack approved hardware.
i.e. eSync 2, BaseStations, some biomechanics hardware, etc., are all acceptable to live on your camera network.
Make sure that you are using a designated NIC on an available PCI/e slot on your computer's motherboard as opposed to the NIC that is soldered onto your computer's motherboard. This will insure isolation from things like Wi-Fi or hardwired Internet.
If you're noticing a camera is either not receiving power or not showing up in Motive, try testing with a new Ethernet cable.
You can also try a cable that you're using for another camera that is powered and showing up in Motive to guarantee that it is indeed a cable issue.
If you've determined that you have a bad cable, remove the cable from the system and replace it with another available cable.
Be sure to test the new cable before it lands at its final position within your setup.
Verify that the port is receiving PoE and a data transfer signal. For most switches, this is indicated by a green light associated with the port.
Try another available port, preferably one that is working with a different camera.
If you've determined a bad port or multiple bad ports, please contact support@optitrack.com for a potential replacement.
If cameras are powered, but are unable to be seen in Motive you may need to verify that your cameras have been authenticated.
This document outlines recommended optimizations for a Motive PC operating in real-time interactive applications.
General Purpose Operating Systems (GPOS) like Windows are designed to maintain user responsiveness with many programs and services running, while real-time operating systems () are designed to run critical applications reliably and with precise timing. A GPOS can handle multiple tasks concurrently but is not ideal for important, time-sensitive applications due to latency and synchronization issues. A GPOS can also operate without time constraints, so tasks may sometimes fail or take longer to execute. For this reason, it may be necessary to optimize Windows 11 to improve performance in Motive.
These optimizations involve disabling various Windows security features, so it is crucial to ensure that the PC is isolated from the internet or other potential sources of malware.
Many of the recommended optimizations are completed using Window’s Local Group Policy Editor. To open this program:
From the Windows search bar, type CMD.
Run Command Prompt as administrator.
At the command line, type gpedit.msc and press enter.
This will open the Local Group Policy Editor window.
Local Group Policy Editor is available only with a Windows Professional License.
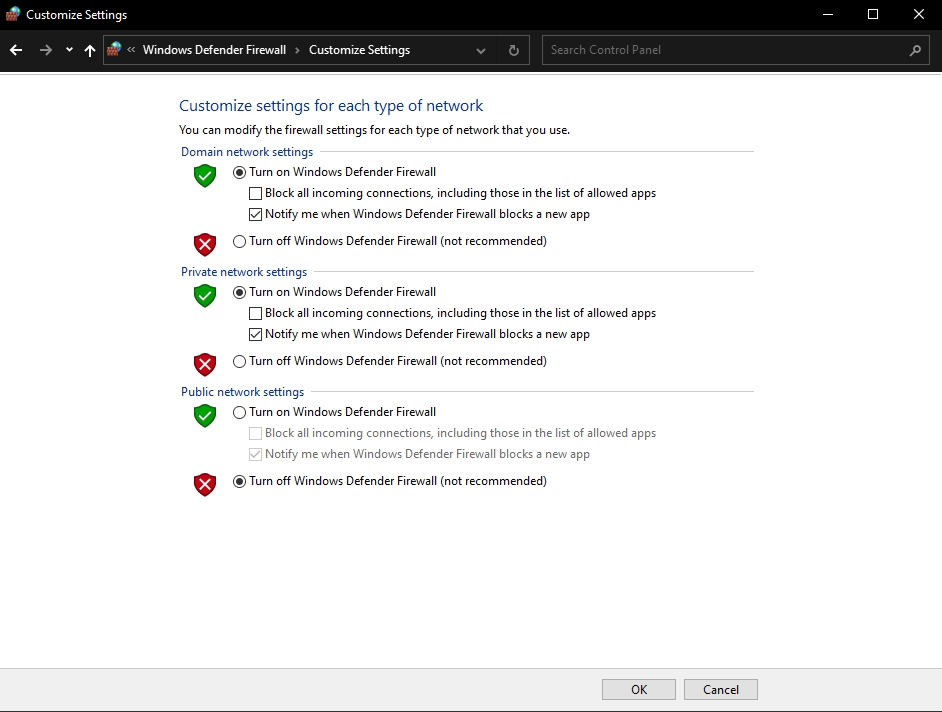
Set a Local Group Policy to disable Private, Public, and Domain firewalls.
Once these policies are implemented, the firewall cannot be re-enabled by any other means.
Navigate to Computer Configuration -> Windows Settings -> Security Settings -> Windows Defender Firewall with Advanced Security.
The Overview panel shows the current status of the firewall. Click Windows Defender Firewall Properties to change the state of the Domain, Private, and Public profiles to Off then click OK.
Set a Local Group Policy to disable Microsoft Defender Antivirus.
Once this policy is implemented, the Windows Defender Antivirus cannot be re-enabled in Virus & Threat Protection.
Navigate to Computer Configuration -> Administrative Templates -> Windows Components -> Microsoft Defender Antivirus.
Double-click Turn Off Microsoft Defender Antivirus.
Select Enabled and click OK.
Use the following processes to disable anti-malware services.
Navigate to: Computer Configuration -> Administrative Templates -> Windows Components -> Microsoft Defender Antivirus -> Real-time Protection.
Double-click Turn off real-time Protection.
Set the policy to Enabled and click OK.
Save the following script to a batch file named OptiTrack_ForceDefenderOFF.bat, in the common Windows startup folder: C:\ProgramData\Microsoft\Windows\Start Menu\Programs\StartUp.
Go to Settings -> Update & security -> Windows Security -> Virus & Threat Protection.
Click Manage Settings at the bottom of the screen.
Scroll to the Exclusions section and click Add or remove exclusions.
Navigate to C:\Program Files\Windows Defender.
Click the Select Folder button.
Restart the computer to decrease the RAM usage by the Antimalware Service Executable in Task Manager Processes.
Stop notifications from Windows and installed applications.
Right-click on the clock on the Task Bar to open the Notifications panel.
Select Notification Settings.
Set Notifications to Off.
Turn Do Not Disturb On.
Scroll through the list of Notifications from apps and other senders and turn Off any that are set to On.
At the bottom of the list, click Additional Settings.
Deselect all options in the Additional Settings list.
Stop scheduled tasks from running.
Open the Windows Task Scheduler application.
Select all the task in the Task Scheduler Library list.
Right-click and select Disable.
Open the Windows Task Scheduler application.
Navigate to Microsoft -> Windows -> Windows Defender.
Select all the tasks in the list.
Right-click and select Disable.
Stop unnecessary applications from loading at startup.
Open the Windows Task Manager application.
Click the Startup apps tab button.
Disable all unnecessary startup apps.
DO NOT disable OptiTrack_ForceDefenderOff.bat.
Turn off HDD/SSD Encryption (for example, BitLocker Drive Encryption Service).
Turn off HDD/SSD Compression.
Open Nvidia Control Panel and Navigate to 3D settings -> Manage 3D Settings
Select the Global Settings tab.
Set OpenGL rendering GPU to the dedicated GPU card.
Use the recommended network configuration.
Use Static IPs for Camera and Streaming Network Interface Cards (NICs)
Isolate the following on three different NICs:
Local Area Network
Incoming camera data
Outgoing streaming data
Type Network in the Windows search bar to find and open the Control Panel to View Network Connections. The image below shows the three NICs specified above.
Double-click or right-click the NIC you wish to configure and select Properties.
From the Properties screen, disable all protocols except IPv4.
With IPv4 selected, click the Properties button.
Select Use the following IP address:
For the NIC connected to the Camera network, enter IP address 192.168.10.1
For the NIC connected to the realtime network, enter IP address 192.168.20.1
Enter 255.255.255.0 for the Subnet mask.
Click OK to save and return to the Properties window.
Set the following properties to the value specified:
Interrupt Moderation = Disabled
Interrupt Moderation Rate = Disabled
Jumbo Packets = Disabled
Max Number RSS Queues = 16
Receive Buffers = 4096 (max)
Receive Side scaling = Enabled
Speed and Duplex = Auto-Negotiate
Transmit Buffers = 16384 (max)
Steps:
From the Properties window, click the Configure... button to customize NIC settings.
Click the Advanced tab.
To update a setting, select it from the Property: list and update the Value field on the right.
Update all of the settings listed above.
Click the Driver tab.
Click Disable, then Enable to restart the NIC with the new settings.
Use the settings supplied by your IT department to connect to corporate or institutional networks.
Customize the Motive desktop shortcut to launch the program with high priority.
On the desktop, right-click the Motive shortcut and select Properties.
Select the Shortcut tab.
Copy and paste the text below into the Target field:
Set the Run property to Maximized.
Click OK to save your changes and close the window.
When setting up your motion capture system, it is recommended that all Windows firewalls to be disabled from your Ethernet camera network. This ensures camera data is transported from the camera switches to the Motive computer or streamed from Motive to another application without dropped frames or lost data.
Basic firewall settings are simple to implement, and any typical user can do so. Advanced firewall settings are less intuitive and should be performed with caution and under the guidance of an OptiTrack Support Engineer or by an IT personnel within your company.
To access basic Windows firewall settings in Windows 10:
You can select the Windows icon from the taskbar then select the Settings cog.
From the Settings window you can then select Network and Internet
This will open the Status window, and from here you can scroll to the bottom to find 'Windows Firewall'
Alternatively, you can either select the Windows icon from taskbar or press the Windows key on your keyboard and search for 'firewall' and select 'Windows Defender Firewall' (be sure to not select 'Windows Defender Firewall with Advanced Security')
Check the license folder. If there is no license file in the folder, download it by running the License Activation Tool, available on the Motive splash page. Alternately, you can run the tool from C:\Program Files\OptiTrack\Motive\LicenseTool, or from the .
for your initial license information if you are unable to find it.
Use the "Check My License" tool at the bottom of the online license tool on the to verify the end date of the license maintenance period.
On the page, find the version of Motive that was valid before the license maintenance period ended. Click to expand the Previous Releases section for either 3.x.x or 2.x.x, depending on which license you have.
If an error symbol is displayed next to the device in Device Manager, the USB driver needs an update. to update the driver.
to purchase a new key. Once received, contact support to complete the transfer of the license to the new key.
Ensure the computer meets the to run Motive; upgrade as necessary.
The online License Tool is available on the page.
Following the Motive 3.0.2 release, users will no longer need to authenticate their cameras. Since this is no longer required, users can authenticate their license without the need of an internet connection. If you are currently using Motive 3.0.1 or below, please install this new release from our webpage. Please note that an internet connection is still required to download Motive.exe from the OptiTrack website.
If you have gone through the above network troubleshooting steps, please reach out to our team for more advanced troubleshooting.
Open Window’s .
Open Window’s .
Open Window’s .
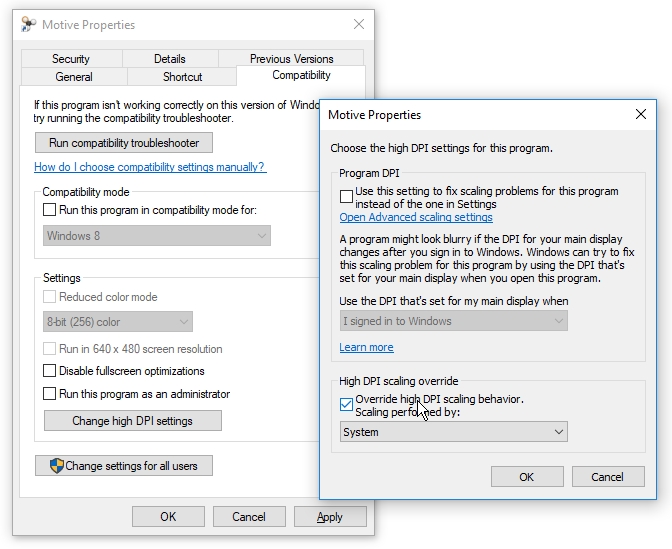
When running Motive on displays with high pixel density, (e.g. 4K resolution displays) the software UI may not be scaled properly and some of the buttons may appear to be very small on the screen. In these cases, you can simply adjust the windows configuration to prevent the scaling on high-resolution displays. Follow the below steps for configuring this.
Right click on the Motive Icon > Select Properties
Navigate to the Compatibility tab
Under Settings section, click Change high DPI settings. This will bring up the properties window.
On the new pop-up window, click and check the box next to Override high DPI scaling behavior. Scaling performed by: setting.
Lastly, make sure “System” option is selected in the drop-down menu as shown in the image below.
Click OK to apply. This will override any incorrect scaling behavior when using Motive on high DPI displays.