The Live Link Skeletal Mesh Generator is a third-party plugin and is not supported by OptiTrack. More details of this plugin can be found here: Live Link Skeletal Mesh Generator Plugin.
Unreal Engine 5.1
Motive 3.0
Visual Studio 2019+
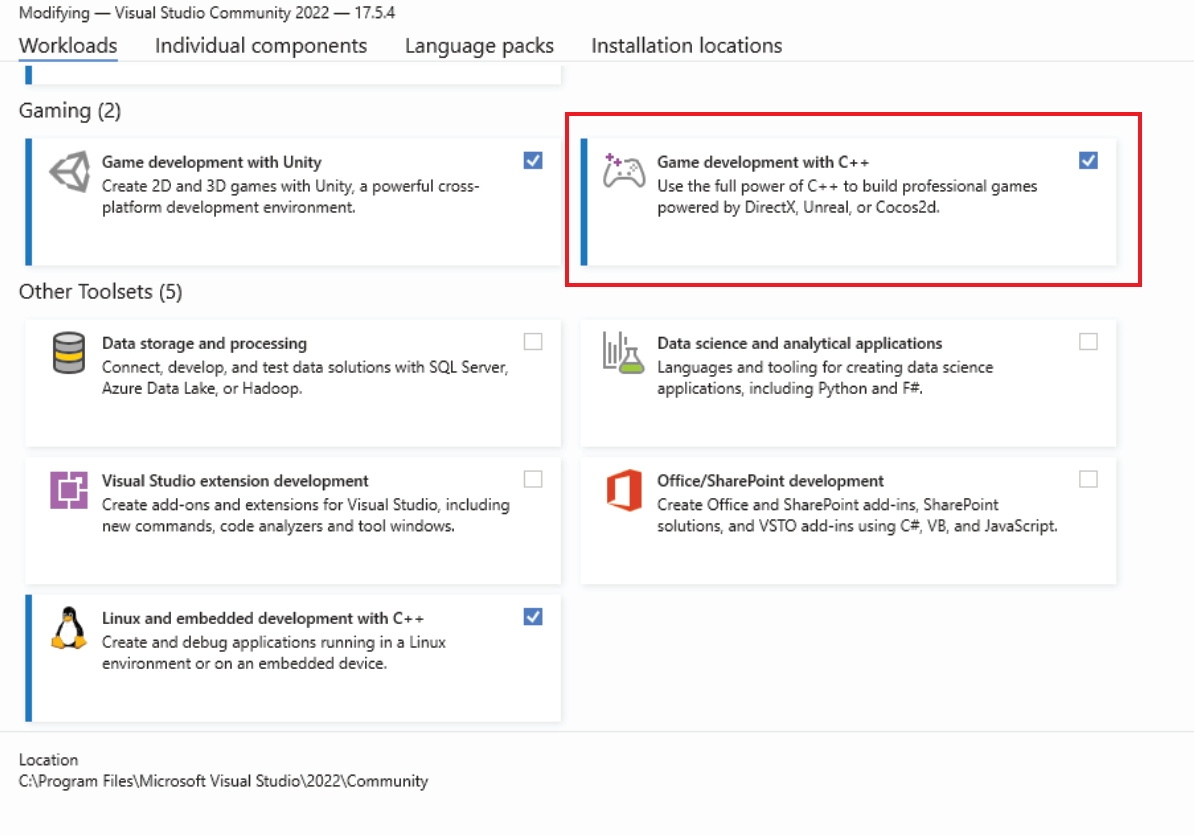
Install Visual Studio 2019 or higher
During installation, from the Workloads tab make sure to select 'Game Development with C++'
Disable any OptiTrack plugins in UE5.1
From your project navigate to Tools > New C++ Class
Select 'None' from the Add C++ Class window
Name your class (i.e. 'StarterClass')
Please note you'll need to bind the mesh to the skeleton in order for your skeletal mesh asset to properly work.
In order for this to be applied, you'll need to save and close Unreal
Find your project in the file directory you chose to save it in
Open the generated solution file and verify that you can select the green play button from top toolbar
This will open the Unreal Editor, close the Unreal Editor and the solution
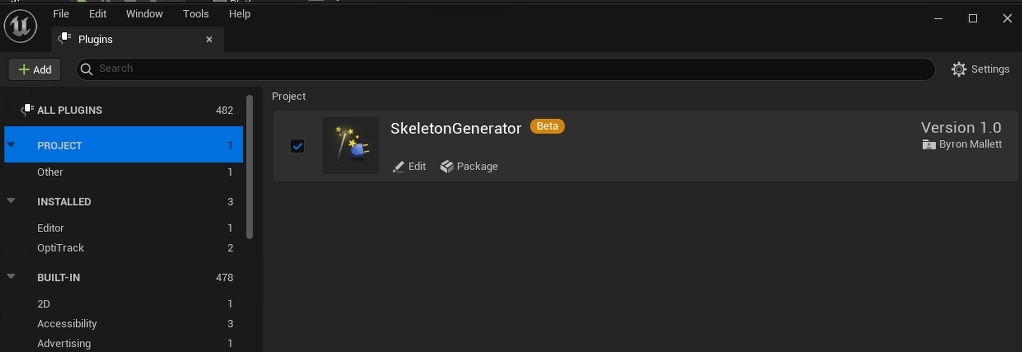
Move the Skeletal Mesh Generator Plugin into the Plugins folder of your project files.
Restart the solution/editor and enable: The 'Skeletal Mesh Generator Plugin', 'Geometry script', and 'Skeletal Mesh Modeling tools'.
Re-enabled OptiTrack LiveLink Plugin.
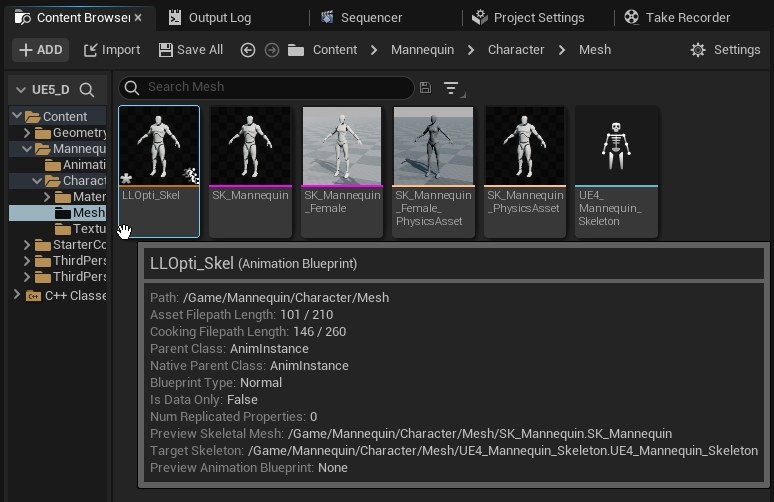
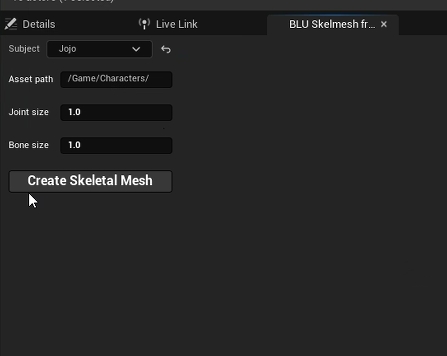
You should now be able to use the Skeletal Mesh Generator Plugin under Plugins > SkeletonGenerator Content > Widgets.
To view the Skeletal Mesh Generator widget, right click on the BLU_SkelmeshFromLiveLink and select Run Editor Utility Widget.
The allows you to stream real-time tracking data from Motive into Unreal Engine. This includes tracking data of Rigid Bodies, Skeletons, and HMDs that are tracked within Motive. This article focuses on the setup of that plugin. For basic instructions on setting up a motion capture system, please refer to the guide instead.
A variety of head mounted displays (HMDs) can be integrated using the .
Support for Oculus HMDs has been deprecated.
First, you'll want to follow the below instructions to set up the data streaming settings in Motive. Once this is configured, Motive will be broadcasting tracking data onto a designated network interface where client applications can receive them.
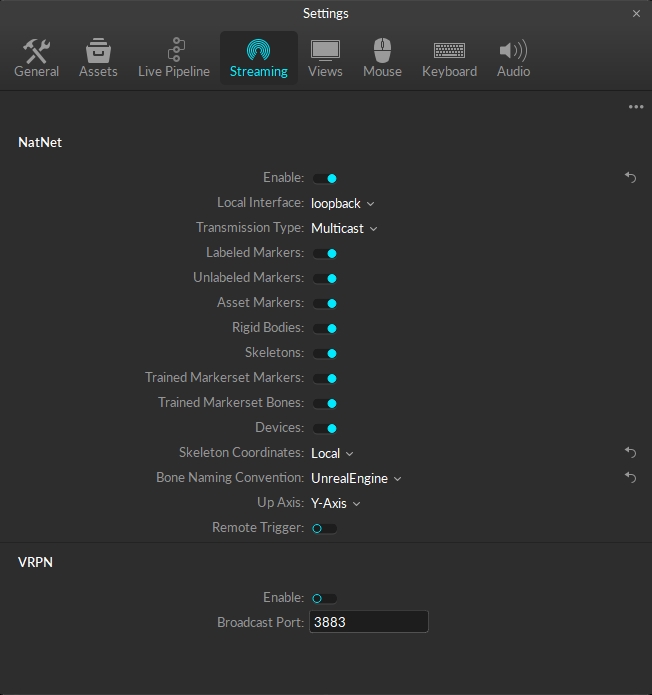
Open the in Motive's Settings window and set the following settings:
Enable - Turn on the Enable setting at the top of the NatNet section.
Local Interface - Choose the desired IP network address from this dropdown to stream data over.
Loopback
This version of the plugin is compatible with Unreal Engine 5.
OptiTrack motion capture systems can be used to track head mounted displays (HMD) and integrate the tracking data into Unreal Engine for VR applications. For instructions on integrating HMD tracking data into Unreal Engine, please refer to the corresponding page:
Deprecated support for Oculus HMDs:
Support for Oculus Integration have been deprecated starting from UE plugin version 1.23; Plugin version 1.22 or below must be used for Oculus HMDs.
Vive and Valve Index HMDs are supported through the OpenVR driver.
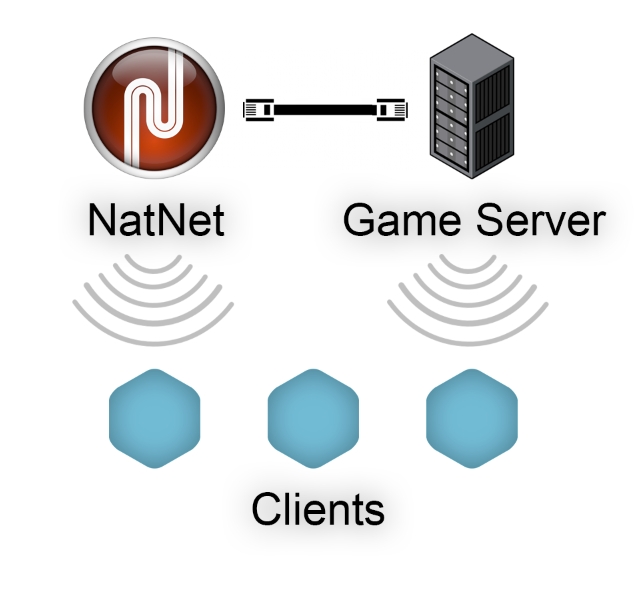
When setting up multiplayer games on wireless clients, it is more beneficial for each client to make direct connection to both the tracking-server (Motive) and the game-server, rather than rebroadcasting the streamed tracking data through the game-server. Then, any of the game related actions that interacts with the tracking data can be processed on the game-server, and this server can send out the corresponding updates to the wireless clients. This allows the wireless clients to only receive both the tracking data or updates without having to send back any information; in other words, minimizing the number of data transfers needed. If wireless clients are sending data there will be a minimum of two transfers on the wireless network, and each transfer of data through wireless network is at risk of latency or lost packets.
This is the local computer IP address (127.0.0.1 or Localhost).
Used for streaming data locally on the PC you are running Motive on that does not interact with the LAN.
Good option for testing network issues.
192.168.0.1x (typical, but may be different depending on which interface is used to establish a LAN connection)
This IP address is the interface of the LAN either by Wi-Fi or Ethernet.
This will be the same address the Client application will use to connect to Motive.
Transmission Type
For streaming over a Wi-Fi network, setting the Transmission Type to Unicast is strongly advised.
Select desired data types to stream under streaming options:
Rigid Bodies - Enabled (required).
Skeletons - Optional for Skeleton tracking.
Markers (Labeled, Unlabeled, Asset) - Disabled for HMDs (advised).
Devices - Disabled.
Skeleton Coordinates
Set to Local.
Bone Naming Convention
Set the appropriate bone naming convention for the client application. For example, if the character uses the FBX naming convention, this will need to be set to FBX.
In order to stream data from the Edit mode, a capture-recording must be playing back in Motive.
For additional information on data streaming in general, read through the Data Streaming page.
Valve Index
HP Reverb G2
This page provides instructions on how to configure VCS inputs in Unreal Engine. The basic configuration is similar to configuring any other input triggers in Unreal Engine. Please note that only one VCS controller can be connected and configured due to some limitations. Having two controllers connected at the same time is not supported.
Create a Rigid Body from your tracking controller’s markers using the Builder pane or by selecting the markers and using the keyboard hotkey CTRL + T. You'll want to orient the controller along the +Z axis during creation to define the 'neutral' or 'zero' orientation.
In Motive, configure the data streaming settings. Use the Data Streaming pane to configure streamed packets. Make sure Rigid Body data is streamed out in order to use VCS.
Start up a project in Unreal Engine (UE).
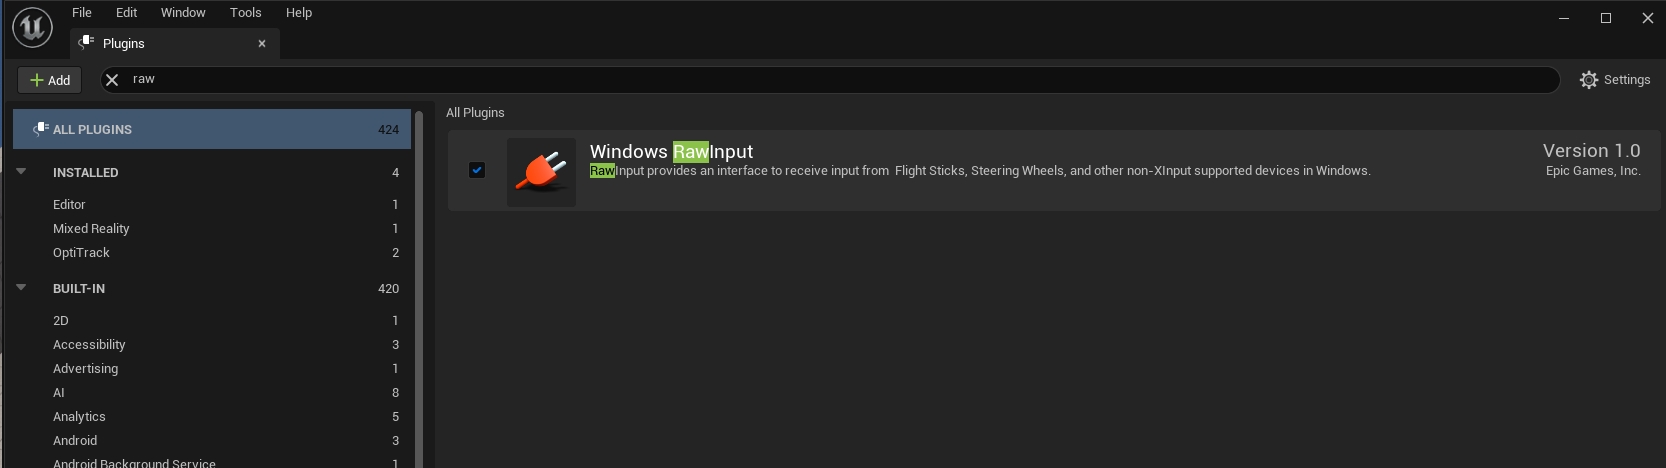
Go to Edit tab → Plugins to open the plugins panel. Enable the Windows RawInput plugin under the Input Devices group.
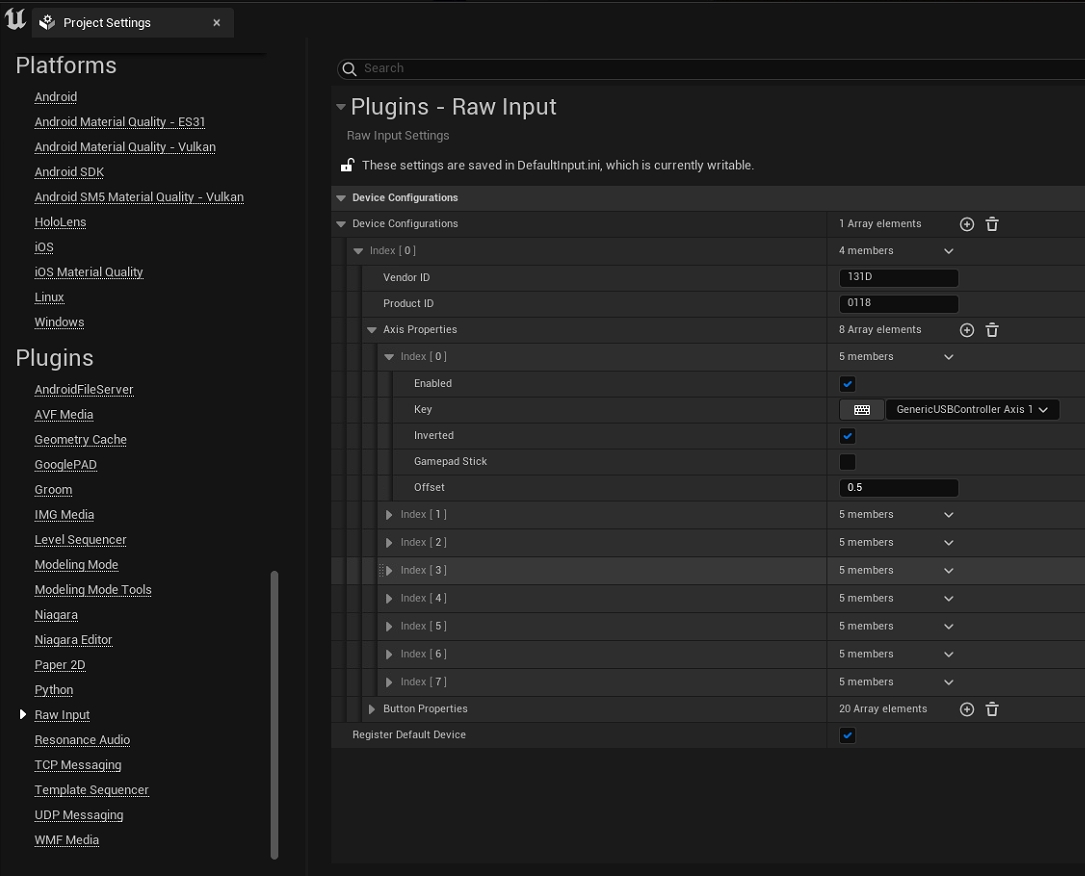
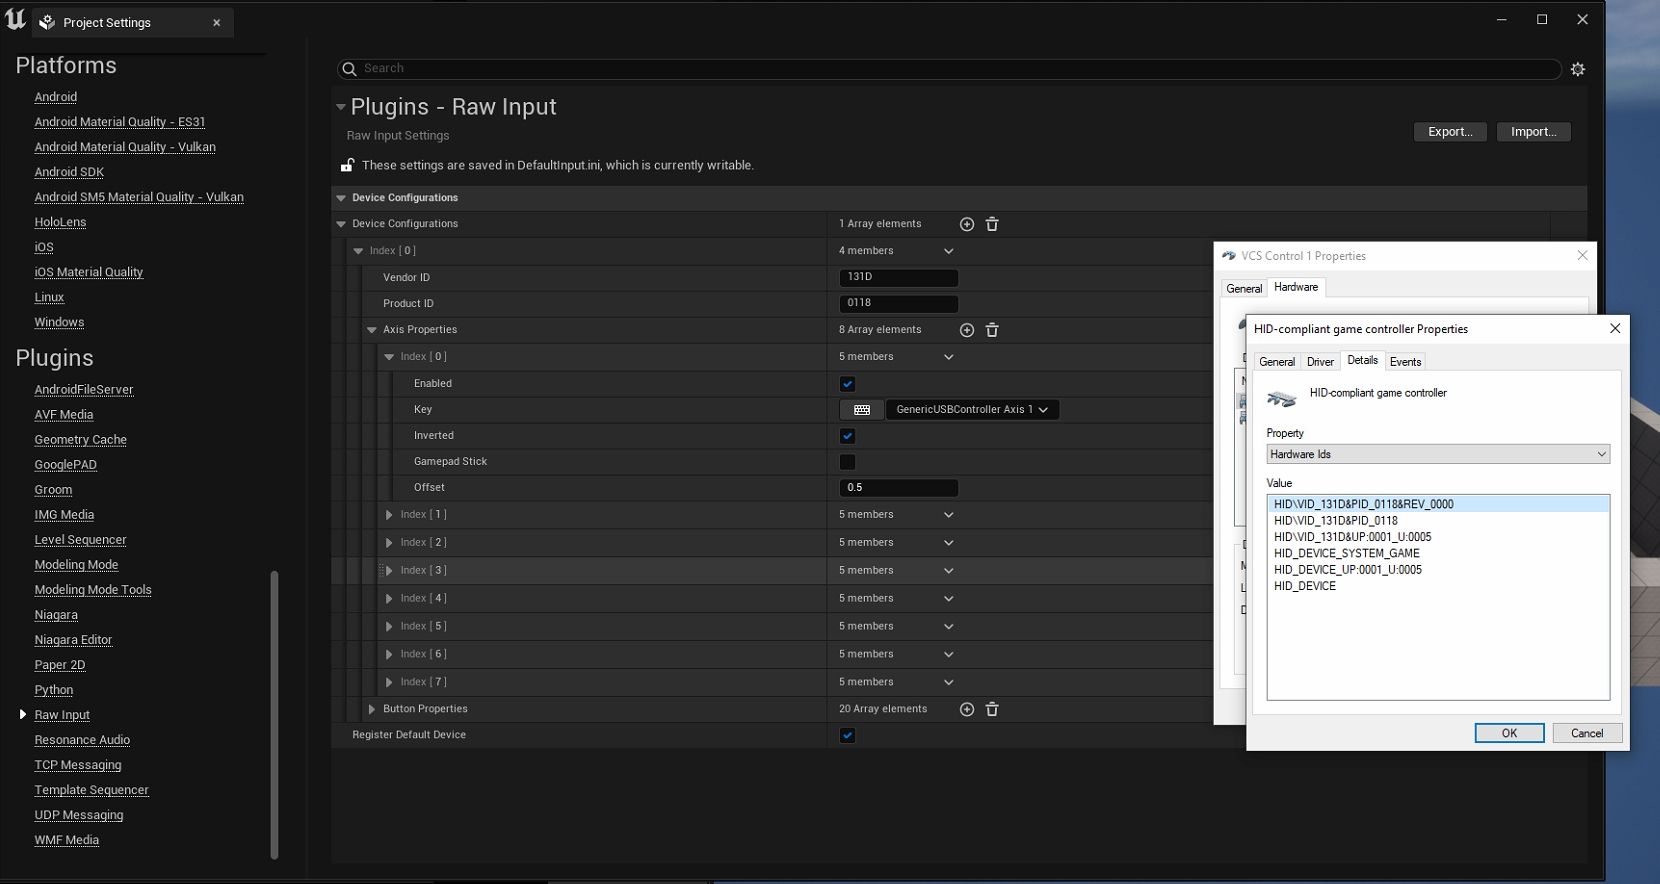
In Edit tab → Project Settings, scroll to the bottom on the left side panel until you see Raw Input under the plugins group. Here you will let UE project know which input devices to use.
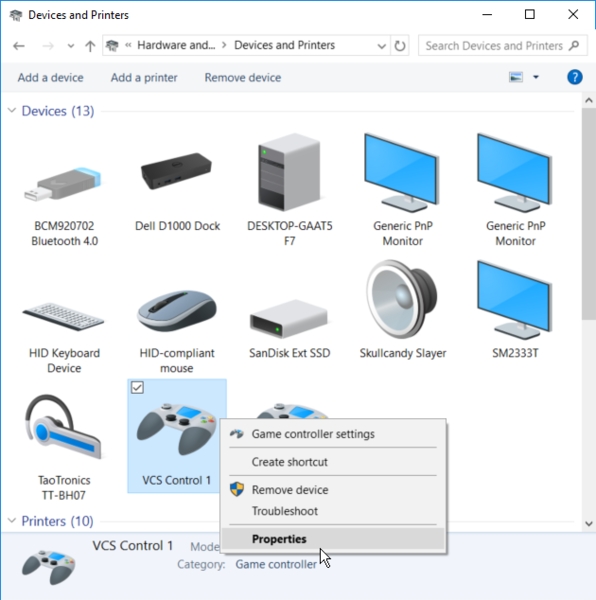
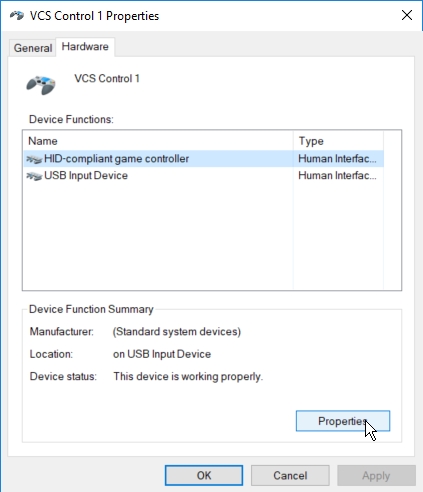
To find these IDs, you will need to look at the windows device properties. Go to Windows Control Panel -> Devices and Printers. Then right-click on the VCS controllers to access its properties. In the properties, go to the Hardware tab and click properties for “HID-compliant game controller”.
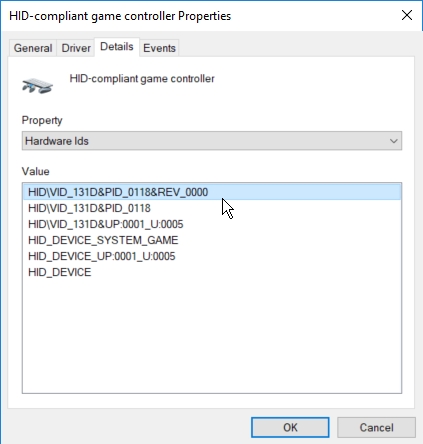
Once you access the controller properties, go to the details tab. Select Hardware ID in the drop-down menu and the hardware ID (HID) and product ID (PID) will be shown under the highlighted section.
Under the project settings panel Raw Input plugin properties, input both the vendor ID (Hardware ID) and the product ID (PID) that was found under the controller properties.
Register the Input Buttons
Now the project has the IDs to look for the controllers, next step is to setup and register the input buttons. To do so, you will play the project scene, and trigger on the buttons to register them.
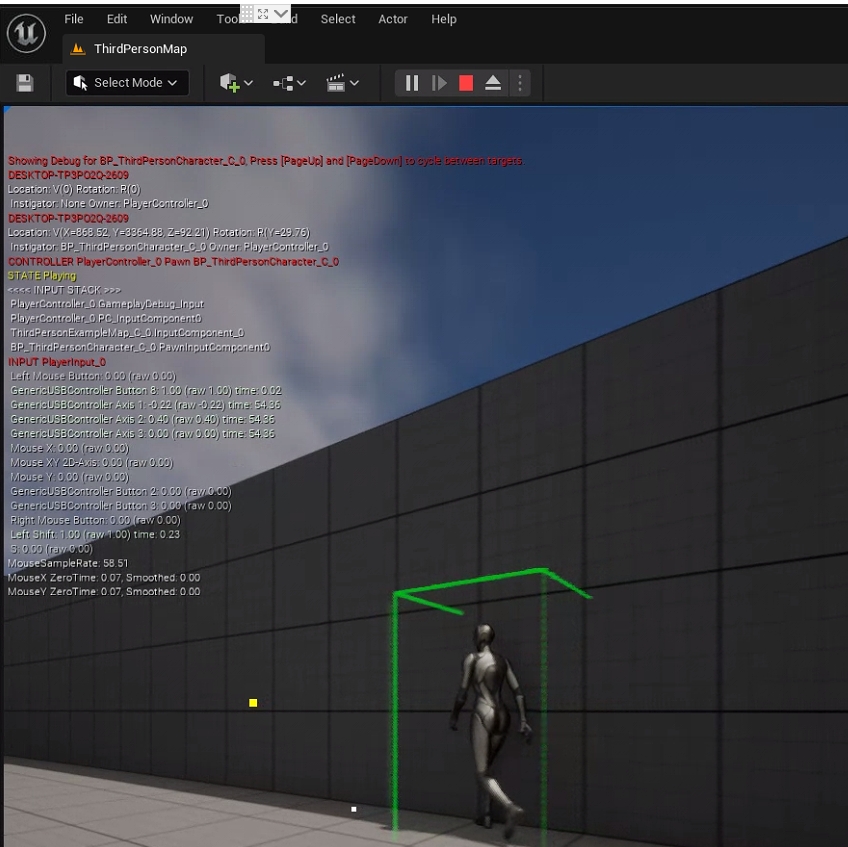
In UE, hit Play and press (~) to access the console. In the console, input command ShowDebug INPUT". This will list out all of the input actions on the left side of the viewport.
Use all of the keys on the controller to register the inputs; total three axis and seven buttons. Please note that these keys may not exactly match the keys on your controller.
Axis 1: Joystick left/right
Axis 2: Joystick up/down
Axis 3: Nob rotate
Button 1: Blue
Button 2: Black
Button 3: White
Button 4: Red
Button 6: Joystick click
Button 7: Nob click
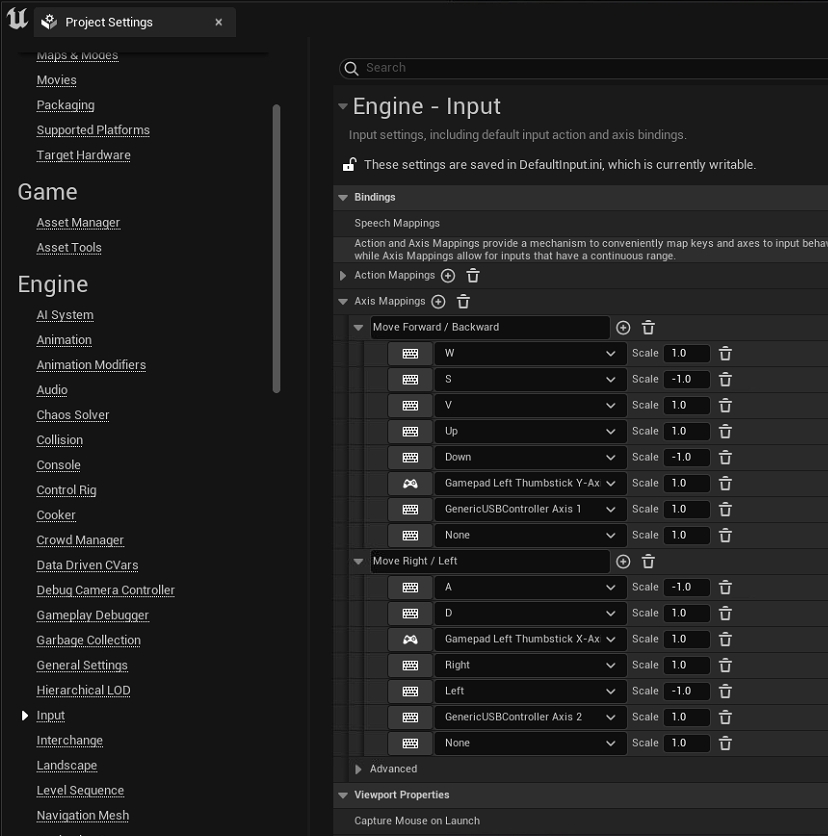
Map the Registered Inputs
Now that the buttons have been registered, next step is to map the keys. They will be mapped under Edit → Project Settings → Inputs. Choose either the Axis mapping or the action mapping to map the controls to desired actions.
Now that all of the buttons are set up, use them to control the VCS in UE.


This page provides instructions on how to use the OptiTrack Unreal Engine Live Link plugin. The plugin communicates with Unreal's built-in Live Link system by providing a Live Link source for receiving tracking data streamed from Motive. This plugin can be used for controlling cameras and objects in virtual production applications. When needed, the OptiTrack Unreal Engine Plugin can also be alongside this plugin. For a specific guide to InCamera VFX (i.e. LED Wall Virtual Production) please see this wiki page Unreal Engine: OptiTrack InCamera VFX.
1. [Motive] Setup rigid body streaming in Motive.
Get Motive streaming with at least one rigid body or Skeleton asset. Make sure the settings are configured correctly, and the asset is active under the .
2. [UE] Install the OptiTrack plugins in Unreal Engine (UE).
You can install the OptiTrack Unreal Engine plugin by putting the plugin files into one of the following directories:
A global engine plugin can be placed in C:\Program Files\Epic Games\[Engine Version]\Engine\Plugins
A project-specific plugin can be placed in [Project Directory]\Plugins
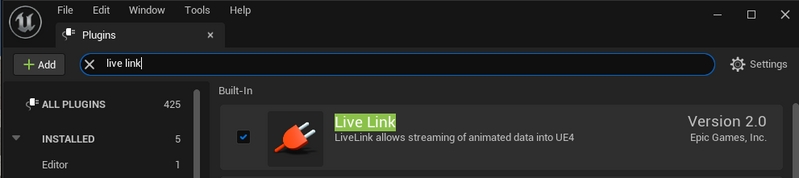
3. [UE] Enable the plugins in UE project.
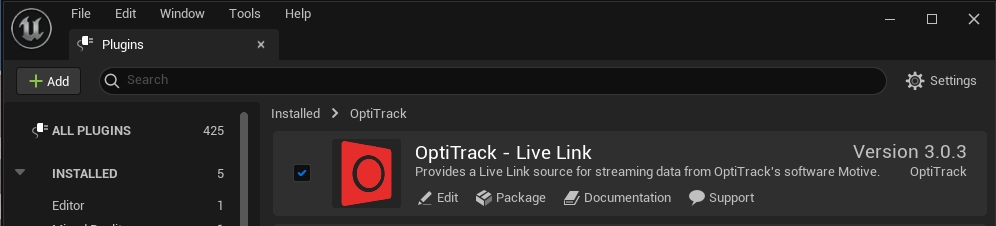
Go to Edit → Plugins and enable two of the required plugins. First one is the OptiTrack - Live Link plugin under Installed group, and the second one is the built-in Live Link plugin under Built-In group.
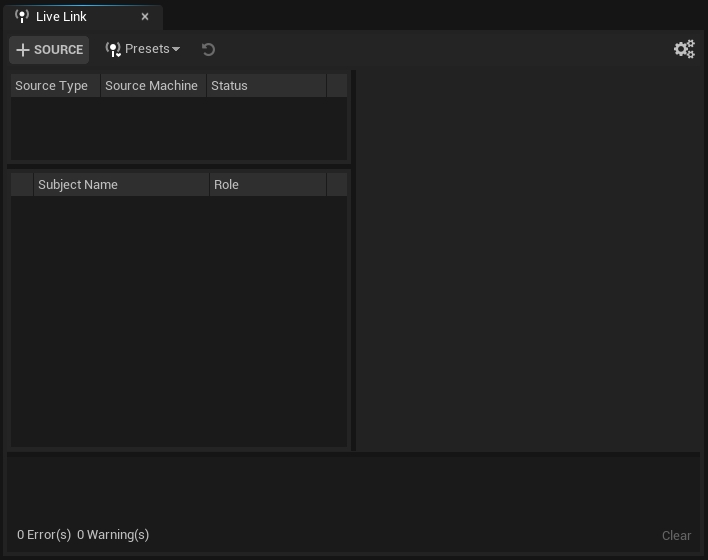
4. [UE] Open the LiveLink pane
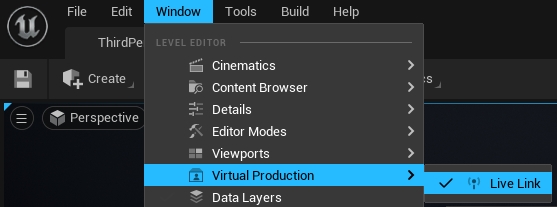
Open the LiveLink pane from Window → Virtual Production → Live Link in the toolbar.
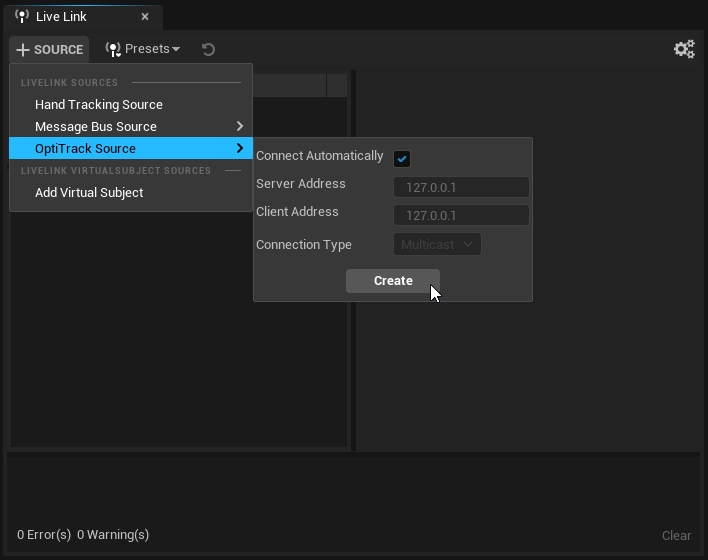
5. [UE] Configure and create a new OptiTrack source
In the LiveLink pane under Source options, go to the OptiTrack Source menu and configure the proper connection settings and click Create. Please make sure to use matching network settings configured from the Streaming pane in Motive.
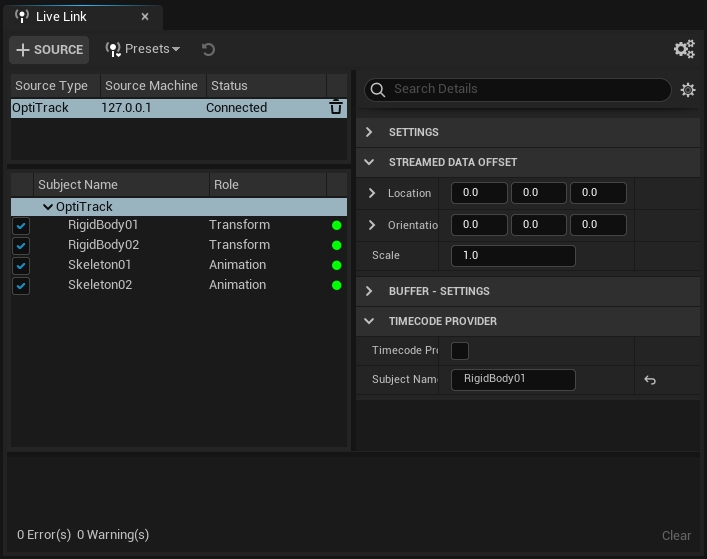
6. [UE] Check the Connection.
If the streaming settings are correct and the connection to Motive server is successful, then the plugin will list out all of the detected assets. They should have green dots next to them indicating that the corresponding asset has been created and is receiving data. If the dots are yellow, then it means that the client has stopped receiving data. In this case, check if Motive is still tracking or if there is a connection error.
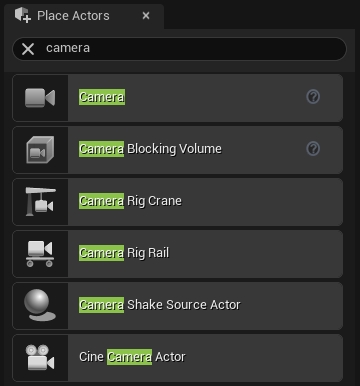
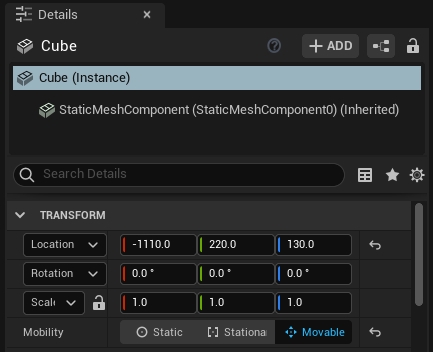
1. Add the camera object or static mesh object that you wish to move
Add a camera actor from the Place Actors pane or a static mesh from the project into your scene. For the static meshes, make sure their Mobility setting is set to Movable under the Transform properties.
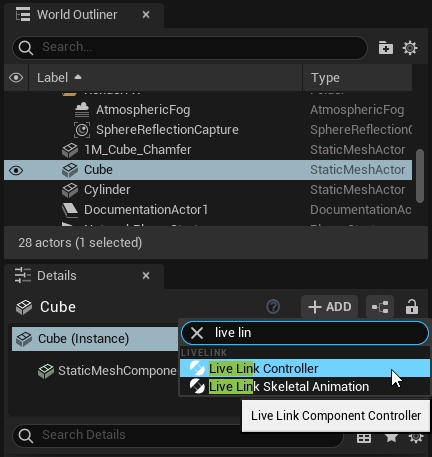
2. Add a LiveLinkController Component
Select an actor you want to animate. In the Details tab select your "actor" (Instance). In the search bar, type in Live Link. Then click on the Live Link Controller from the populated list.
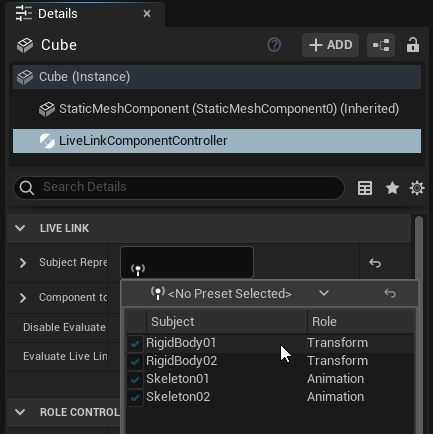
3. Select the target rigid body
Under the Live Link properties in the Details tab click in the Subject Representation box and select the target rigid body.
4. Check
Once the target rigid body is selected, each object with the Live Link Controller component attached and configured will be animated in the scene.
When the camera system is synchronized to another master sync device and a timecode signal is feeding into , then the received timecode can be used in UE project through the plugin.
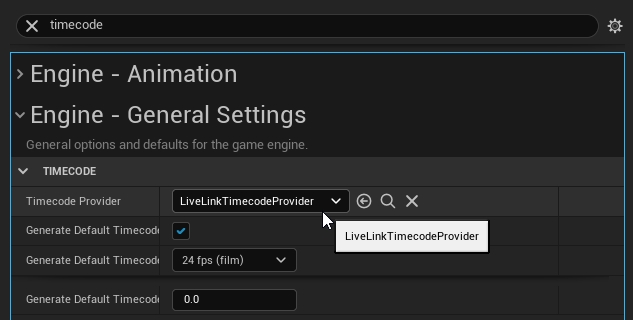
1. Set Timecode Provider under project settings
From Edit → Project Settings, search timecode and under Engine - General settings, you should find settings for the timecode. Here, set the the Timecode Provider to LiveLinkTimeCodeProvider.
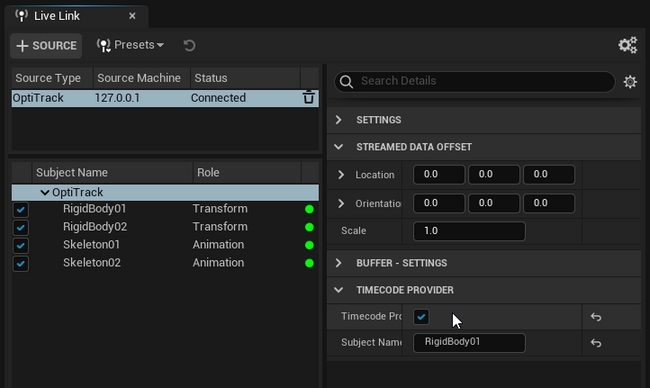
2. Set OptiTrack source in the Live Link pane as the Timecode Provider
Open the Live Link pane, and select the OptiTrack subject that we created when first setting up the plugin connection. Then, under its properties, check the Timecode Provider box.
3. Check
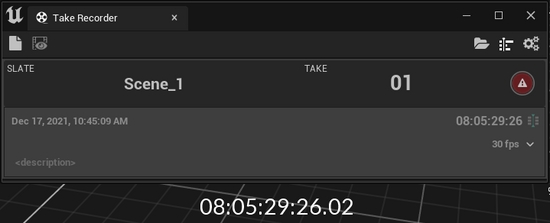
The timecode from Motive should now be seen in the Take Recorder pane. Take Recorder pane can be found under Window → Cinematics → Take Recorder in the toolbar.
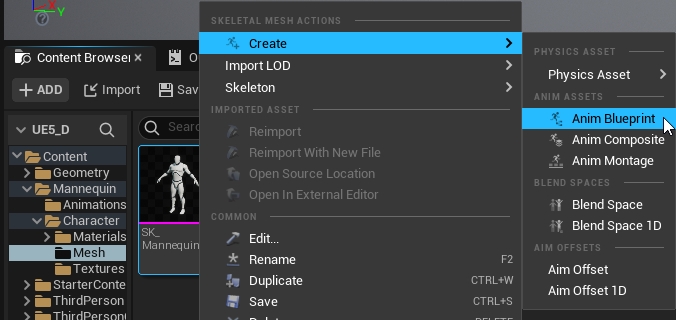
1. Create a new Animation Blueprint
Right click the mesh you would like to use and select "Create > Anim Blueprint"
2. Name and Open the Animation Blueprint
Name the animation blueprint something appropriate, then double click it to open the blueprint.
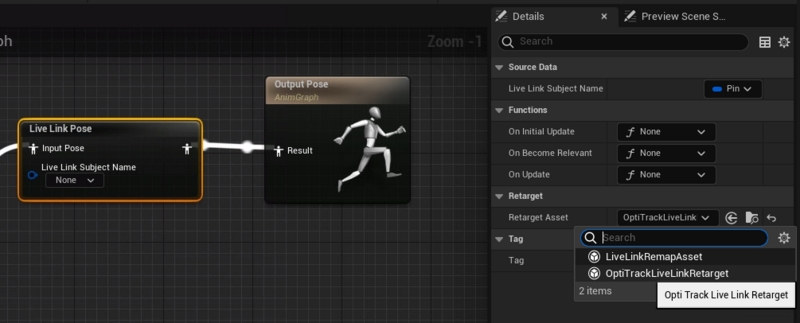
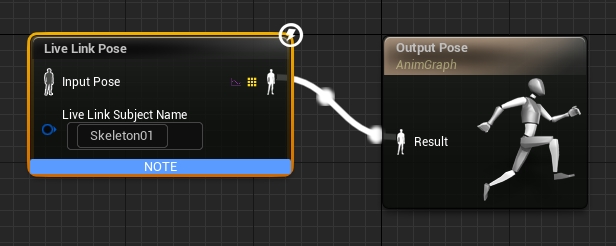
3. Hook up your Blueprint
Create a "Live Link Pose" component and connect it to the "Output Pose". Assign the "Live Link Subject Name" to the Skeleton that you would like to use.
Change the "Retarget Asset" property in the Details pane of the blueprint editor to "OptiTrackLiveLinkRetarget"
4. Getting the Skeleton to Animate
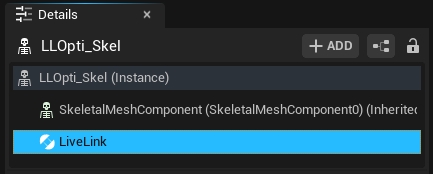
To animate the Skeleton in real time click the Animation Blueprint from earlier. In the Details pane under the skelteonLive Link Skeleton Animation". After you add that component the mesh should start animating.
To animate the Skeleton in a game, just press the play button. Adding the "Live Link Skeleton Animation" object is not necessary to animate in play mode.
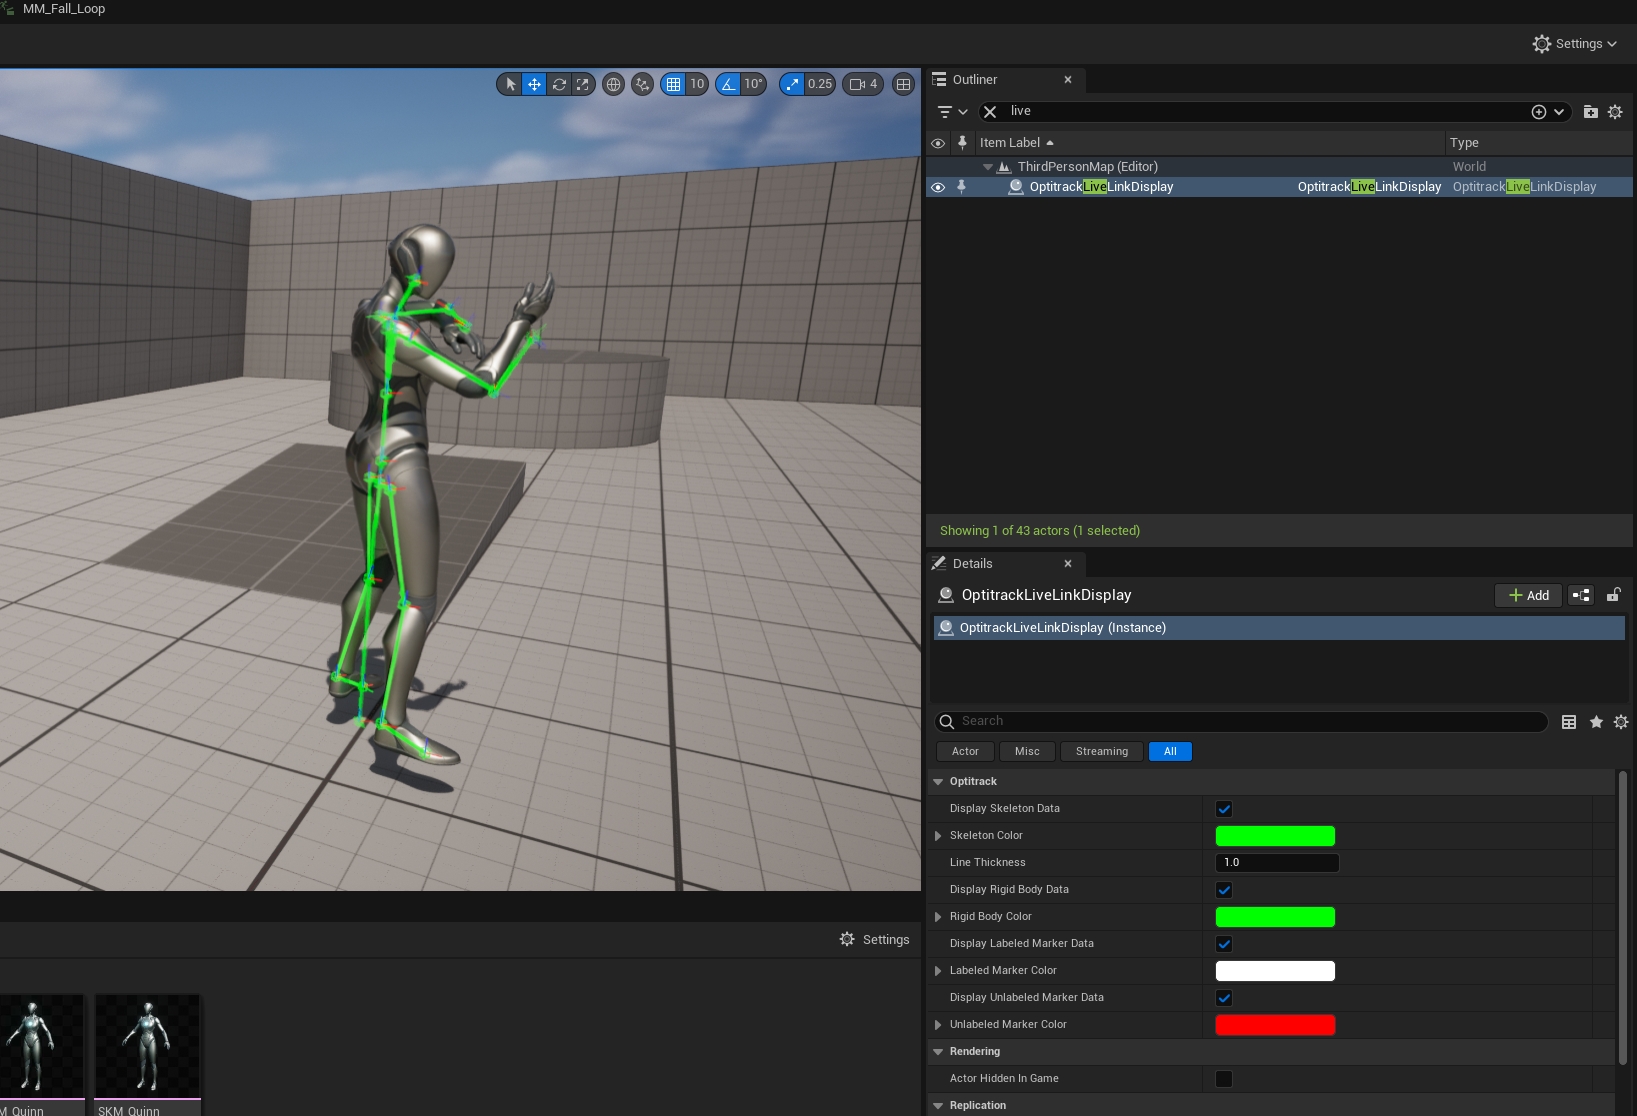
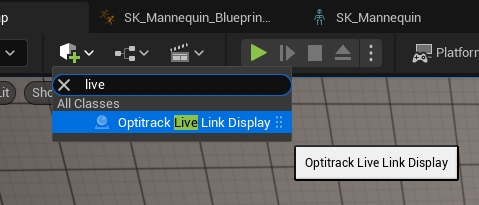
5. OptiTrack Live Link Display
In order to see the debug skeleton overlay from Motive, you can enable the OptiTrack Live Link Display. From the Quick Add dropdown from the toolbar, you can select OptiTrack Live Link Display. This will appear in the Outliner tab and you can change any settings in its Details tab as needed.
Debugging Note
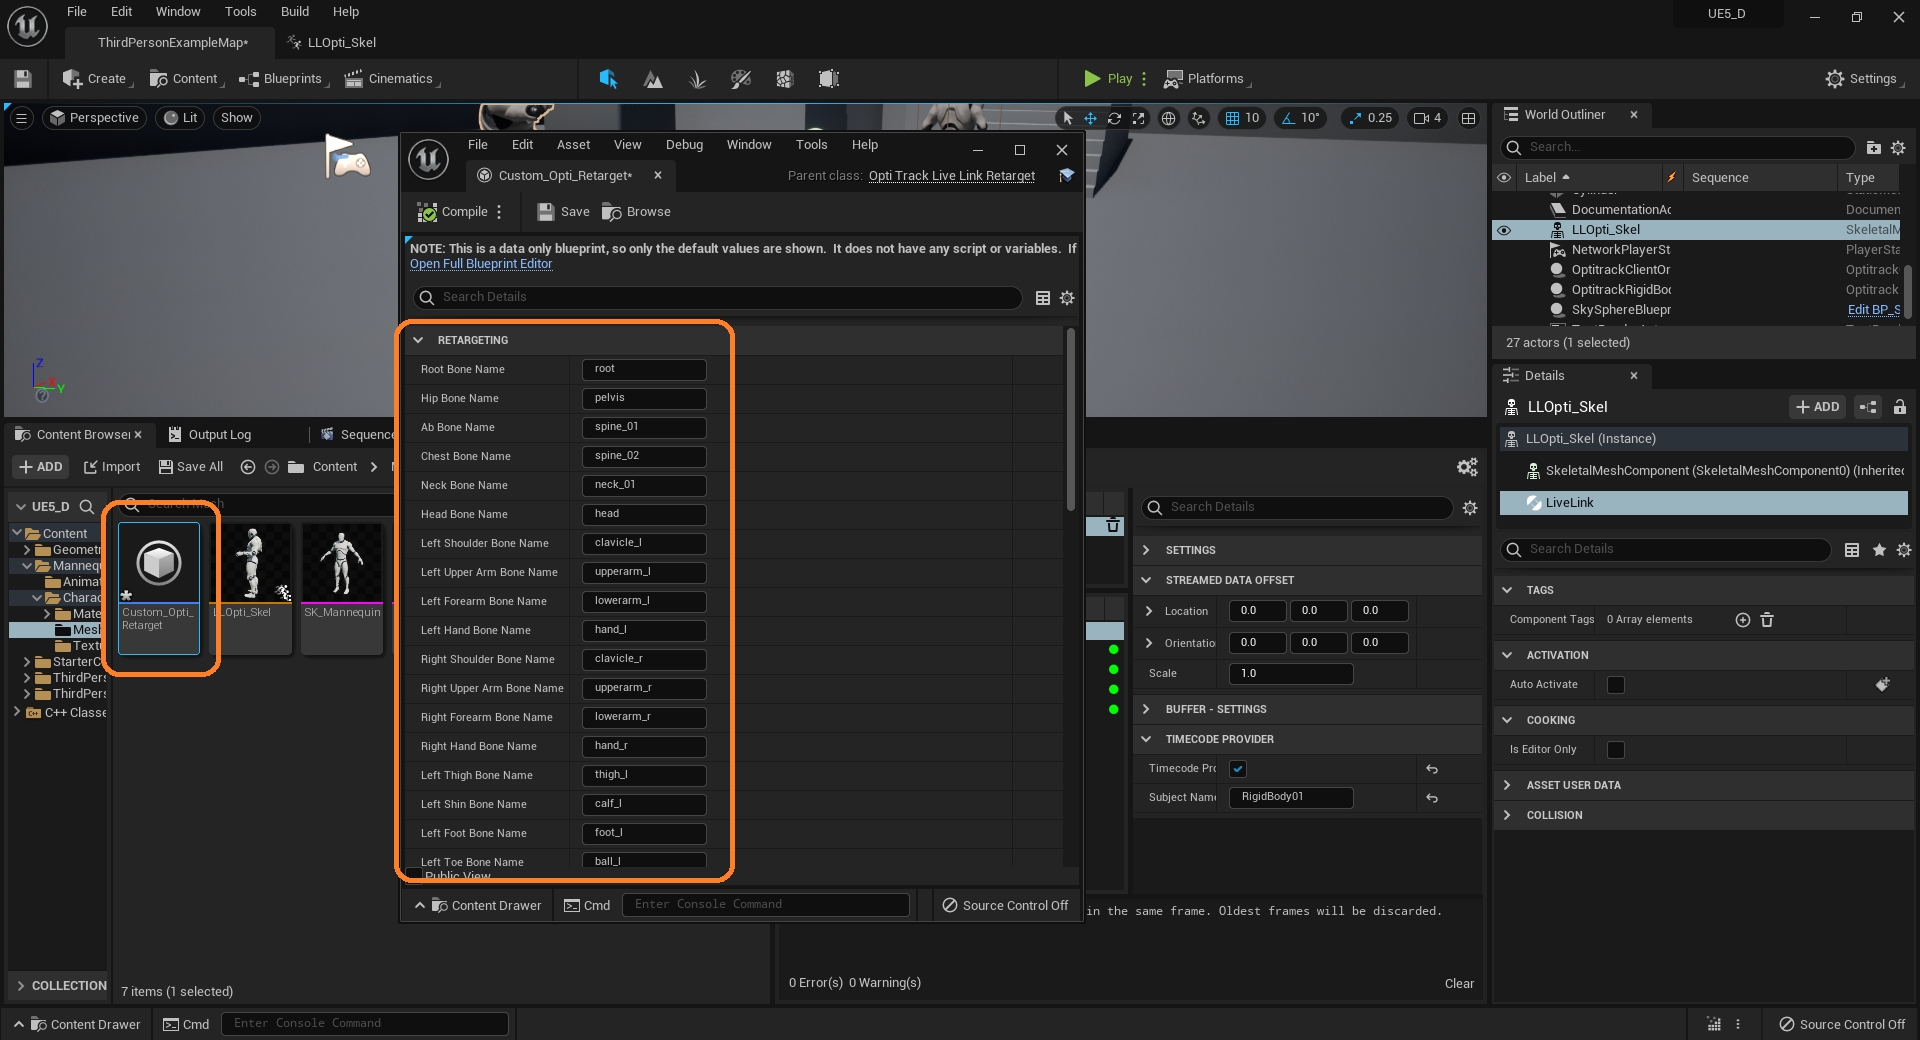
If the retargeting doesn't match the mesh correctly, then you can create a new OptiTrackLiveLinkRetarget blueprint from scratch and modify the bone mapping names.
Animating a MetaHuman follows basically the same steps as another Skeleton, but requires hooking into the Skeleton at a very specific location. For more information about MetaHuman setup outside of our scope, please visit .
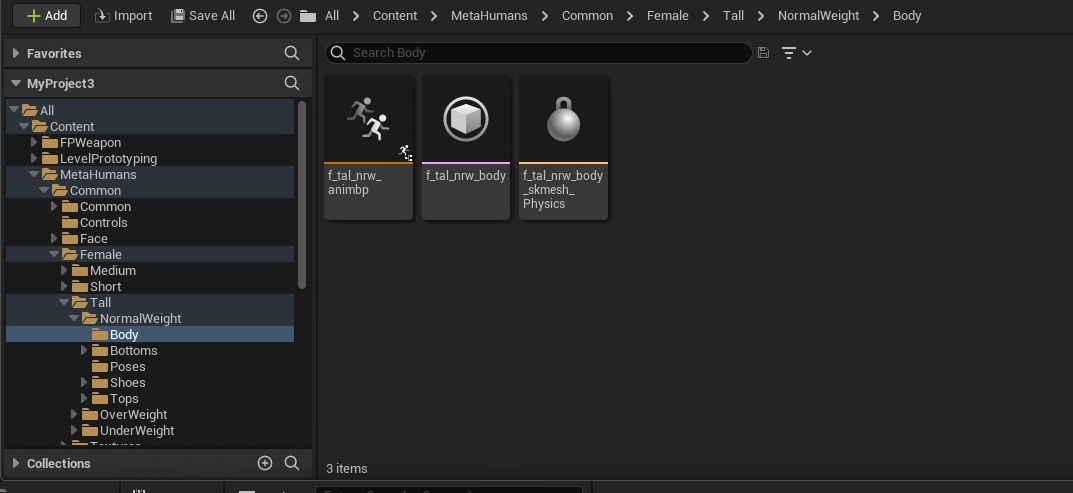
1. Find the Skeletal Mesh
Navigate to the Skeletal Mesh for your MetaHuman. This is typically located in a folder such as MetaHumans > [Name] > [Female/Male] > [Height] > [Weight] > Body. Double click the Skeletal Mesh to open the blueprint.
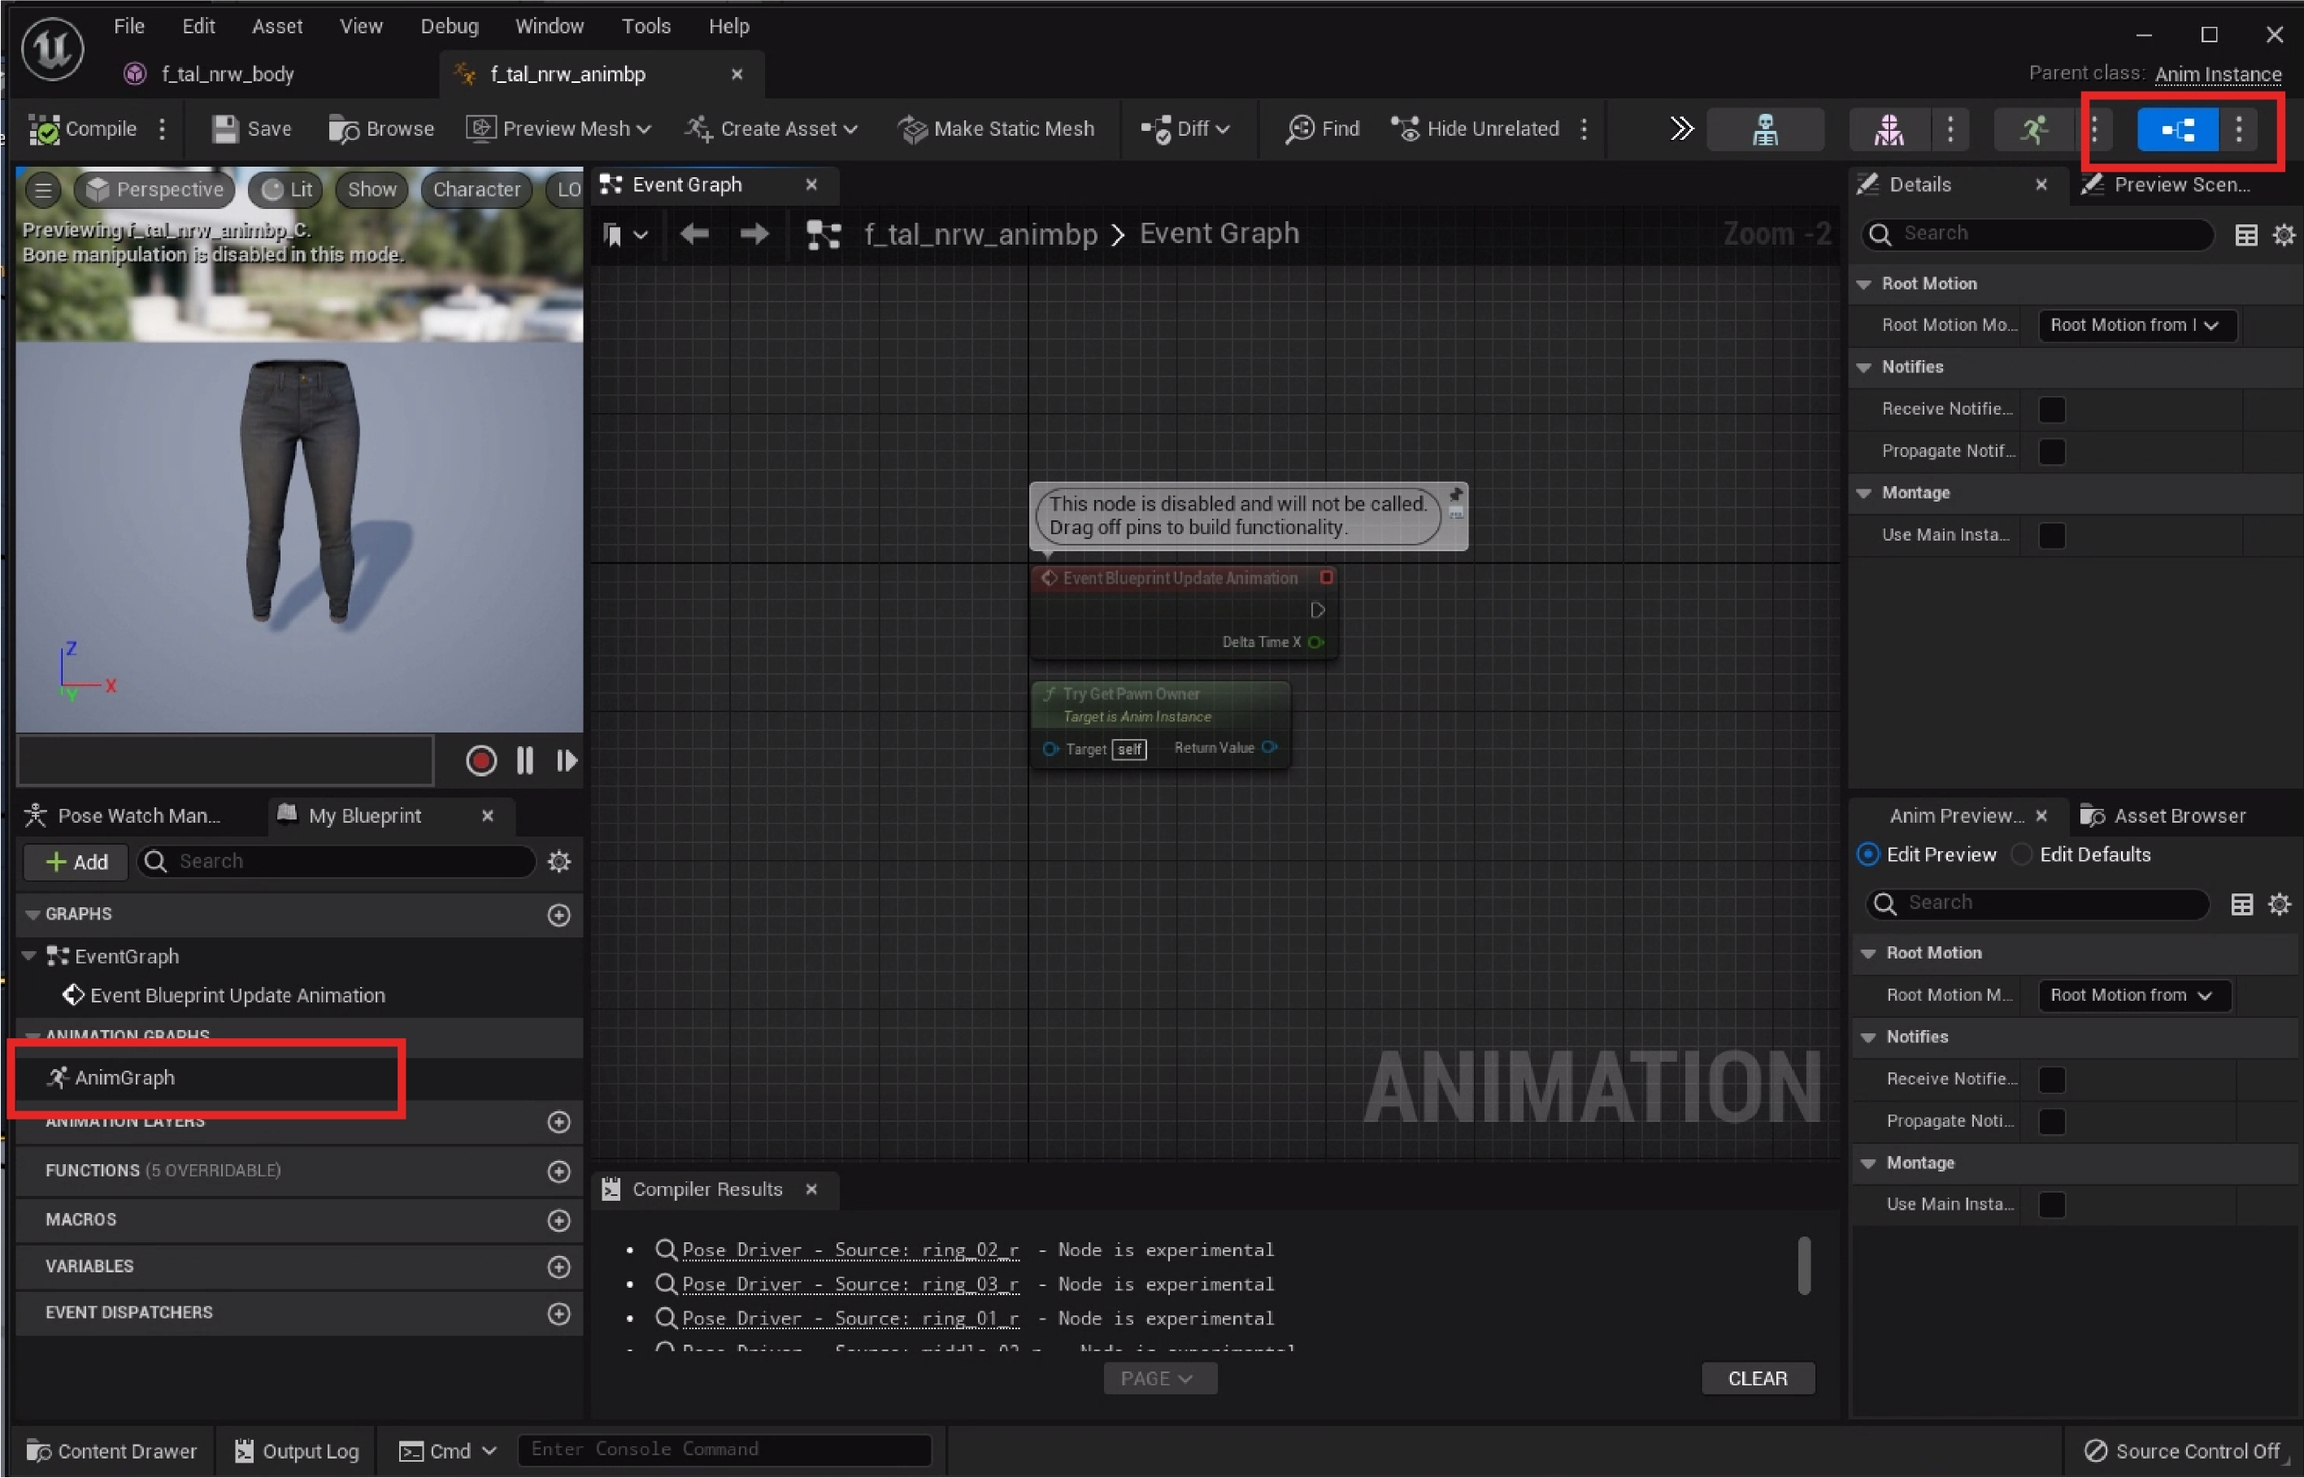
2. Open the AnimGraph Tab
Click the "Blueprint" option on the top bar of new window. In the bottom left corner navigate to My Blueprint > Animation Graphs > AnimGraph and double click.
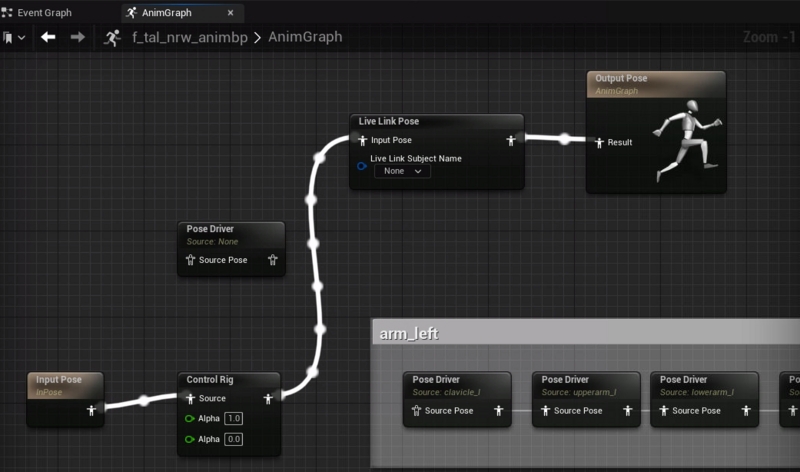
3. Hook up your Blueprint
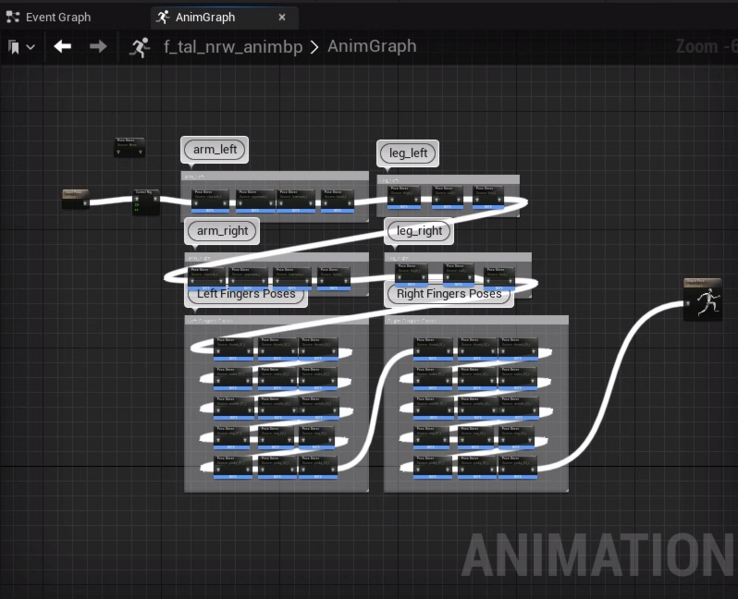
You'll see a very complex AnimGraph already setup. Make a new Live Link Pose object like in the Skeleton creation steps. Connect the Input Pose or Control Rig to the input of the Live Link Pose. Connect the output of the Live Link Pose to the Output Pose AnimGraph object.
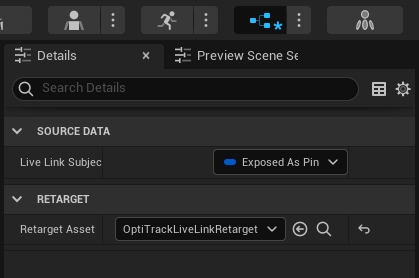
4. Retarget in the Details Tab
The last step in this window is to set the Retarget Asset to OptiTrackLiveLinkRetarget for the Live Link Pose node. To do this, simply click on the dropdown in the Details tab and click the dropdown under Retarget Asset and select OptiTrackLiveLinkRetarget. After it has been set, click Compile in the top left of this window. You may now close this window and move on to the next steps.
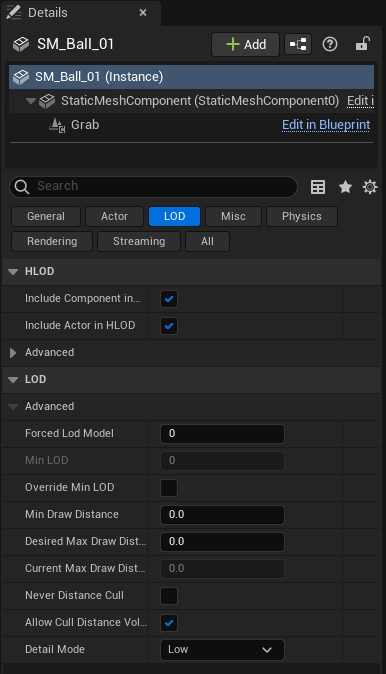
5. Level of Detail (LOD)
MetaHumans will change their Level of Detail (LOD), i.e. how complex the asset is, based on how far the camera is from the actor among other factors. In order for things to animate correctly the Forced LOD must be a minimum of 1 (default of -1). To change this setting, click on the (Instance) you wish to change in the Details tab on the main workspace window. Below the selected (Instance) select the LOD tab. From here you can change the value in the Forced LOD Model field.
6. Animate your MetaHuman
At this point if you drag the base MetaHuman object into the scene then it will animate like other Skeletons.
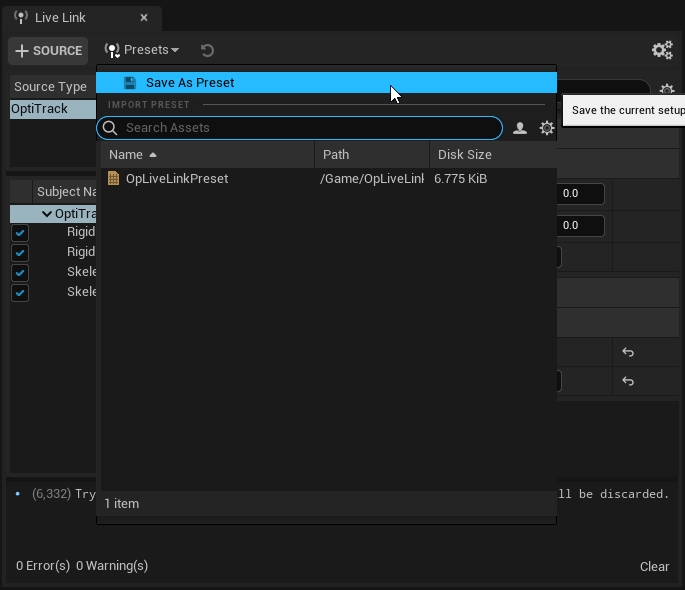
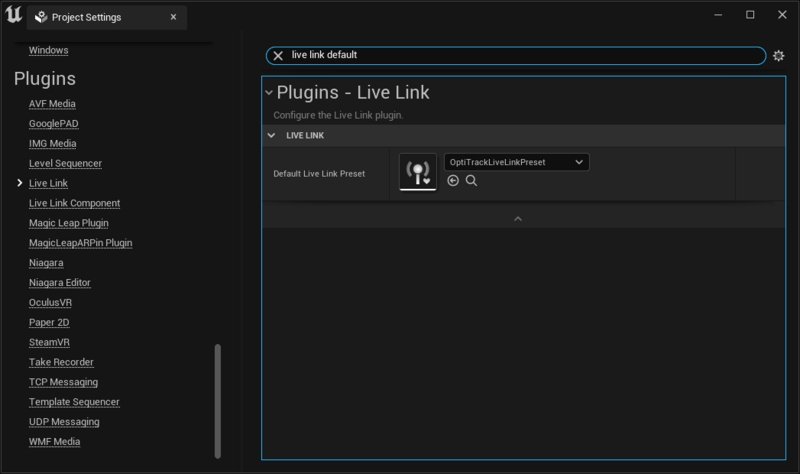
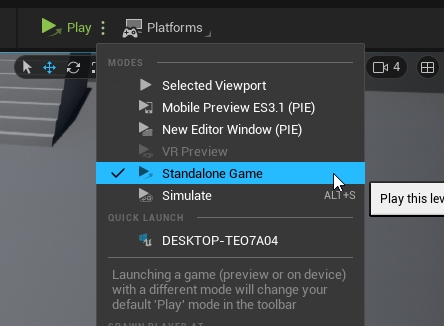
For testing the project in standalone game mode, or when developing an nDislay application, the Live Link plugin settings must be saved out and selected as the default preset to be loaded onto the project. If this is not done, the configured settings may not get applied. After configuring the LiveLink plugin settings, save out the preset from the Live Link pane first. Then, open the Project Settings and find Live Link section in the sidebar. Here, you can select the default Live Link preset to load onto the project, as shown in the screenshot below. Once the preset is properly saved and loaded, the corresponding plugin settings will be applied to the standalone game mode.
If all the configuration is correct, the actors will get animated in the newly opened game window when playing the project in the standalone game mode.
Another path to get data into Unreal Engine is to stream data from Motive -> MotionBuilder (using the OptiTrack MotionBuilder Plugin) -> Unreal Engine (using the Live Link plugin for MotionBuilder). This has the benefit of using the Human IK (HIK) retargeting system in MotionBuilder, which will scale characters of very different sizes/dimensions better than the base Live Link plugin. More information can be found by consulting .